

Are you trying to add more depth to your scenes? Do you want to make your illustrations more believable?
This can be done easily by adding perspective to your illustrations.
Learning how to draw a one point perspective might seem difficult at first, but with this step-by-step guide, I’ll show you how to draw various one-point perspective drawings in an easy way.
In this guide, you’ll learn what is one-point perspective is, how to draw a city, room, a street, and various other scenes using this perspective to help make your 2D drawings look more 3D.
Get your drawing paper or digital tablet ready.
I will share this drawing tutorial that will help start drawing one point perspective at a professional level.


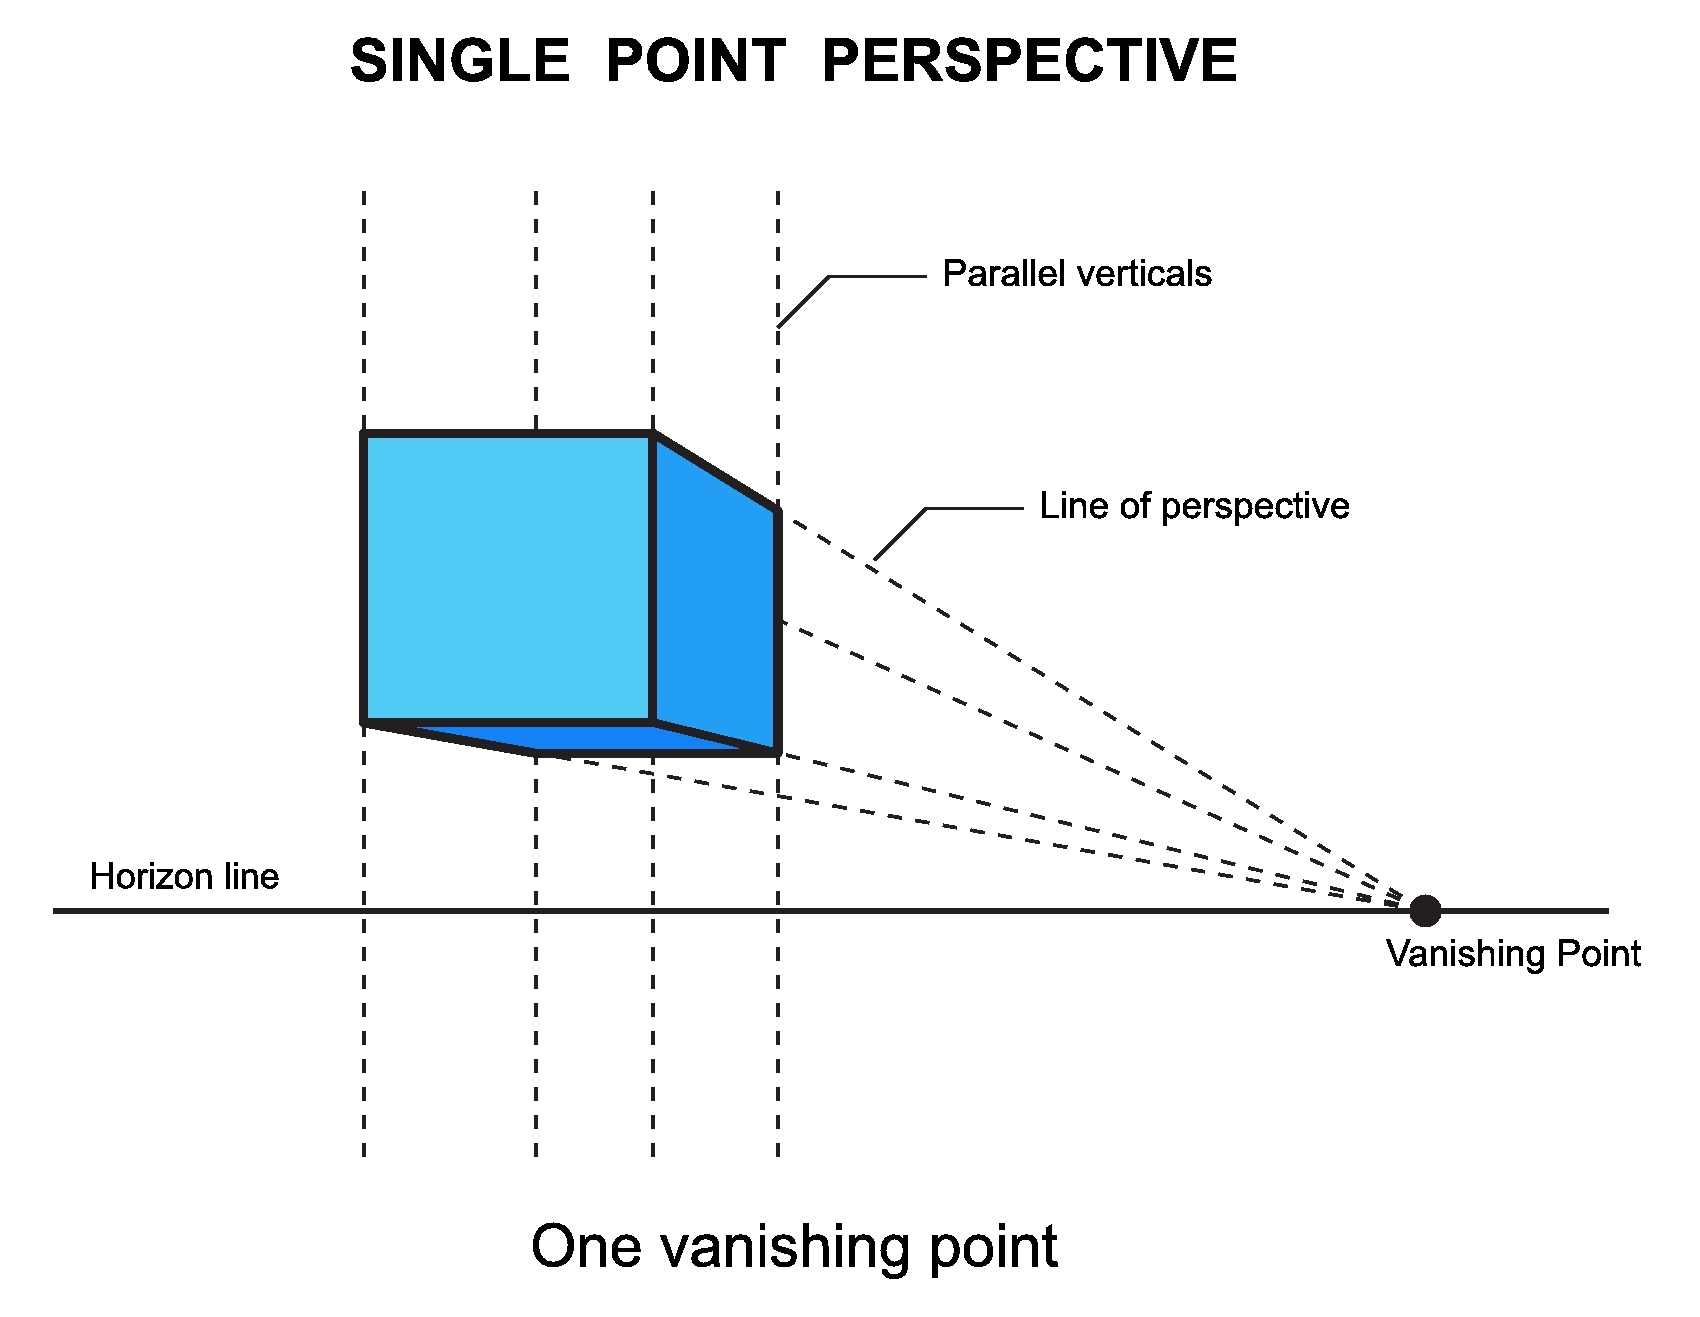
What is one-point perspective?
One-point perspective is a technique to make your 2D drawings look like they go back in space.
It’s like an illusion you can create to transform your flat drawing into something more 3D.
This type of perspective is easier than two-point perspective and three-point perspective.
Because it is the easiest type of perspective to master, it makes it incredibly easy to add depth and believability to your illustrations!
One-point perspective, as the name suggests, is the perspective of one single person.
It is a kind of linear perspective and has a single vanishing point.
Anything ranging from a long road with multiple cars to a single room drawn from a single wall showing the rest of the 3 walls is an example of a single-point perspective and will create an illusion of depth.
It can be used to construct the hallways, create a more depictive image of what a building is supposed to look like, etc.
You can connect the vanishing points together and continue the rest of the painting normally.
Other topics to help you at drawing:
- Top 10 Tips to Drawing Backgrounds Like a Pro
- 10 Tips for Drawing People for Beginners
- 8 Tips to Create Simple Flower Drawings (For Beginners)
- The Ultimate List of Skills You Need to Begin Drawing
- 9+ Things to Avoid When Learning How to Draw a Car
Understaning Point Perspective Terms

One-point perspective drawing doesn’t work like regular drawings.
You can just lay down the drawing paper and start sketching on the paper casually, but when it comes to point perspective drawings, you need to familiarize yourself with the following terms:
Parallel lines:
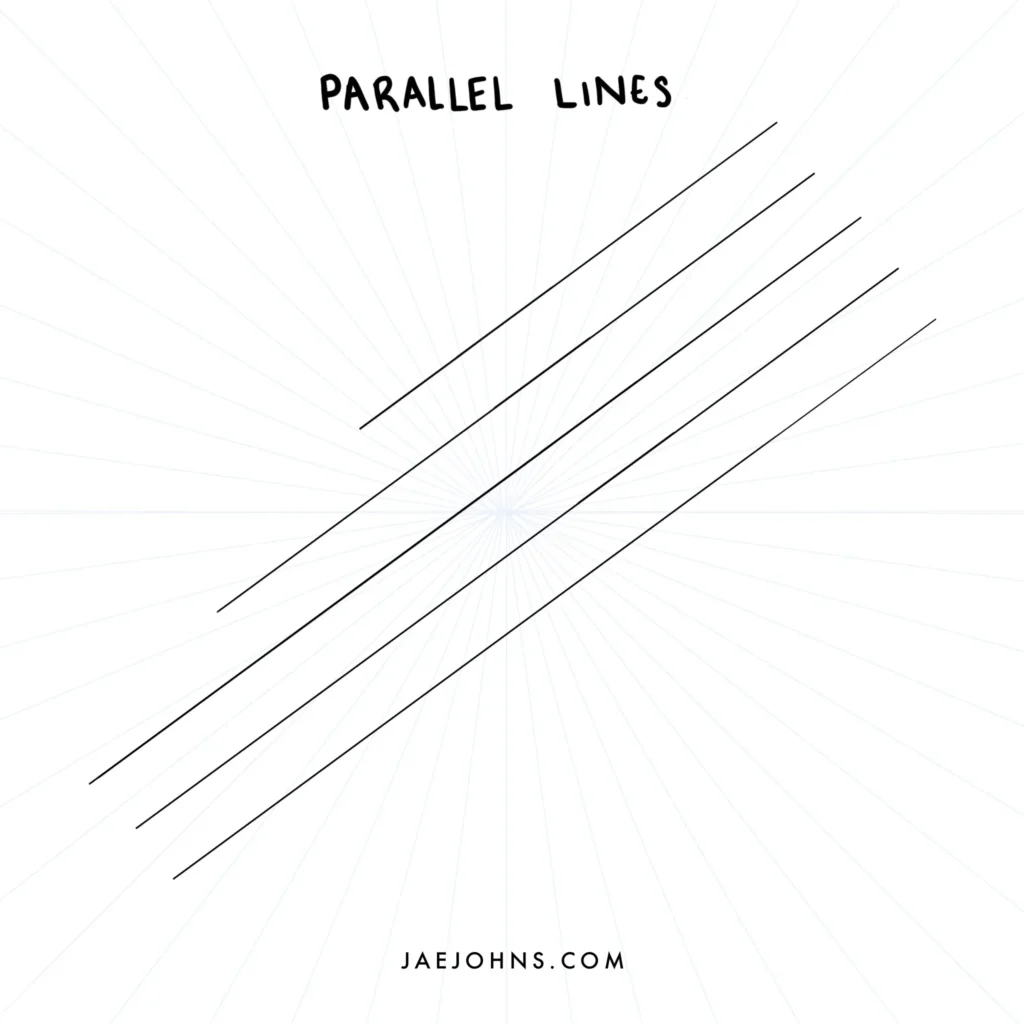
Parallel lines are the lines that never touch.
They go along on the same plane, from and to the same direction but never interact with each other or intersect with each other at any point.
Horizontal lines:

The side-to-side level lines with the horizon are known as horizontal lines.
These lines are parallel as well and will be parallel to the bottom and top edges of the paper.
Vertical lines:
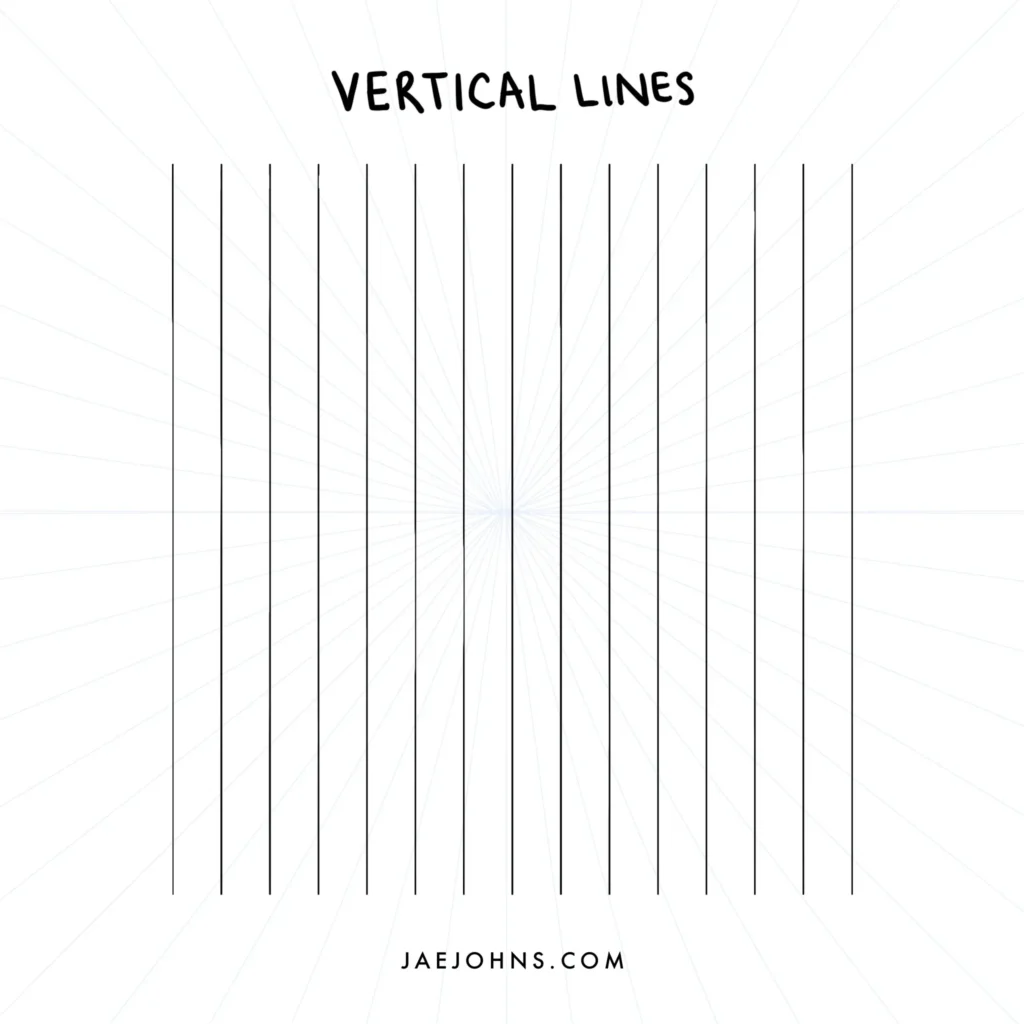
Vertical lines are parallel lines as well.
They are parallel to the right and left sides of your paper and intersect with the horizontal lines at all points.
Slanted lines:
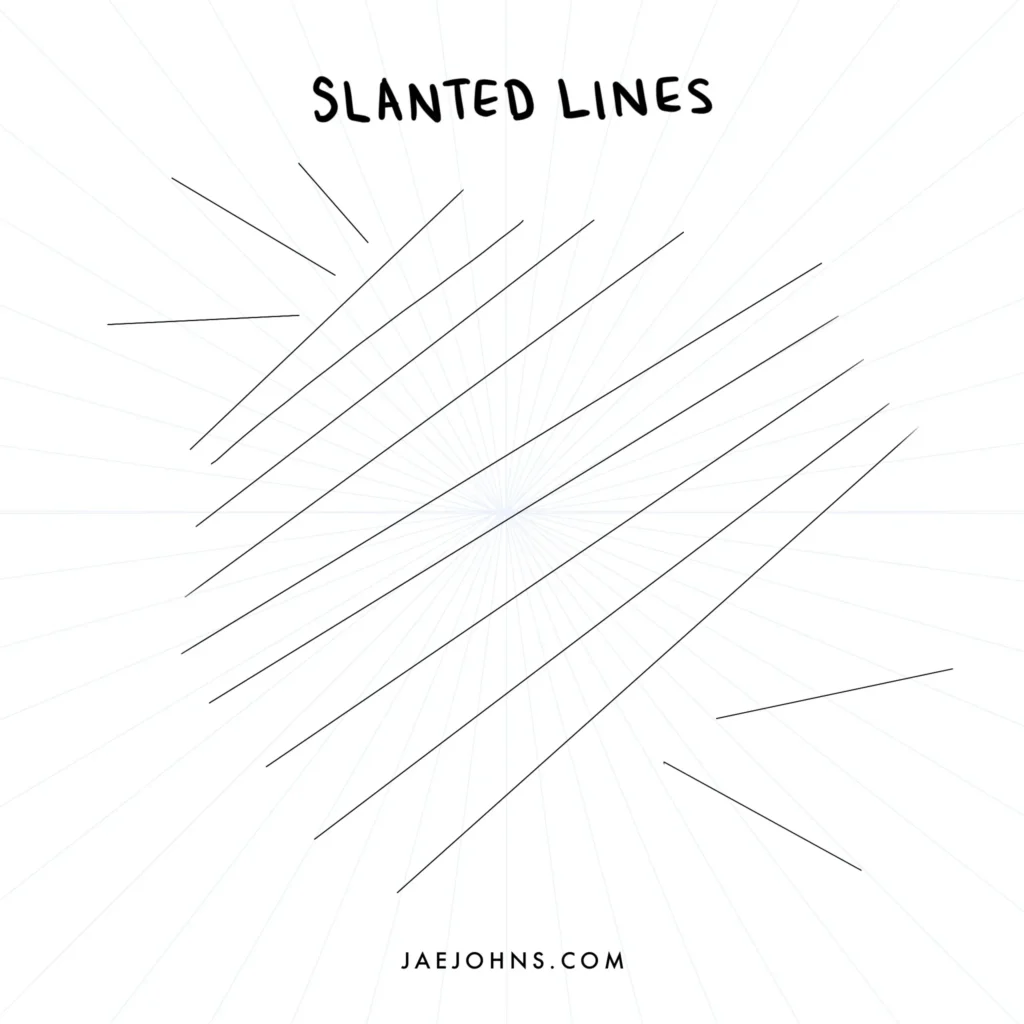
As vertical and horizontal lines are parallel to the sides of the edges, slanted lines are not parallel but are drawn diagonally.
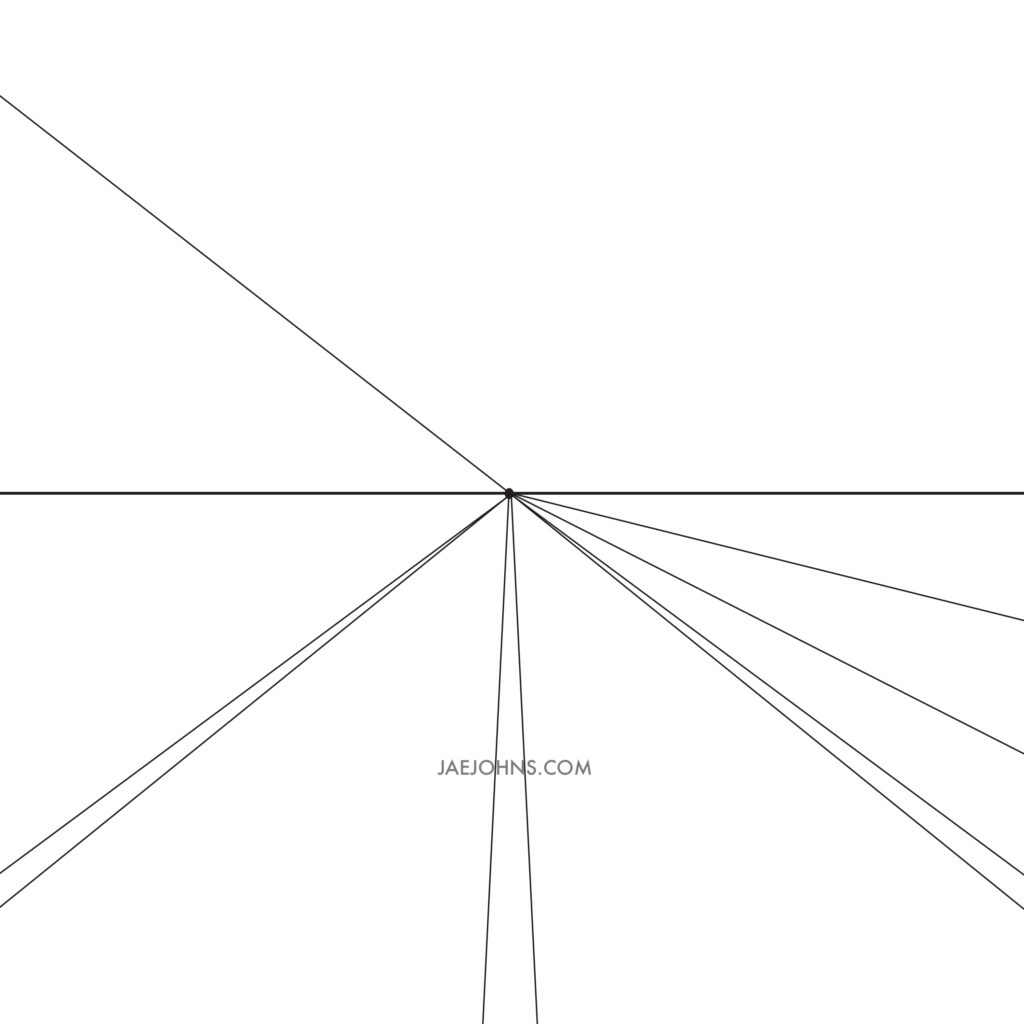
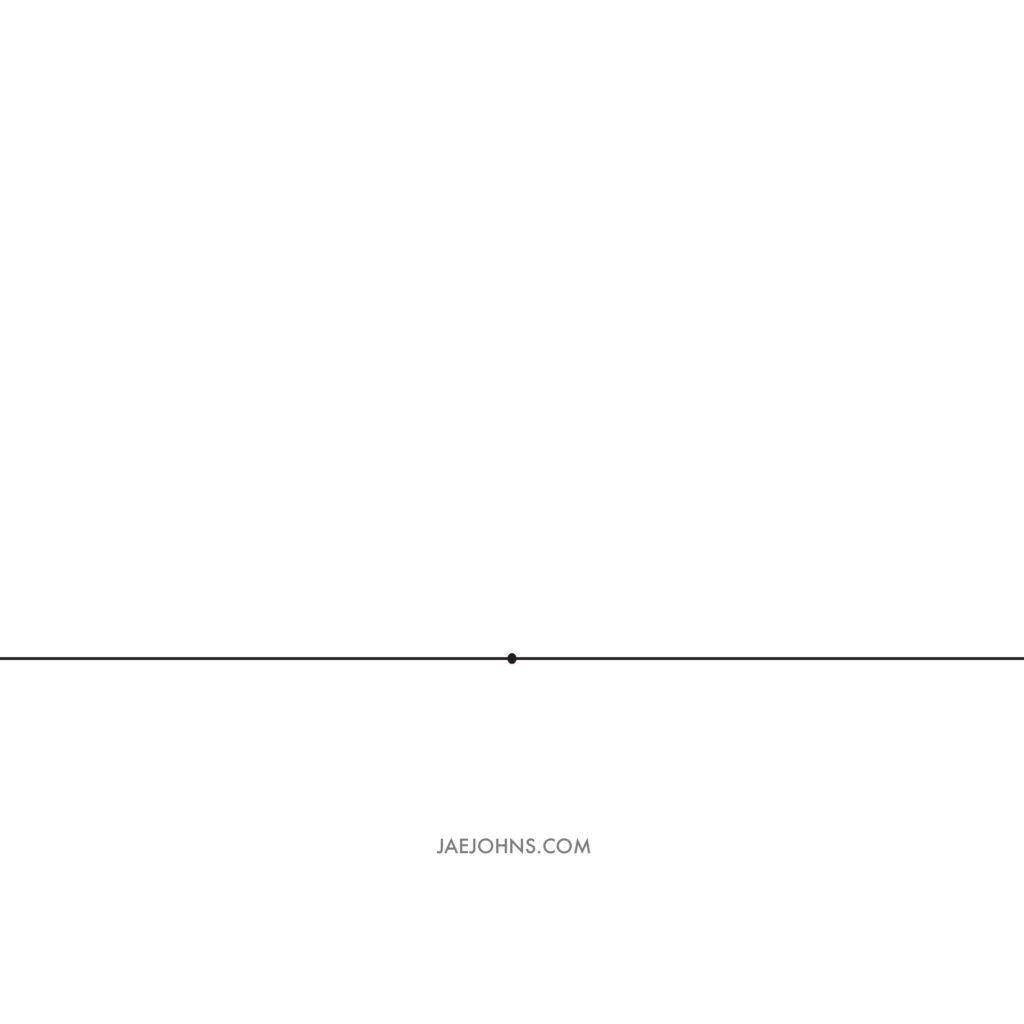
Horizon line:

The Horizon line presents the eye level of the viewer.
Most of the time, this line is completely imaginary, but if you are having some trouble working without it, you should draw it lightly to erase it afterward without any problem.
Vanishing point:

It is a point on the horizon line where all the lines meet and create a vanishing point.
At this point, the vision of the painter disappears as that point is far away, and everything vanishes from that point forward.
This point doesn’t have to be in the middle of the paper and can be located anywhere you want it.
It can be on the top, bottom, right, left, or at any other point in between these points.
Perspective lines:

Perspective lines are the lines that meet on the vanishing point.
In real life, all these lines are parallel but to create an illusion of depth; they converge on the paper in the perspective drawing.
Plane:

The plain 2D surface is called a plane.
A paper has two planes; the normal cube has 6 planes, etc.
Forms:

Forms, on the other hand, are three-dimensional and have volume and depth.
The whole idea of perspective drawing is built around converging 2D and 3D.
Although understanding all these terms will benefit you in drawing perspective, I would recommend understanding vanishing point, horizon line, and a vertical line as a first priority.
Draw a Cube
Drawing a cube in a single point perspective is a great way to show geometric perspective.
This is a step by step drawing that anyone can do.
Step 1


Draw a horizontal line with a point in the middle.
Step 2


Starting from the point in the middle draw four lines sideways to the right corner.
Step 3


Make a straight vertical line on that line to form a cube.
Step 4


Connect the line with the thick line so that it forms a cube.
Step 5


Erase the structural lines and you are done with cube objects and you are done.
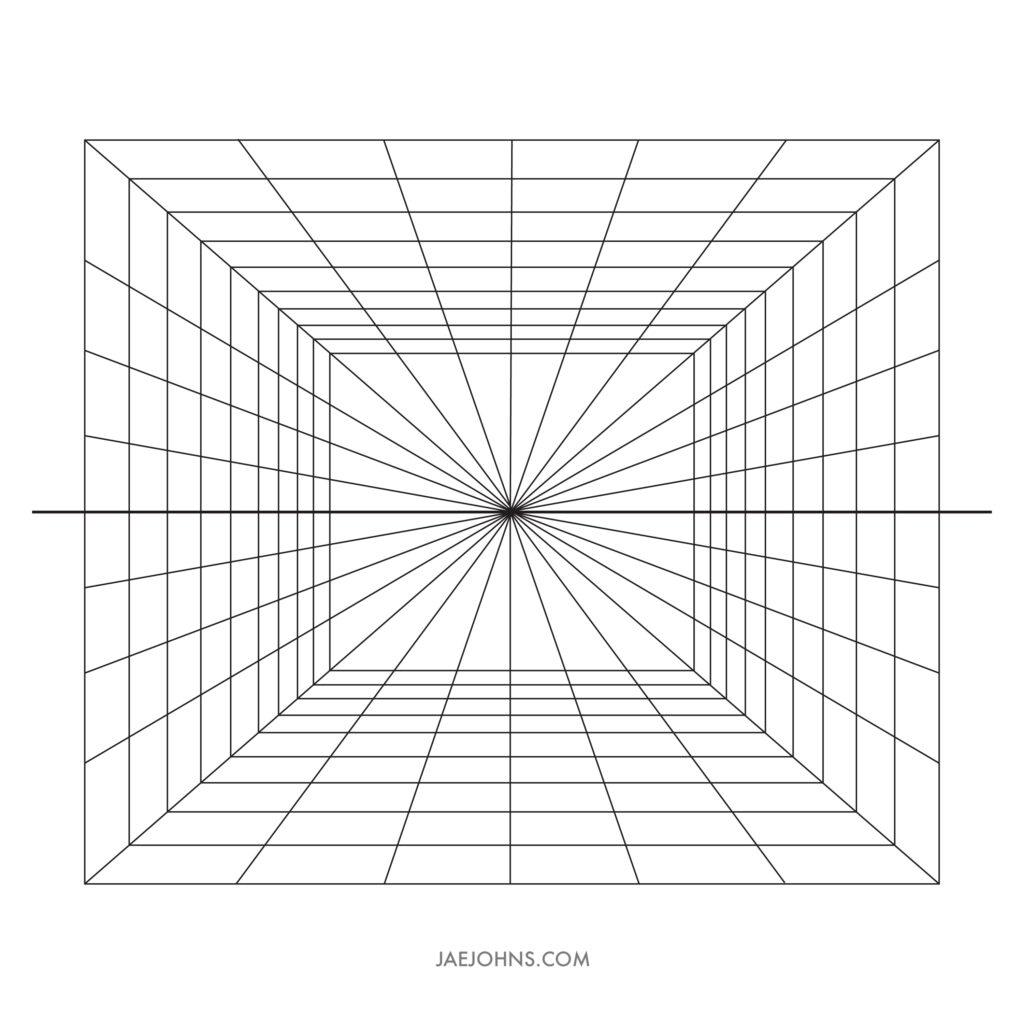
One Point Perspective Grid
Drawing a perspective grid is a great way to help you establish the picture plane and draw perspective art.
Step 1


Draw a horizontal line with a point in the middle.
Step 2
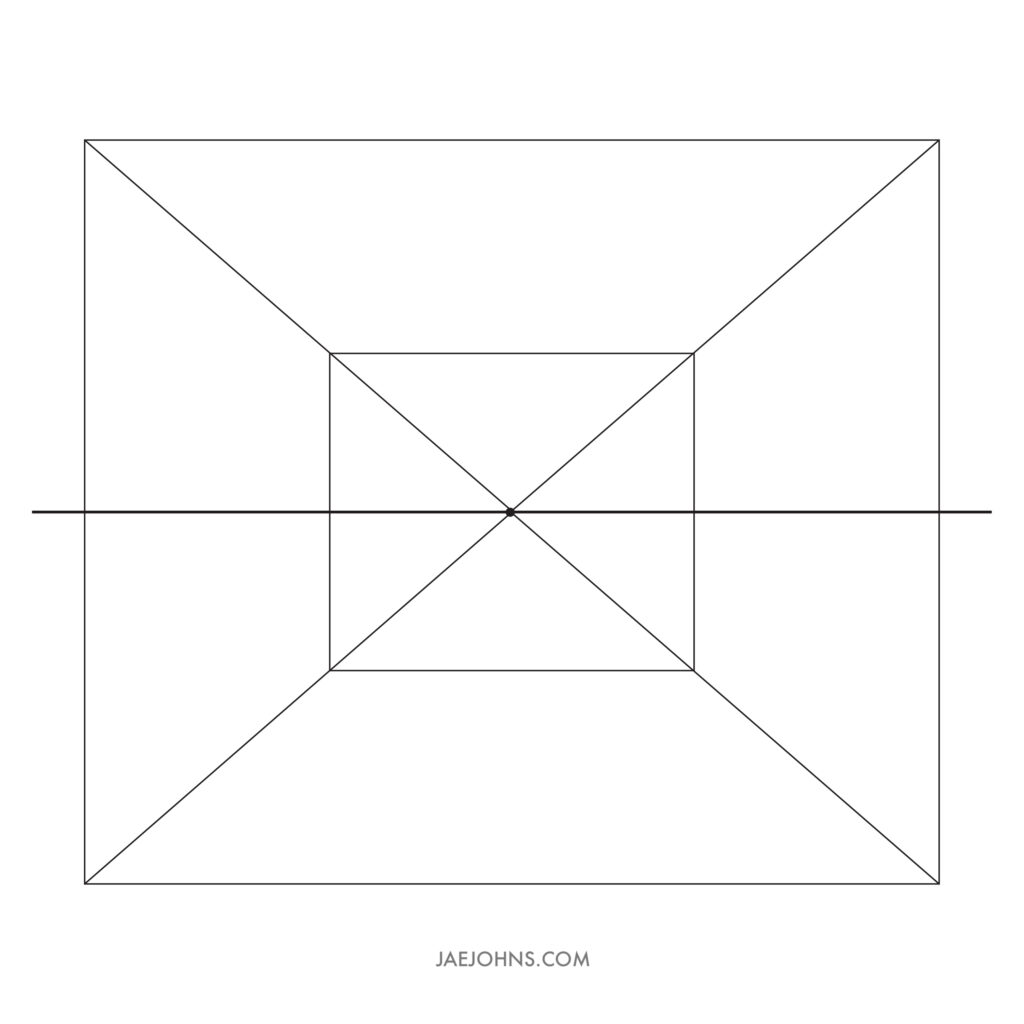

Make some lines spread all over the field.
Step 3

Make a box-shaped line by connecting the lines that have been made previously.
Step 4


Make a horizontal and vertical line on the box in the middle.
Step 5


Erase the structural lines and you are done.
One Point Perspective Room
In the above exercise, we drew a grid. If you have a grid, then drawing a bedroom will save you on some steps below.
In fact, you can get a piece of tracing paper and place it on top of the grid to help you draw steps 4 and 5.
Step 1
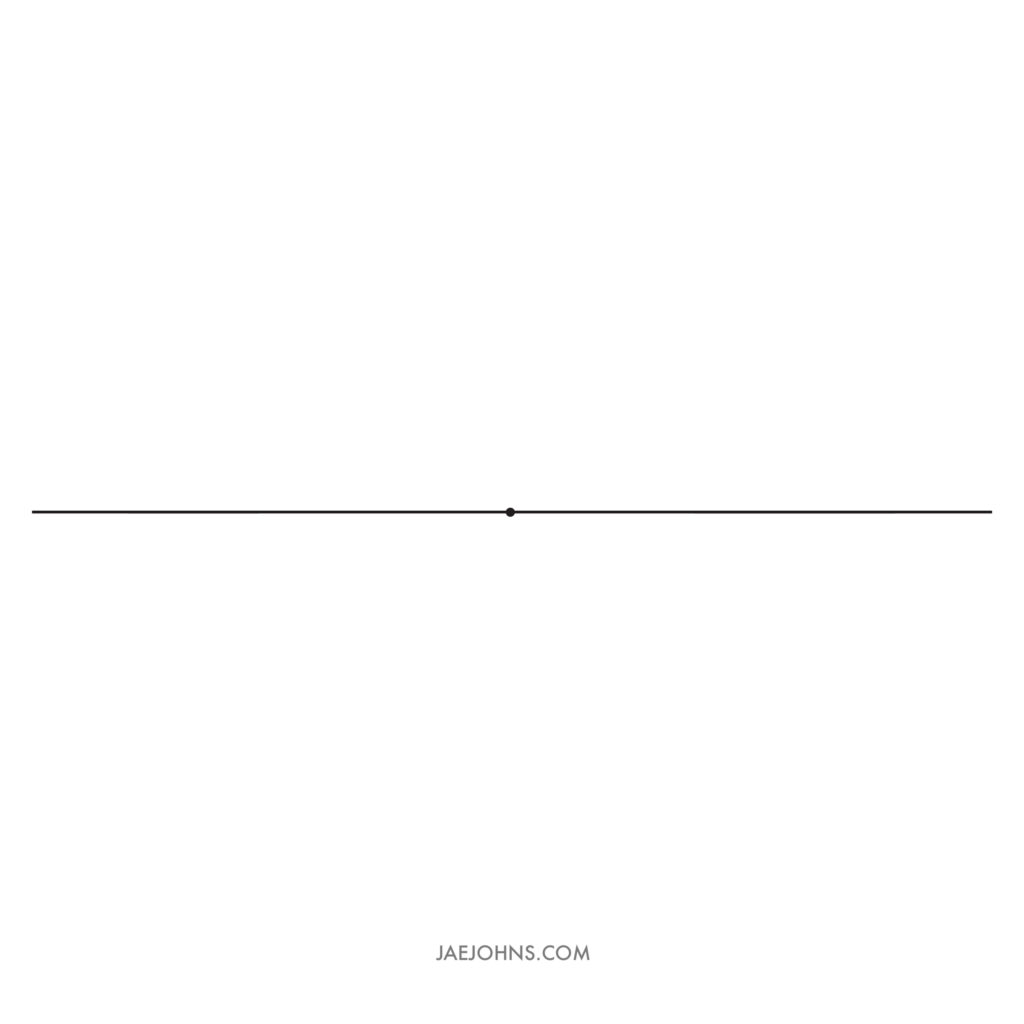

Draw a horizontal line with a point in the middle.
Step 2


Starting from the point in the middle, draw a line to all corners.
Step 3


Connect the lines so that they form a room and some objects in the bedroom.
Step 4
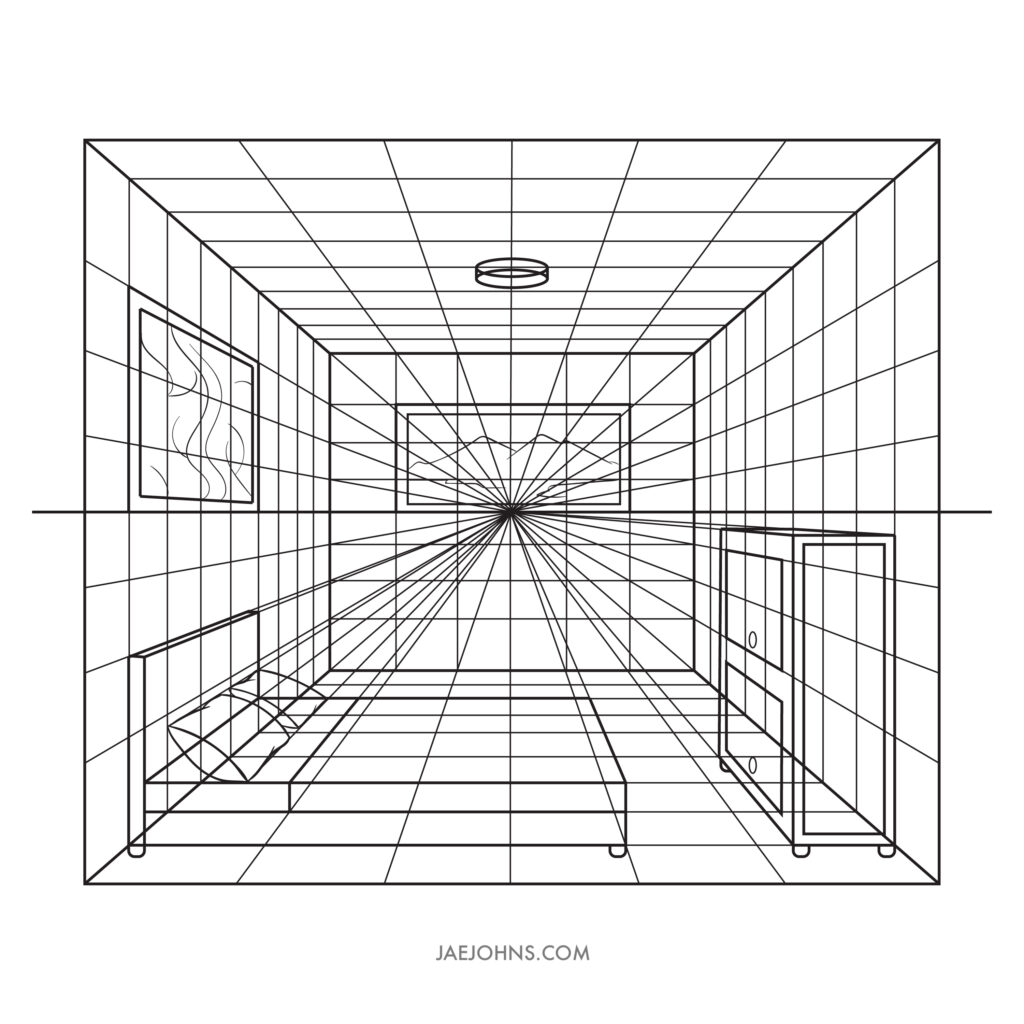

Make details with thick lines so that the shape of objects in the bedroom can be seen clearly.
Step 5
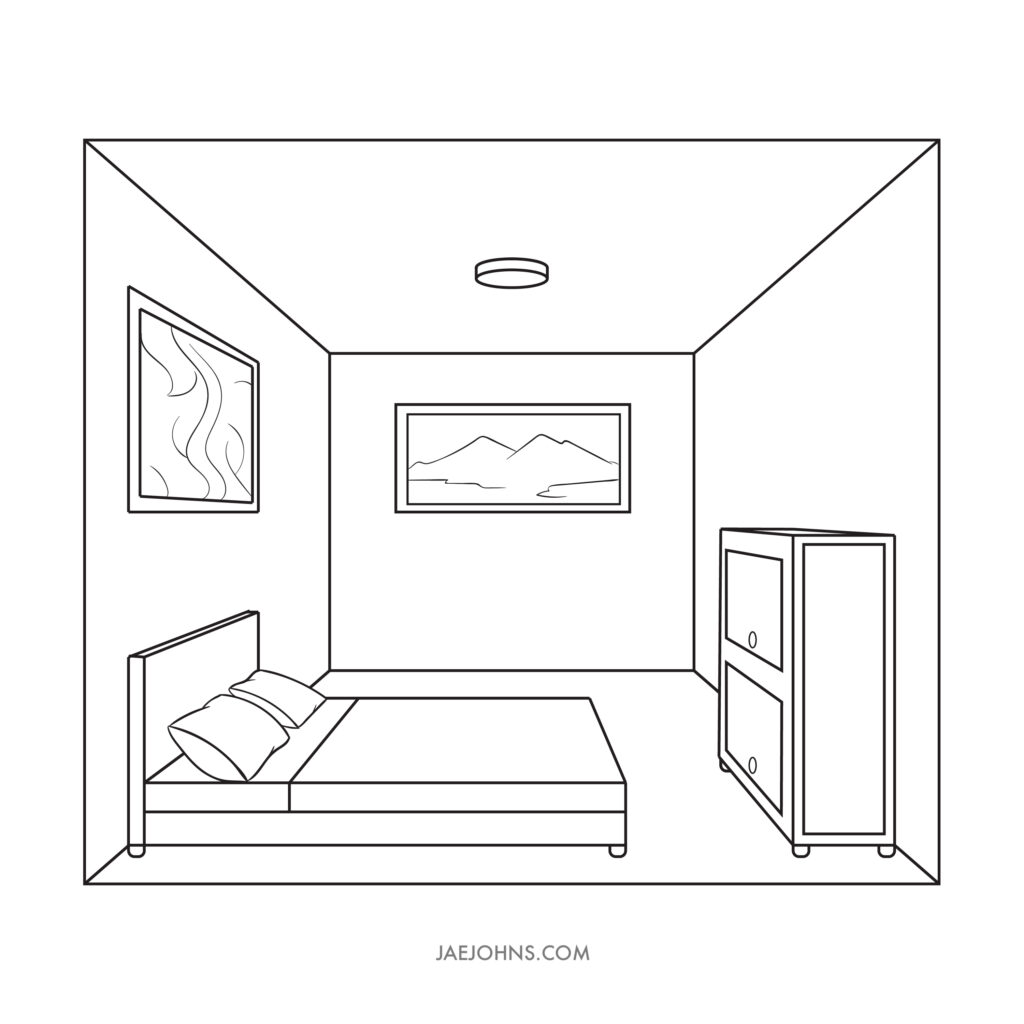

Erase the structural lines and you are done.
One Point Perspective Living Room
Similar to the bedroom, you can use the perspective grid for this, too.
The grid functions as a way to draw straight lines that will make drawing perspective easy.
Step 1


Draw a horizontal line with a point in the middle.
Step 2


Make structure lines like making grid lines.
Step 3


Create an object such as sofas, televisions, and flower vases for the living room by drawing a thin line starting from the center point.
Step 4


Make details with the guideline structure earlier so as to form the object of the living room.
Step 5


Erase the structural lines and you are done.
How to Draw a Road
In a sense, drawing a road in one point perspective is extremely easy.
It is like drawing a long diagonal line that goes farther away in the distance.
Step 1


Draw a horizontal line with a single point in the middle.
Step 2

Draw construction lines from the center of the point to form roads, poles, and mountains.
These construction lines are orthogonal lines that recede to the vanishing point.
Step 3


Make the object in the path of poles and outline the path with the help of the previous construction line.
Step 4


Make details with the guideline structure earlier so as to form the object of the road.
Step 5


Erase the structural lines and you are done.
One Point Perspective City
It might seem challenging, but drawing a one point perspective city is not hard.
The task can be more time-consuming compared to the others on this page.
It involves drawing more lines parallel to one another, and you’re drawing objects and a scene that requires more detail.
To create illusion and visual interest in your city, try to draw more buildings that are different from one another.
Step 1


Draw a horizontal line with a point in the middle.
Step 2


Draw structure lines from the center of the point to form roads and the city.
Step 3


Make the object in the path of a building and outline the path with the help of the previous structure line.
Step 4
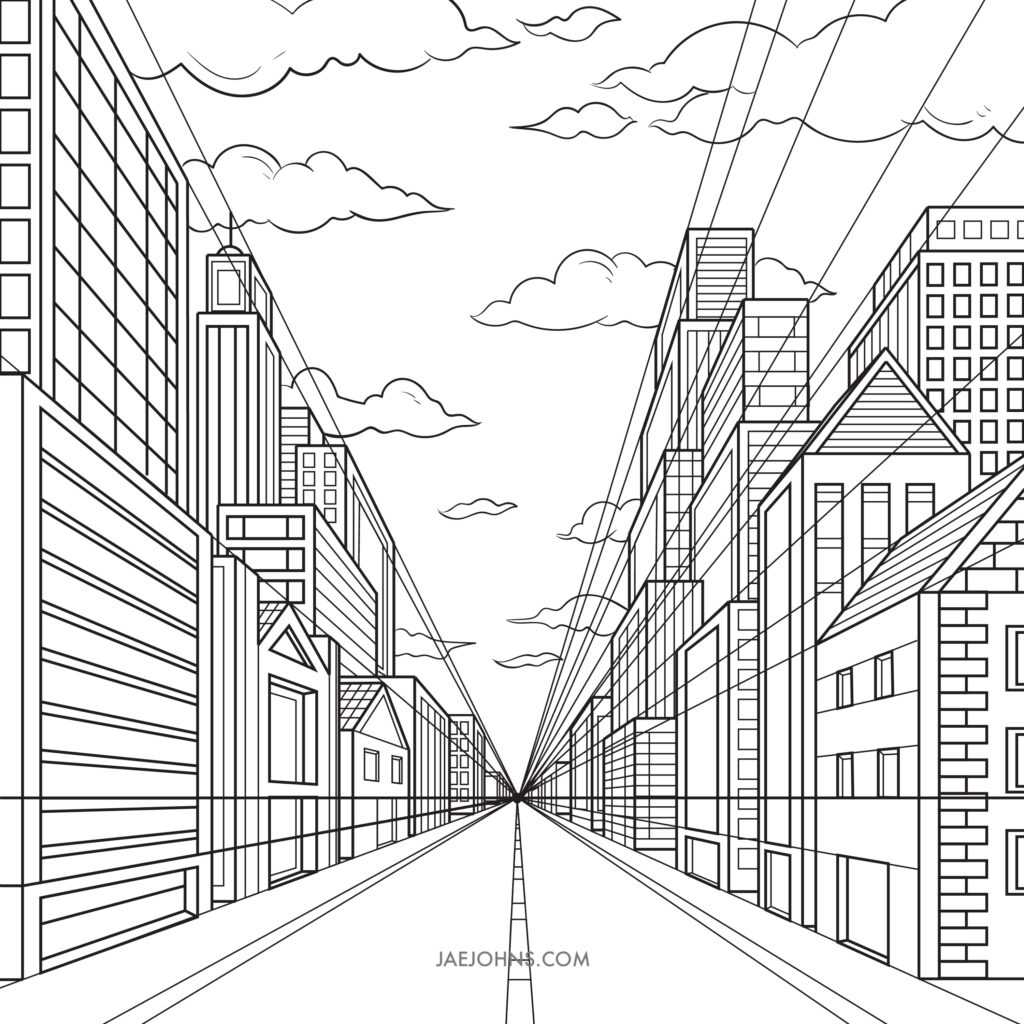

Make details with the guideline structure earlier so as to form the object of the city.
Drawing clouds that are bigger in the front and smaller in the background is a great way to show aerial perspective.
Step 5
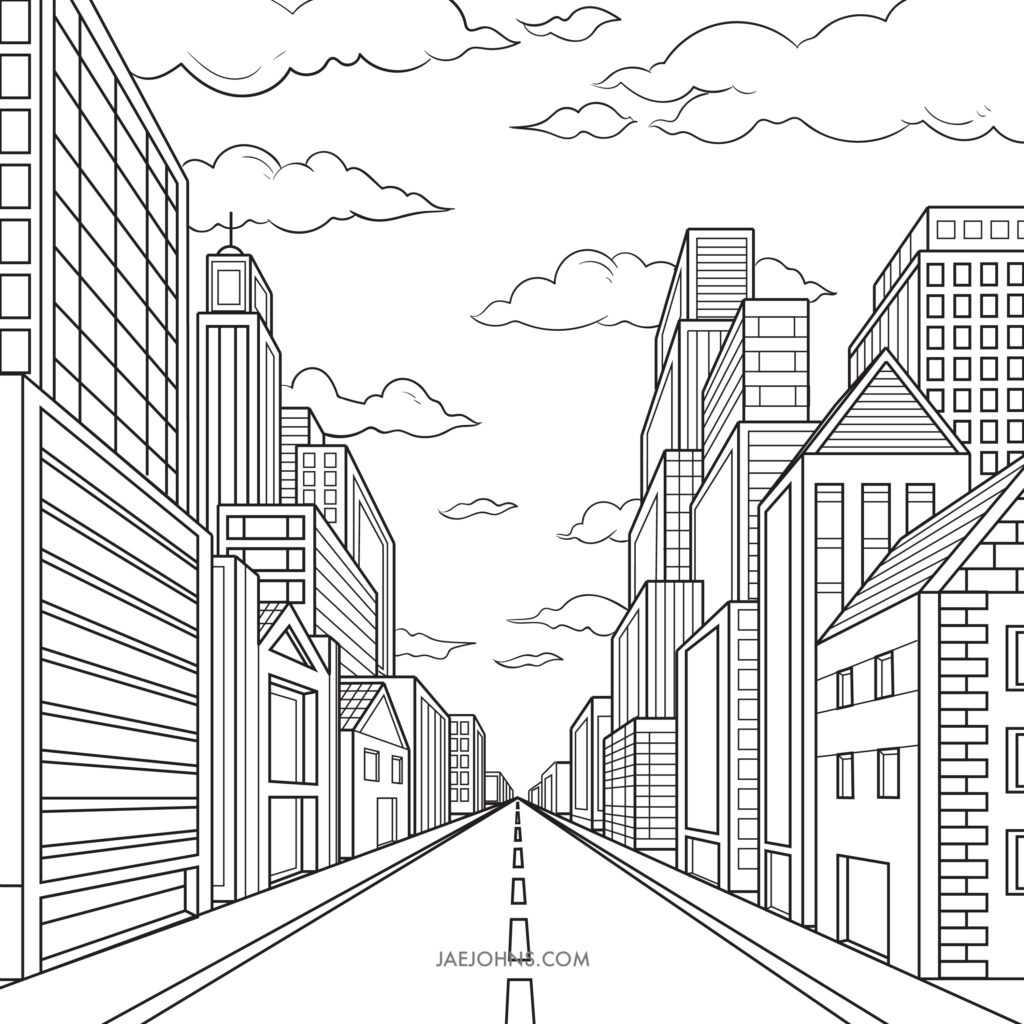

Erase the structural lines and you are done.
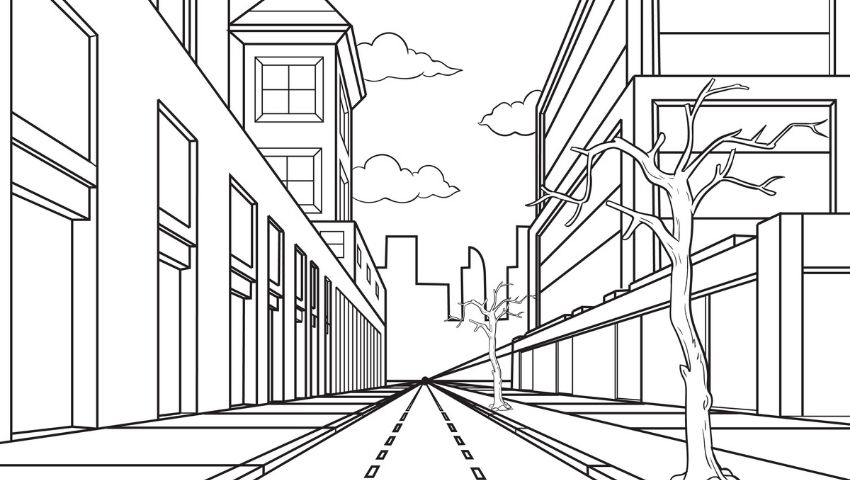
Street Drawing
To draw single point perspective art of a street, you can think of it as combining the lesson from the road and city in the above drawing tutorials.
Step 1

Make a horizontal line with the center point on the right side.
Step 2


Draw structure lines from the center of the point to form roads and streets.
Step 3


Make the object in the path of a building and outline the path with the help of the previous structure line.
Step 4
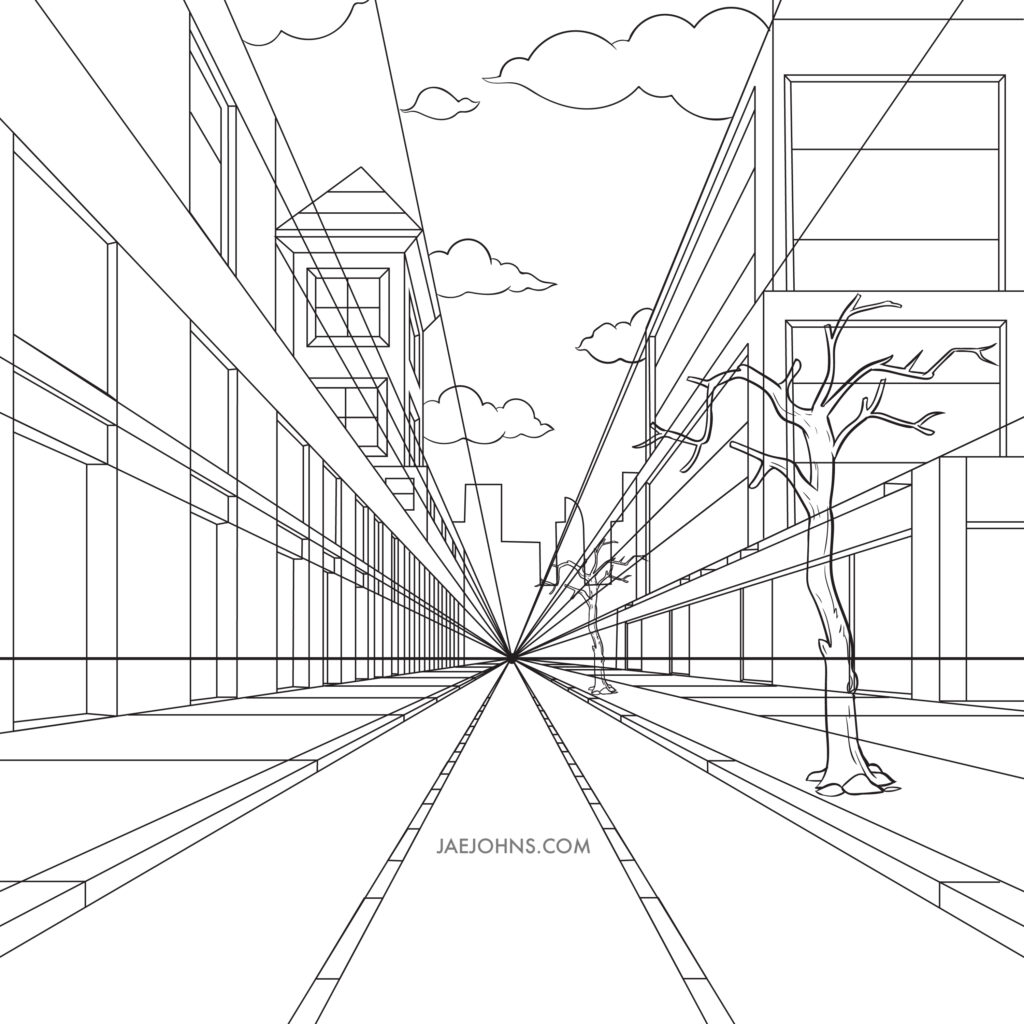

Make details with the guideline structure earlier so as to form the object of the street.
Adding in clouds that get smaller is a fantastic way to show atmospheric perspective.
Step 5
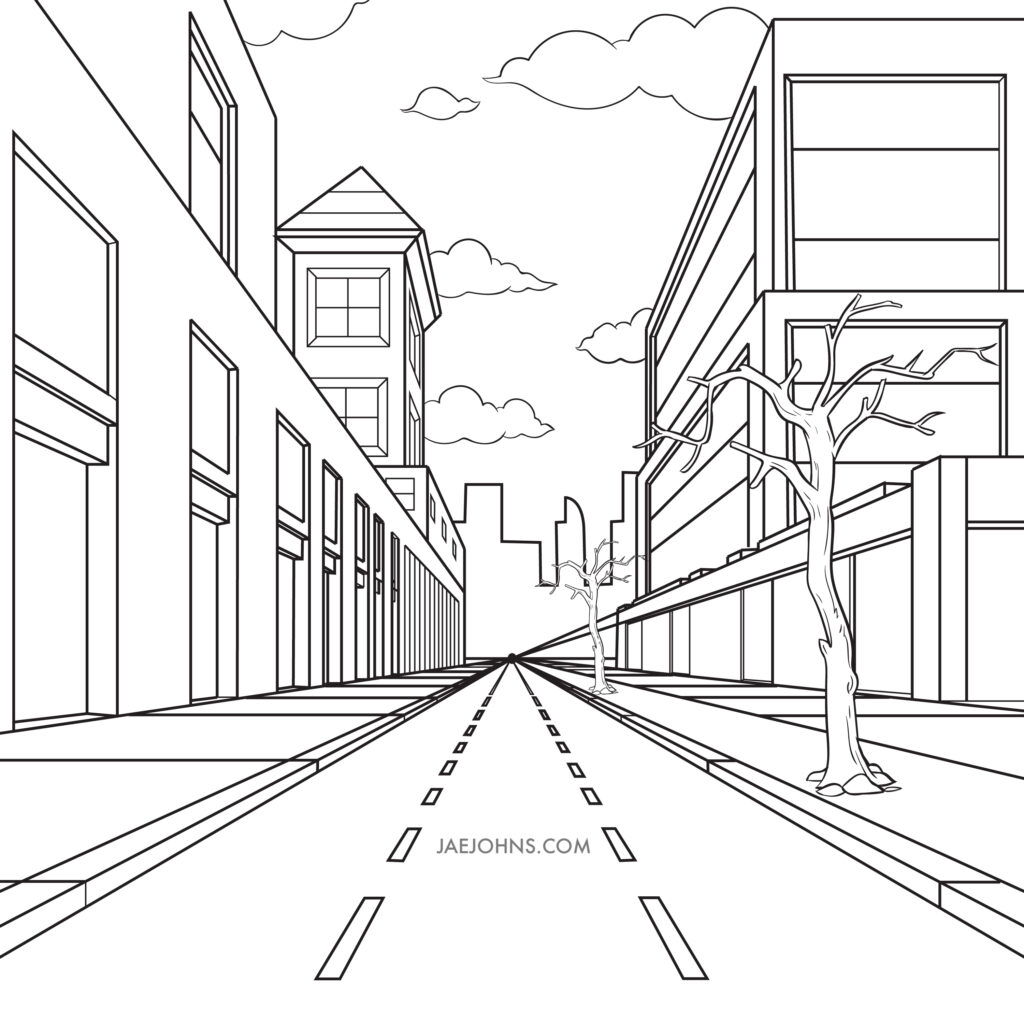

Erase the structural lines and you are done.
How to Draw a 3D Letter
I will show you how to draw a 3D letter from a block letter drawing.
When you have once mastered the technique of drawing a cube with the one-point perspective technique, the next step is the alphabet.
Here is how you can draw a simple 3D letter in a one-point perspective:
Step 1


Whatever letter you are trying to write in 3D, just write it normally and create a horizon line.
Pick out a point that will be the vanishing point.
Step 2


Take the lines from every corner of the alphabet, for instance, alphabet J, and drag it towards the vanishing point.
With this 3D look, you can work on the alphabet easily.
Step 3


Once you have drawn the lines on the vanishing point, you need to pick out the length that you want your letter to be.
Look at the lines behind the letter and decide what point would be the best to end the lines and form a letter there.
Once you have decided the point, draw the same letter, in the case, the letter “J” and try to meet all the points on it.
That would be the ending part of your drawing, and when you have formed the other “J” behind the original one, you can just delete it.
Step 4


Remove the lines that seem unnecessary and only keep the points that make sense at that point.
As we are going for a more 3D look, you can remove the lines which were joining the letters from the back.
Think of the front lines as they are creating a wall, and anything behind it is hidden.
You can try this technique on other alphabets as well, like A, F, etc.
How to Draw a Room in One Point Perspective


How to draw a bedroom in one point perspective
Materials
- Pencil
- Paper
- Or tablet and stylus
Tools
- Pencil
- Paper
- Or tablet and stylus
Instructions

 Draw a horizontal line with a point in the middle.
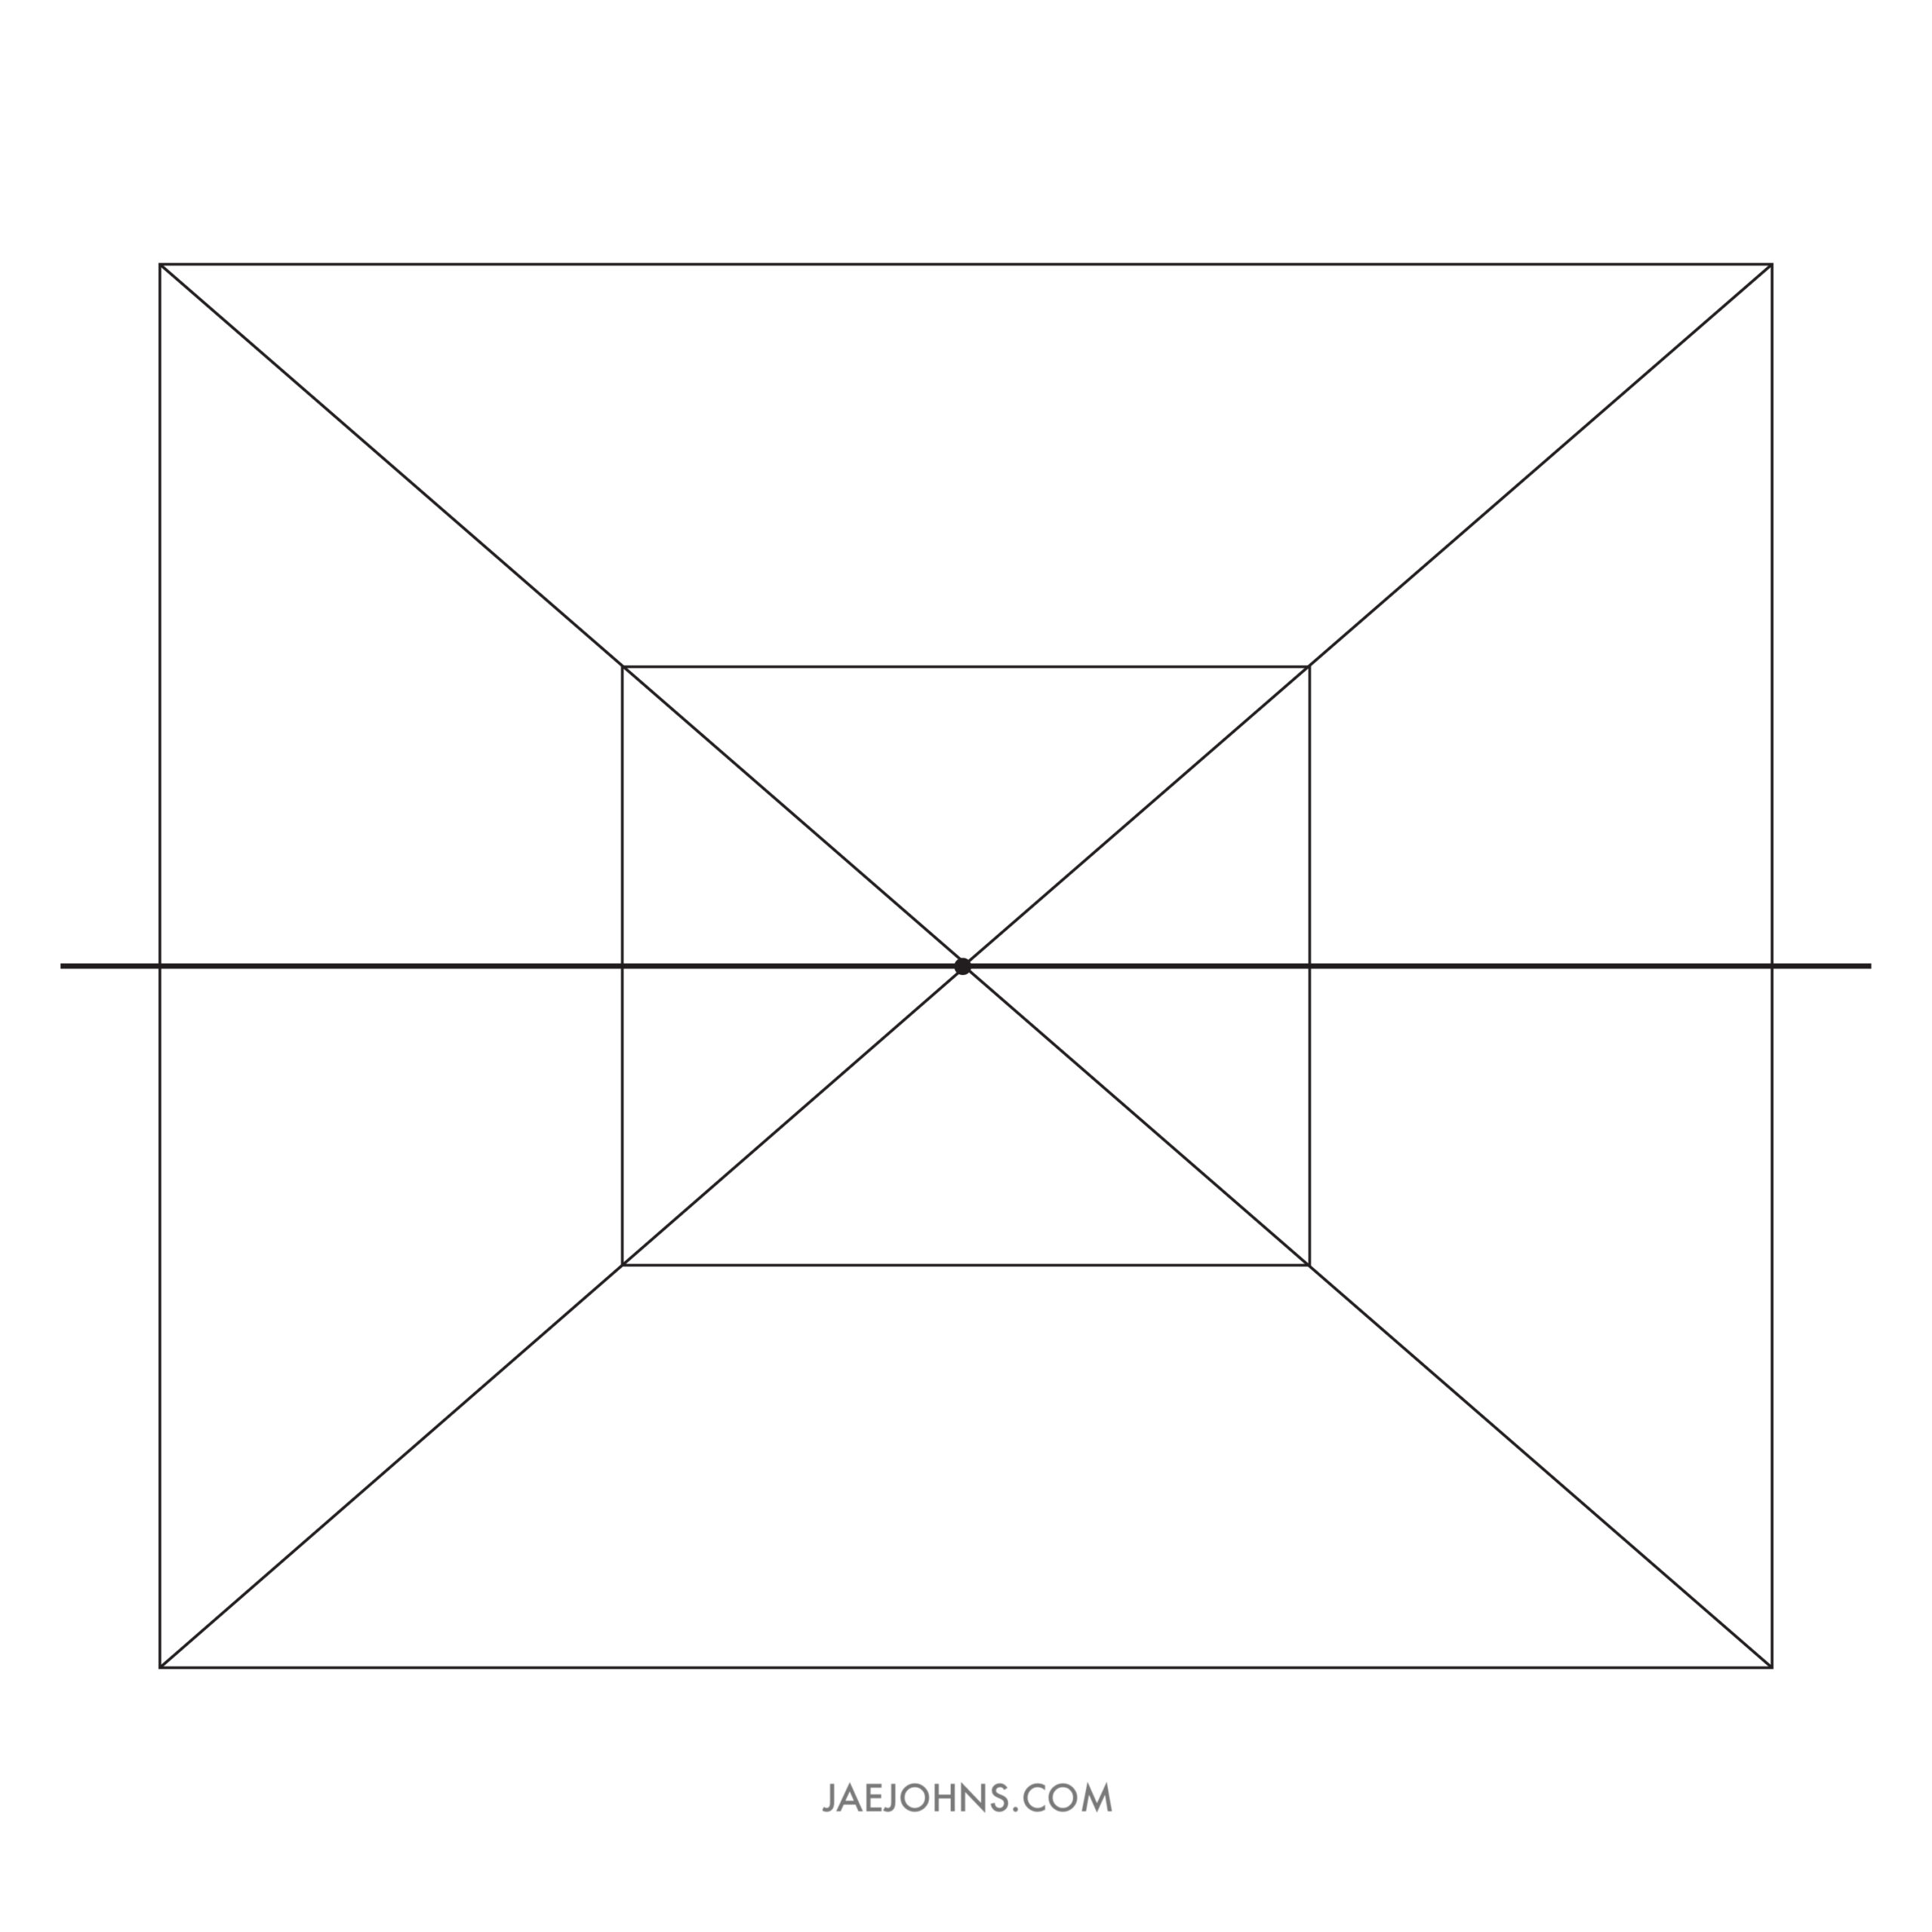
 Starting from the point in the middle, draw a line to all corners.
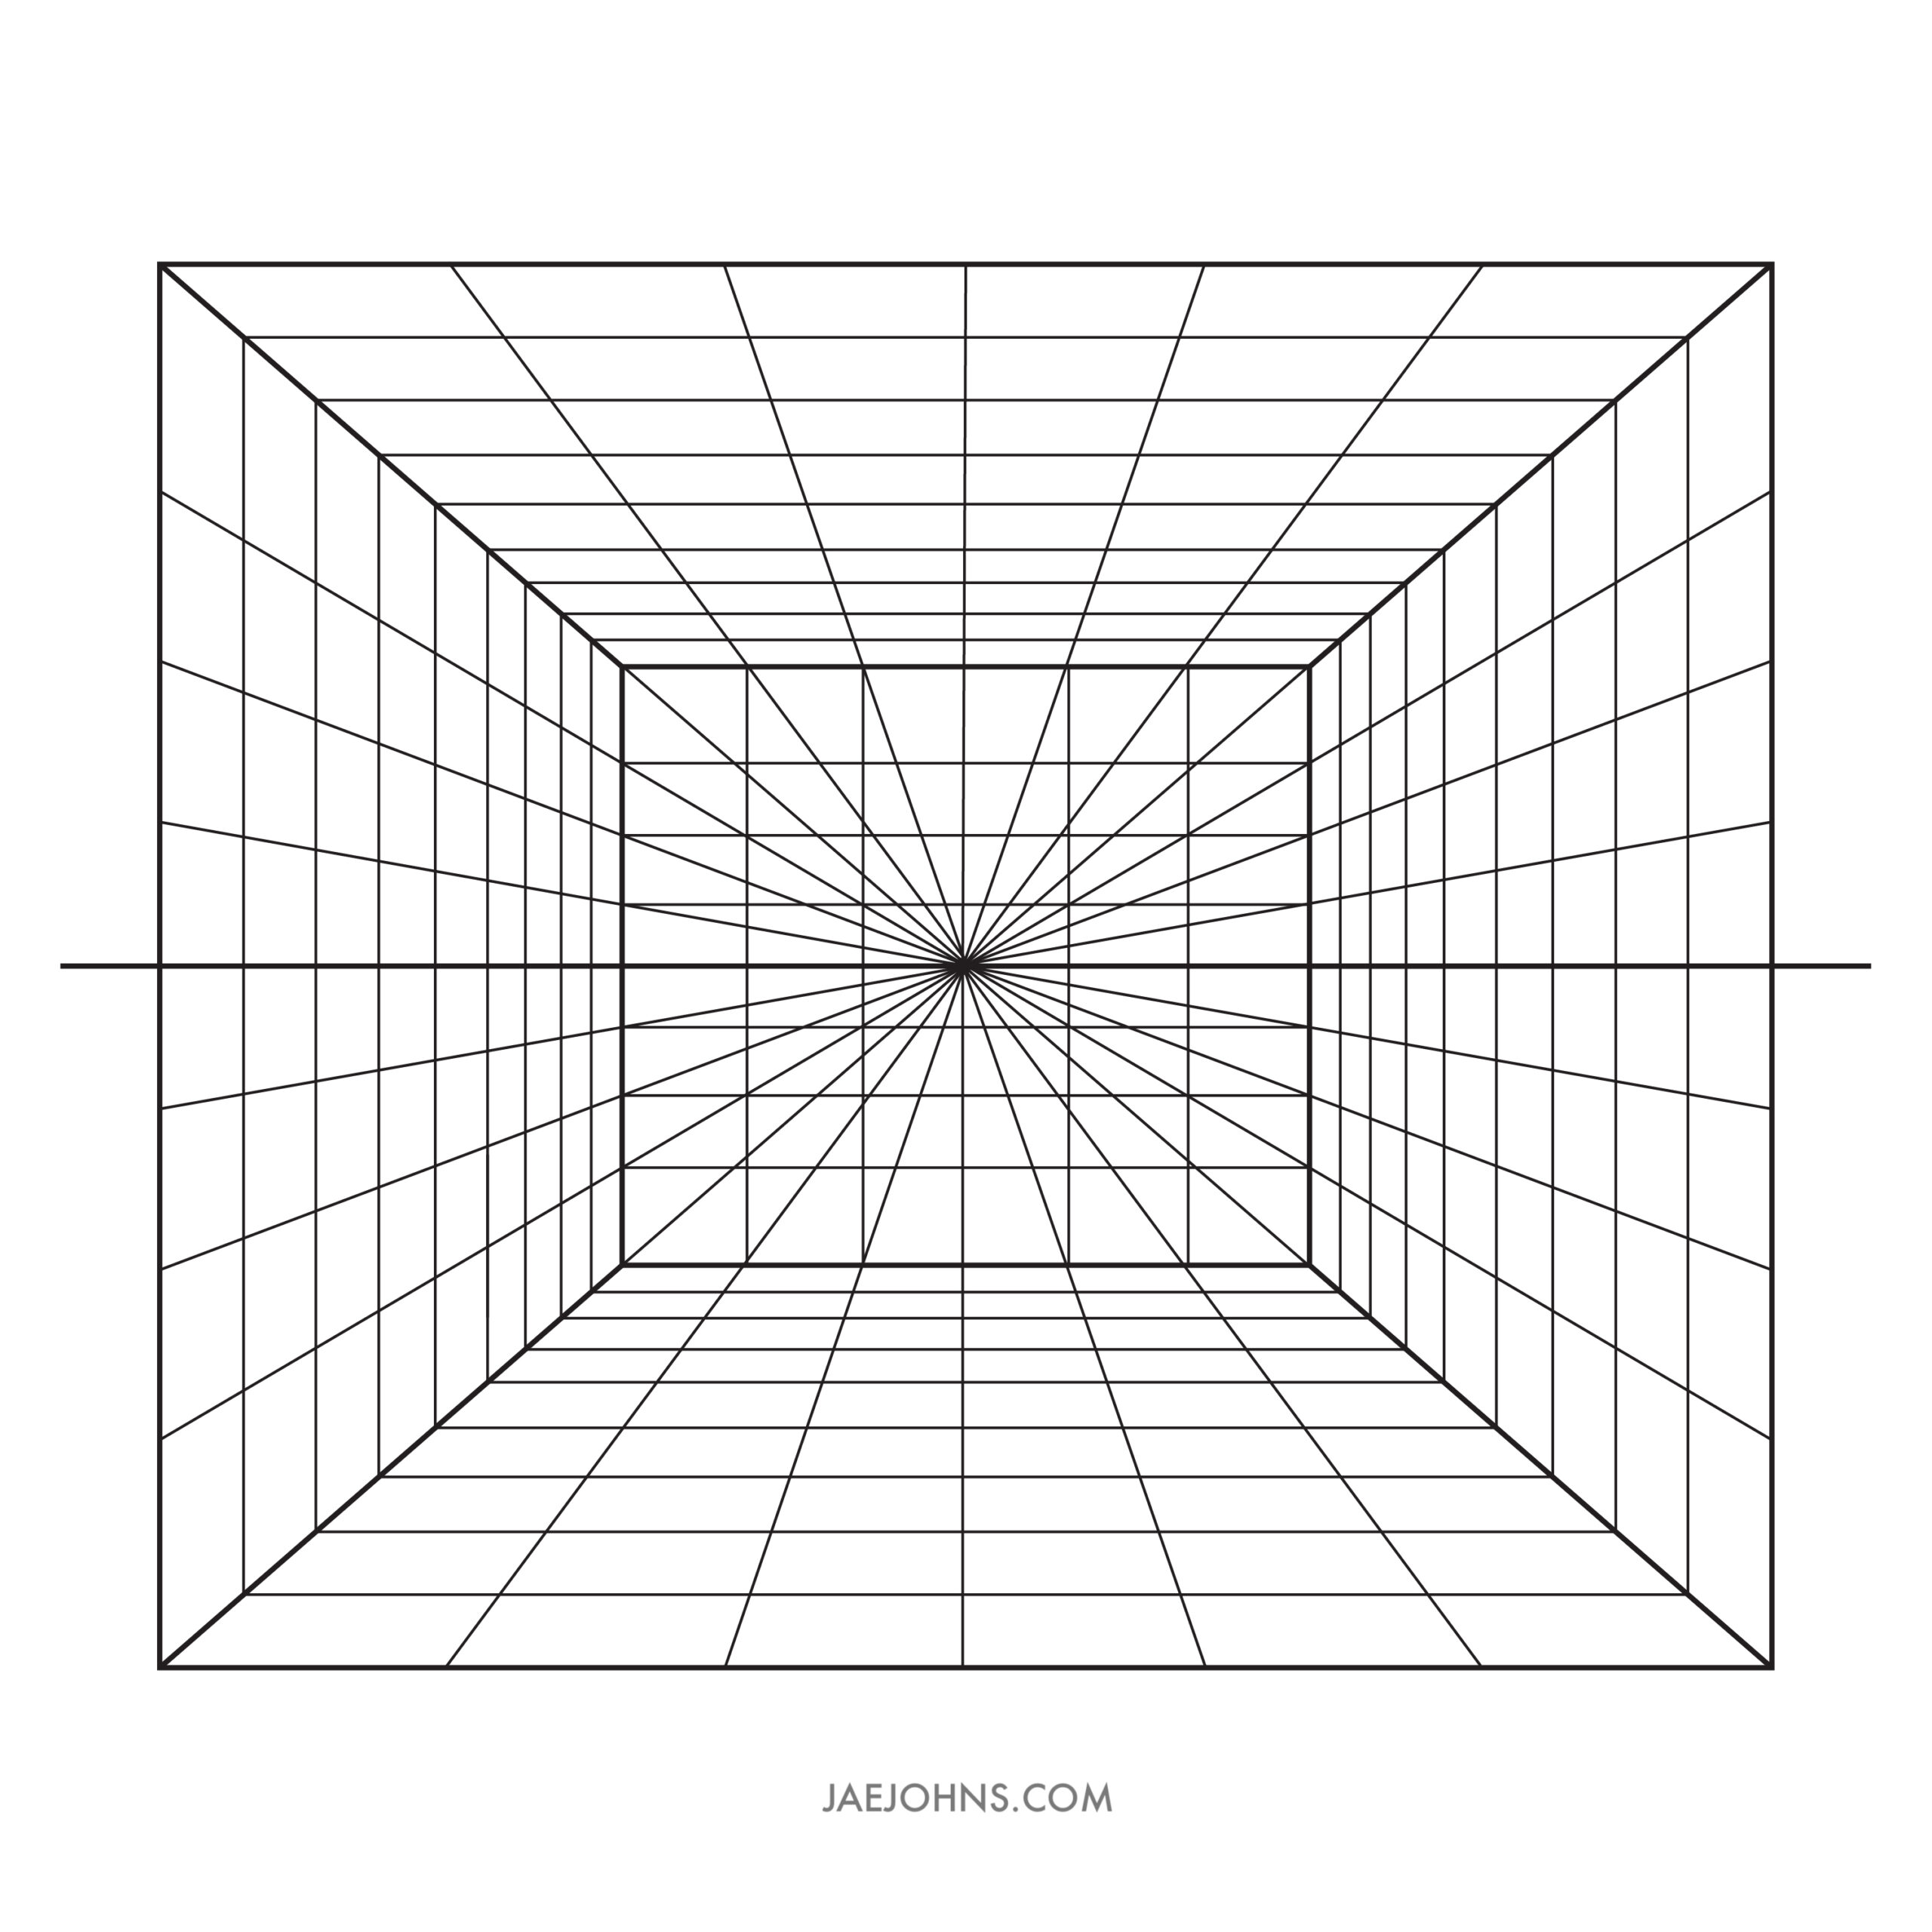
 Connect the lines so that they form a room and some objects in the bedroom.
 Make details with thick lines so that the shape of objects in the bedroom can be seen clearly.
 Erase the structural lines and you are done.
Conclusion
As you can see from the drawing tutorials above, learning how to draw a one-point perspective is easy.
Remember the key thing is to place your line for the horizon and one vanishing point.
Once you have these, you can draw a city in a one-point perspective, you can draw a room in a one-point perspective, you can draw a road in a one-point perspective, and so much more.
Erika
Monday 4th of July 2022
Thank you, Jae Johns. I learned a lot in this blog today; fantastic job.
Jae Johns
Thursday 7th of July 2022
you're welcome