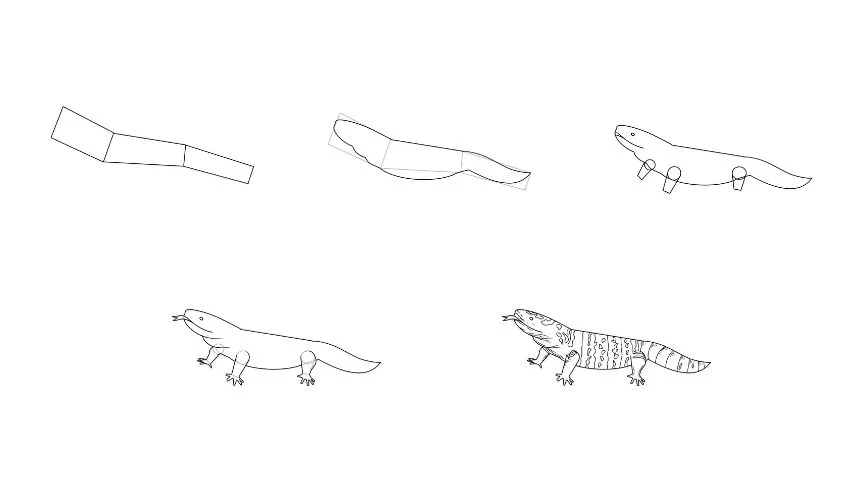
Are you trying to learn how to draw a gila monster?
This notable reptile is quite easy to draw as long as you have the right step by step illustrations to guide you.
By using some basic shapes, you can illustrate a gila monster in a matter of minutes!
In only 5 steps, you will have an awesome realistic drawing of a gila monster.
Let’s get started!
Drawing Supplies Needed
You can use any drawing supplies to draw a gila monster, but here are the best tools for drawing.
Step 1

First make 3 squares attached to form his body.
Step 2

Delete the square line art and give a form that is suitable for Gila Monster from head to tail.
Step 3

Add the eye area, his mouth and make a skeleton for his feet.
Step 4

Remove the skeleton feet, add his legs down and give a tongue form that sticks.
Step 5

Lastly given a gila monster motif on each side of the skin.
Drawing a Gila monster may seem difficult, but with these step-by-step pictures, you’ll be able to be more confident and draw this large lizard.

How to Draw a Gila Monster

Step-by-step instructions on how to draw a Gila Monster.
Materials
- Pencil
- Paper
- Or tablet and stylus
Tools
- Pencil
- Paper
- Or tablet and stylus
Instructions
- Step 1
First, make 3 squares attached to form his body.
- Step 2
Delete the square line art and give a form that is suitable for Gila Monster from head to tail.
- Step 3
Add the eye area, his mouth, and make a skeleton for his feet.
- Step 4
Remove the skeleton feet, add his legs down and give a tongue form that sticks.
- Step 5
Lastly given a Gila Monster motif on each side of the skin.

