

Are you trying to find out how to use Clip Studio Paint? You can level up your Clip Studio skills from beginner to expert in no time.
You will be on your way to making stunning digital art with some simple tips anyone can do.
Let’s discover some amazing tips to help you get better at using Clip Studio Paint.

What are the Best Tips for Clip Studio Paint?
Do you want to get a better grasp of using the most efficient drawing methods in Clip Studio Paint?
Let’s get started with the best tips for Clip Studio Paint!
01. Choose an Appropriate Tool to Ink Your Artwork

Are you having a problem creating digitally-inked artwork? Inking or line art is said to be the most frustrating and challenging part of the art process.
It is the process in which a final line is added over the rough drawing.
But once you get to know how to ink in Clip Studio Paint, you can not only create your sketch but can give life and motion to it.
There are many inking tools available in the Clip Studio Paint that you can use to ink your artwork.
To ink your artwork in a proper way, it is essential to choose an appropriate tool.
But now the question that arises here is how you can get to know the tool you are going to use is suitable for your drawing or not.
It depends on some key factors that must be considered while inking digital artwork.
For example, you should get to know whether you want thin lines or thick lines in your drawing.
If you want thick lines, then how much thickness do you want or whether you want all lines to have the same level of thickness or not.
Moreover, bold lines, soft lines, or the appearance that you want for your end product must also be considered while choosing an inking tool.
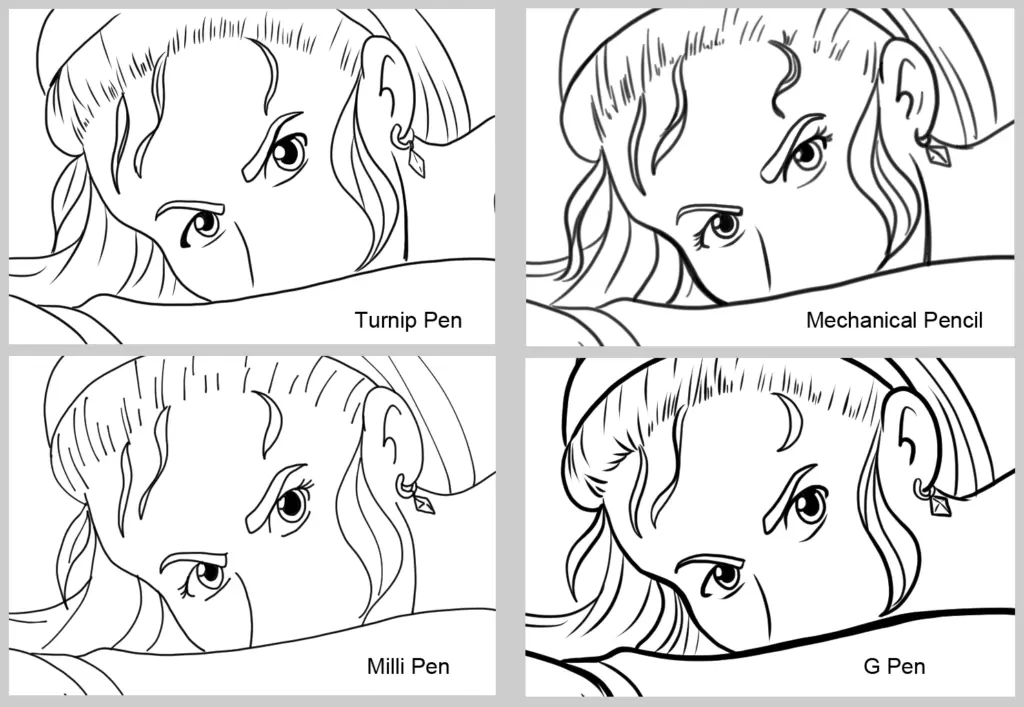
What you have learned: To create a different look for your final art in Clip Studio Paint, make sure that you have used the suitable tool.
There are many inking tools including mechanical pencil, turnip pen, and G pen but all these tools create different looks.
The choice of the tool may depend on your preference of how you want your artwork to look.
02. Color an Artwork Using Colorize Tool
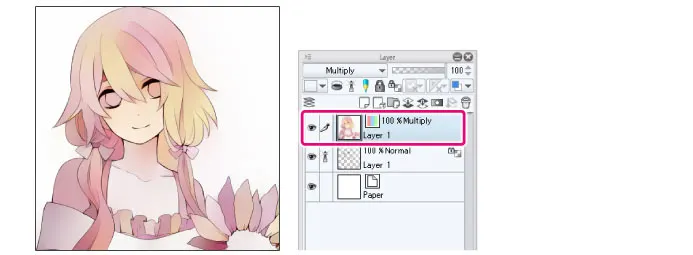
One of the most essential Clip Studio tips is using the Colorize tool to color an artwork.
To apply Colorize, first, you need to draw line art of your sketch on a layer.
You can use this layer as a reference layer as well.
Once the line art of your drawing is complete, create a new layer below the first layer (on which line art was created).
This new layer is used to add colors to a drawing, hence known as the color layer.
To use the Colorize tool, go to Edit, click Colorize, and then select the option ‘Use Hint Image and Colorize’.
This tool will add colors but still, you need to fix the Colorize result with the use of light and dark colors by making colors more stable or by adding some new layers.
What you have learned: Colorize tool is an important tool by which you can color your artwork and make it look more good and appealing.
But before applying the Colorize tool over your artwork, you must create a layer and draw a line art over it.
With just a few clicks, the Colorize tool will add colors on your drawing.
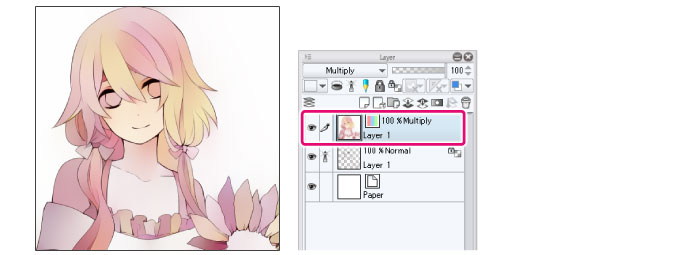
03. Value Check by Changing the Layer Color
Another important technique used in Clip Studio Paint is a value check by changing the color of a layer.
If you have drawn a shape that looks a bit flat instead of appearing 3D, you should check the values of a layer.
In other words, we can say that it is important to determine where the values have been pushed.
Value check is a simple trick; all you need to do is choose a layer that you want in white and black mode and change its color (under the layer property menu).
Instead of converting the whole layer to black and white, you can apply this tip to the whole image as well and makes it appear the way you want.
What you have learned: In Clip Studio Paint, to make a layer look flat, 2D or 3D, values are very important.
Because it is the values that can change the appearance of the shapes or objects on your drawings.
Hence, value check is an important technique that should never be overlooked while creating digital artwork on Clip Studio Paint.
04. Using Multiple Layers to Move a Single Frame
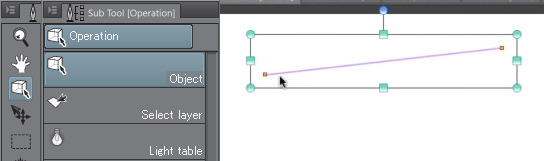
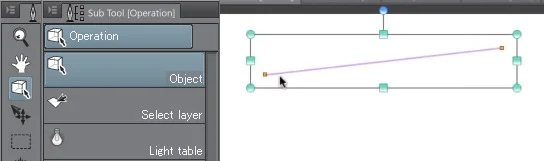
Using multiple layers to move a single frame is an animation technique on Clip Studio Paint that is widely used by artists all over the world.
If you have created a basic version of your drawing but you feel like the location is off on a frame, it is time to use multiple layers.
Yes, it is right! You can use multiple layers to move a single frame.
To move layers, always use the Operation tool.
By default, the Operation tool is set to the Object mode by which you can work on only the selected layers. It is better to set it on the Select Layer.
By choosing the Select layer option, you can move only those layers that are selected in the box. In other words, you can lock the layers that you do not need.
What you have learned: If you want to make necessary adjustments on a layer, you can use the Operation tool. It can move a single frame using multiple layers, hence helping in animation.
05. Using Screen Color as a Drawing Color
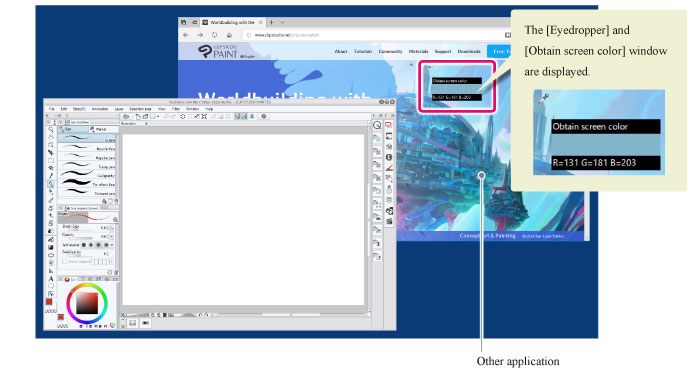
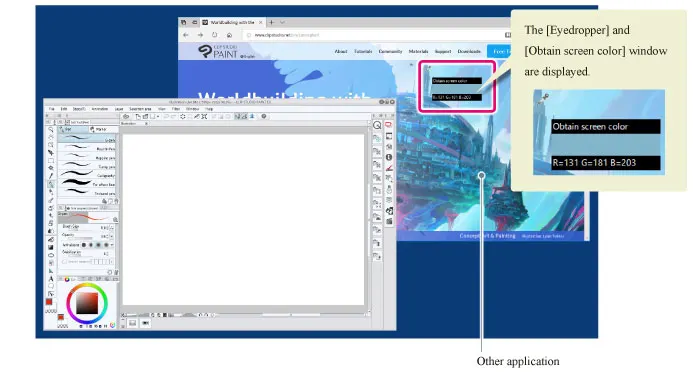
One of the best Clip Studio tips in our list is to use an option of obtaining screen colors.
It is another amazing tool that you can use in Clip Studio Paint; all you need to do is pick up any color from the screen and use it in your artwork as a drawing color.
In other words, with the help of Obtain screen colors, you can register any color on the screen.
You can use it if you are creating artwork in Clip Studio but want to use the colors of an image in another application.
It means that you are still in Clip Studio but you can use the color of an image opened in another app.
What you have learned: Obtain Screen color is a great tool in CSP and is good to use especially if you like a color that is not in CSP or you are having a multi-monitor setup.
06. Using Symmetrical Ruler

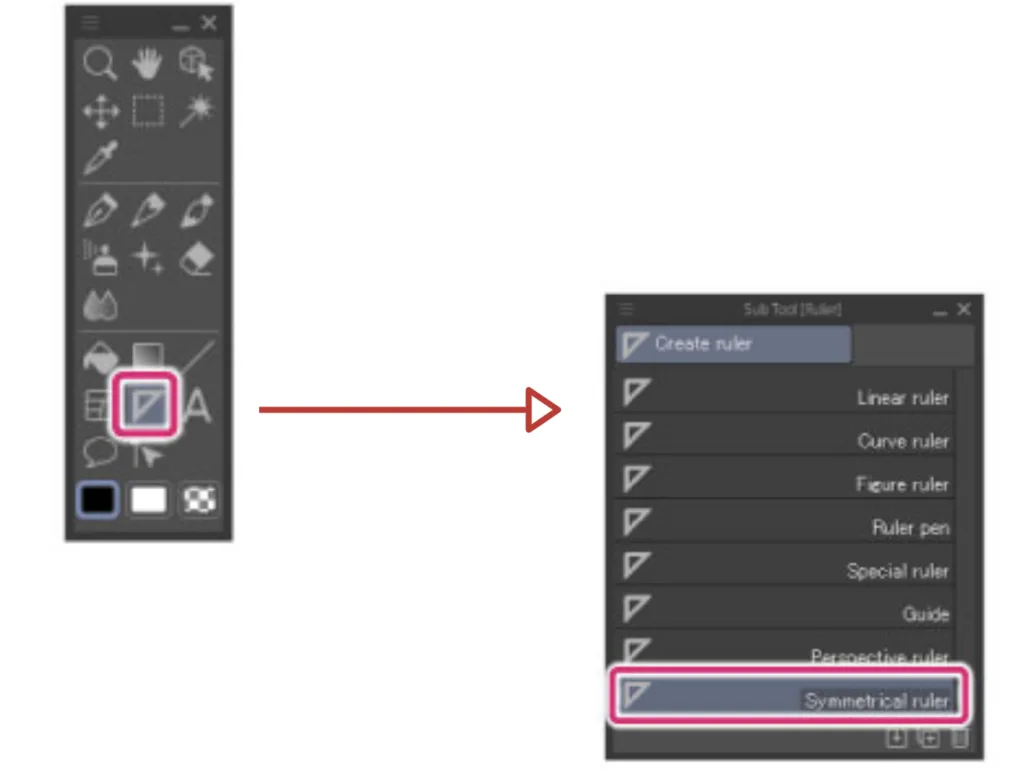
If you want to draw something using Clip Studio Paint but do not have any clue what to draw, you can use the symmetrical ruler.
First, you need to choose the layer on which you want the ruler to be created.
Once the ruler is selected from the Tool palette, it is time to configure its number of lines.
In short, by using the symmetry ruler, you can play around with different angles, shapes, lines, etc.
What you have learned: If you just want to have fun while creating a digital artwork on Clip Studio Paint, you can use a symmetrical ruler.
07. Always Adjust Brush Properties before Creating Strokes
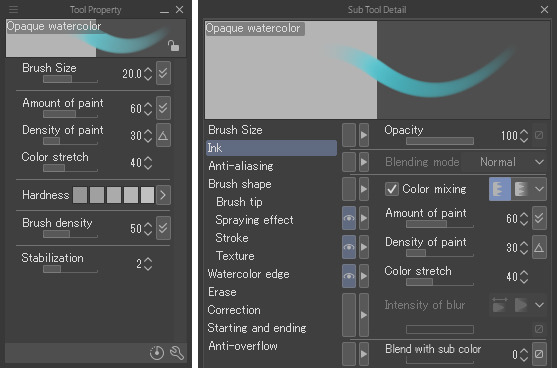
So, here comes another technique among the best Clip Studio tips and it is to adjust brush properties.
Yeah, you heard it right!
To get a smooth quality of a line or to improve the overall performance of your artwork, it is always useful to adjust the brush properties.
Check out the following link to get some amazing Clip Studio brushes.
What you have learned: Brush settings are very important if you want to customize your artwork according to your choice.
Conclusion
So, here I have shared some of the best Clip Studio tips that I use while creating digital artwork.
Clip Studio Paint is one of the most famous art applications that is specially designed for people who love to draw and paint.
With tons of customizable brushes and tools, you can create amazing artwork whether it is concept art and painting, animation, comics, manga, or illustration for design.
To follow all these techniques, you need to use the best tools that work for you as well as a process that fits into your workflow.
No matter you have just started creating art using Clip Studio Paint or you are an expert in using the software, all the above-mentioned Clip Studio tips will surely help you to get the best out of the Clip Studio software. Happy Drawing!