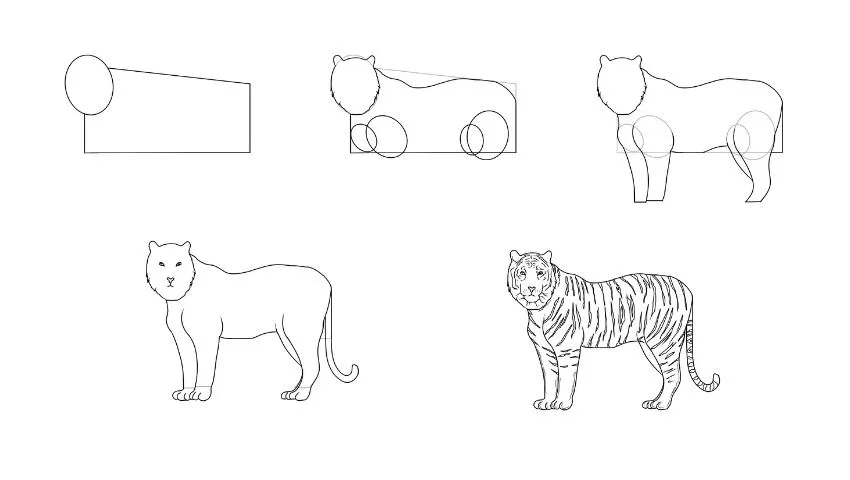
Do you want to learn how to draw a realistic tiger? Did you know if you have the right step by step images, it’s easy to draw a tiger?
By using some basic shapes, you can illustrate a tiger in a matter of minutes!
In only 5 steps, you will have an awesome realistic drawing of a tiger.
Let’s get started!
Drawing Supplies Needed
You can use any drawing supplies to draw a tiger, but here are the best tools for drawing.
Step 1

First, make a circle and a square shape for the head and body.
Step 2

Remove some line art, then fix the body shape to make it more proportional and make 4 circles to form the legs.
Step 3

Remove some line art, then shape the 4 legs.
Step 4

Remove the distracting lines, add the tiger’s fingers, tail and face.
Step 5

Finish by adding a stripe on each side of the skin.
Drawing a tiger may seem difficult, but with these step-by-steps, you’ll be able to be more confident and draw these powerful felines easily.
Other related topics to help you draw:
- Draw a Cat in a Box in Quick and Easy Steps
- How to Draw Dogs – Easy Step by Step Tutorial for Cute Dogs
- Draw a Realistic Dinosaur (5 Step by Step Pictures)
- How to Draw a Dragon (Step by Step with Pictures)

How to Draw a Tiger

Step-by-step instructions on how to draw a tiger.
Materials
- Pencil
- Paper
- Or tablet and stylus
Tools
- Pencil
- Paper
- Or tablet and stylus
Instructions
- Step 1
First, make a circle and a square shape for the head and body.
- Step 2
Remove some line art, then fix the body shape to make it more proportional and make 4 circles to form the legs.
- Step 3
Remove some line art, then shape the 4 legs.
- Step 4
Remove the distracting lines, add the tiger's fingers, tail and face.
- Step 5
Finish by adding a stripe on each side of the skin.

