

Are you interested in drawing a bird?
Drawing a small bird can be in less than 20 minutes.
Yes! You can be a pro at knowing how to draw a small bird in no time!
Best part is that after you follow these step by step instructions, you’ll be able to use this knowledge to draw any type of bird.
Let’s get started!
Drawing Supplies Needed
There are certain supplies that are best for drawing.
Click here to get the best tools for drawing, but also feel free to use anything that you have laying around to do this step by step process.
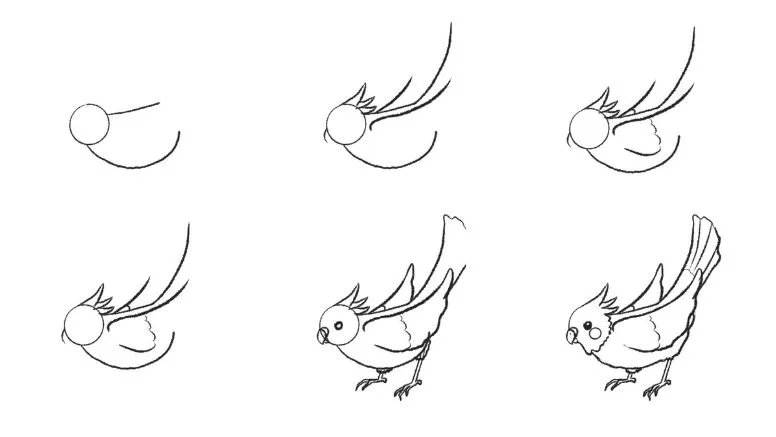
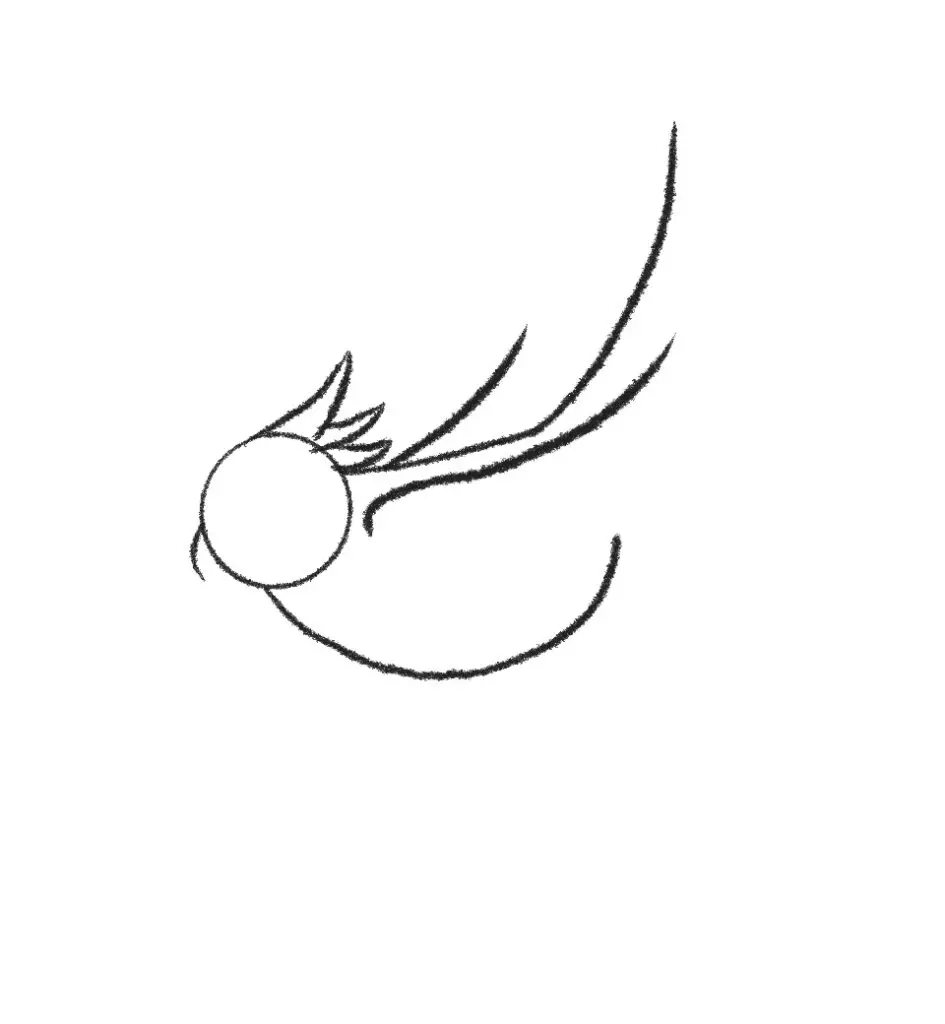
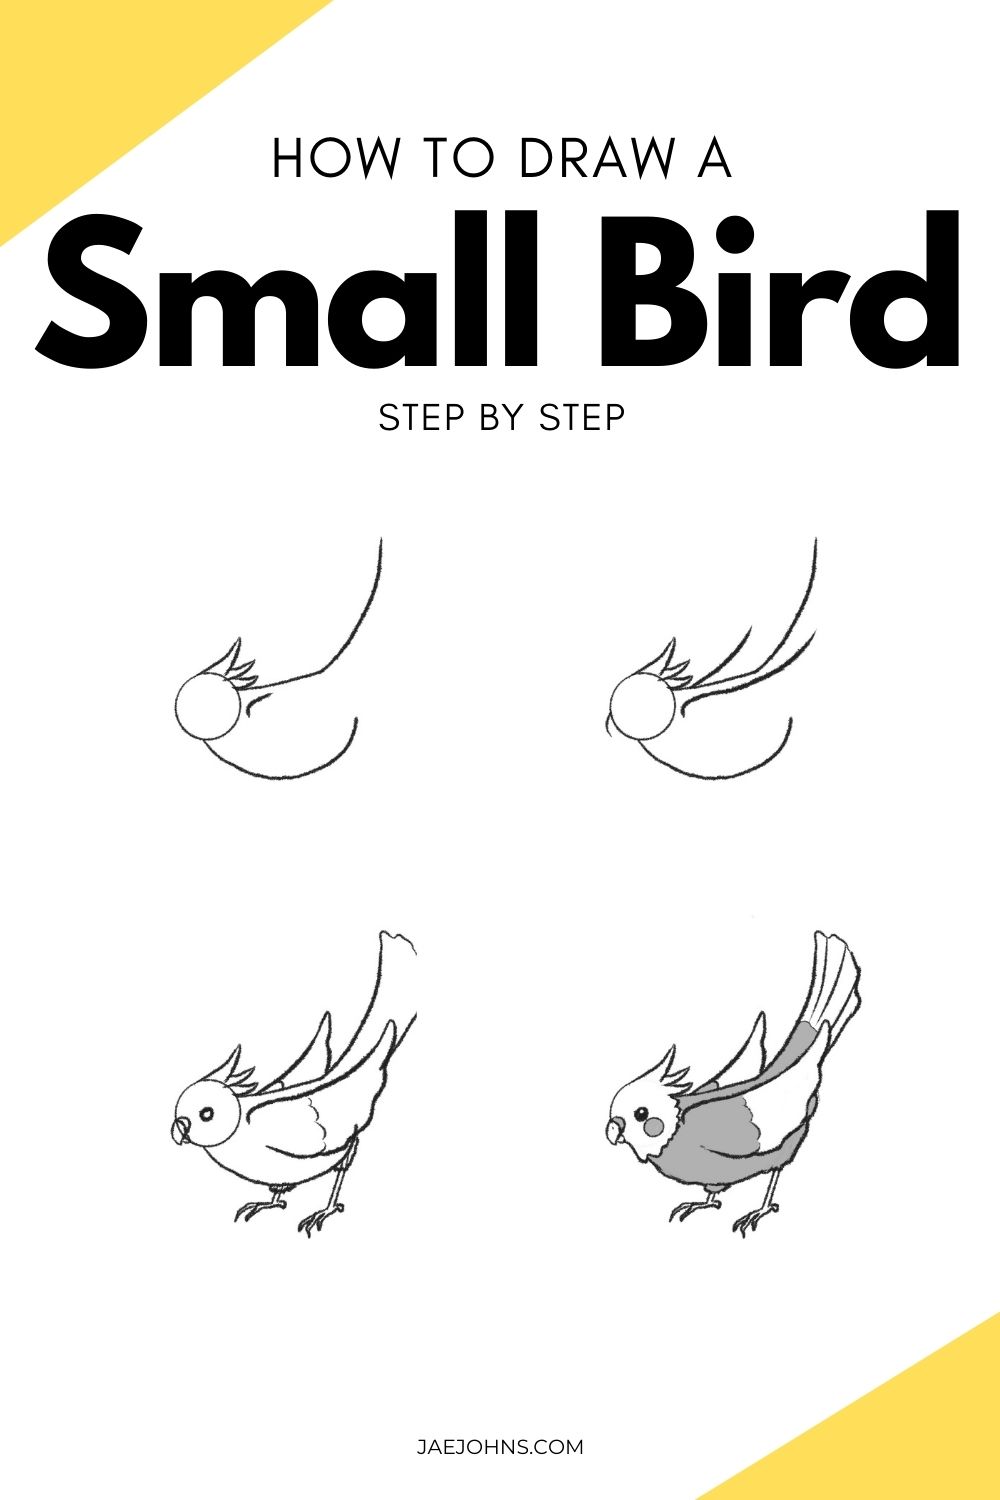
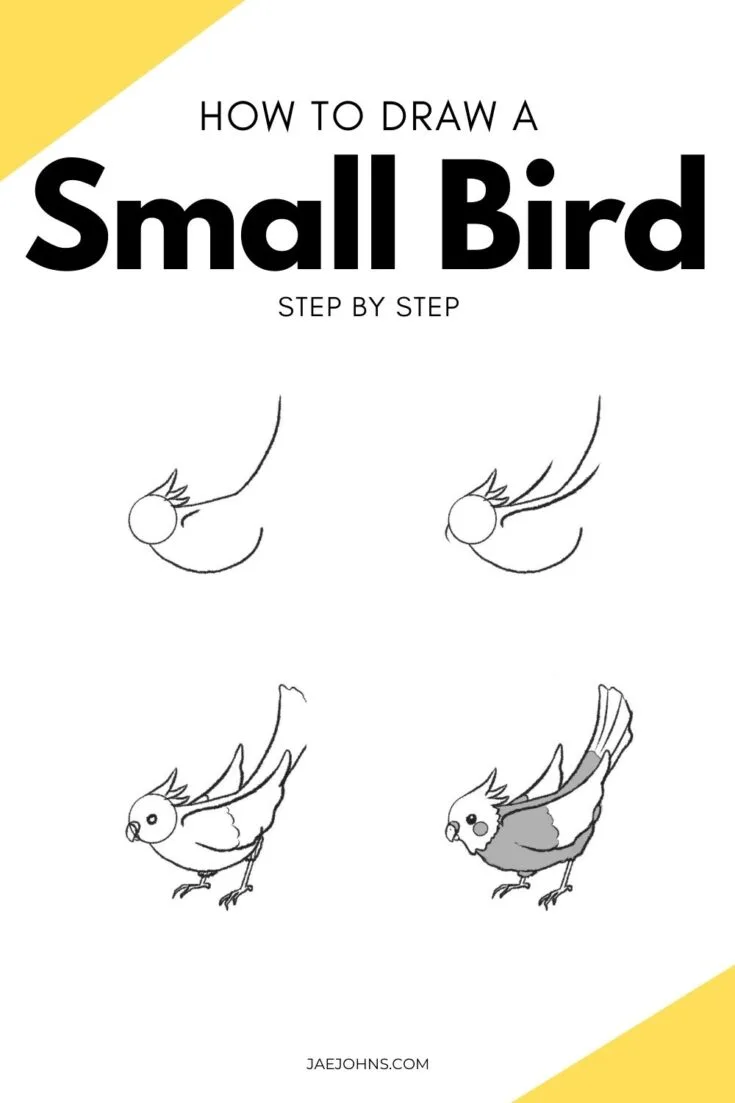
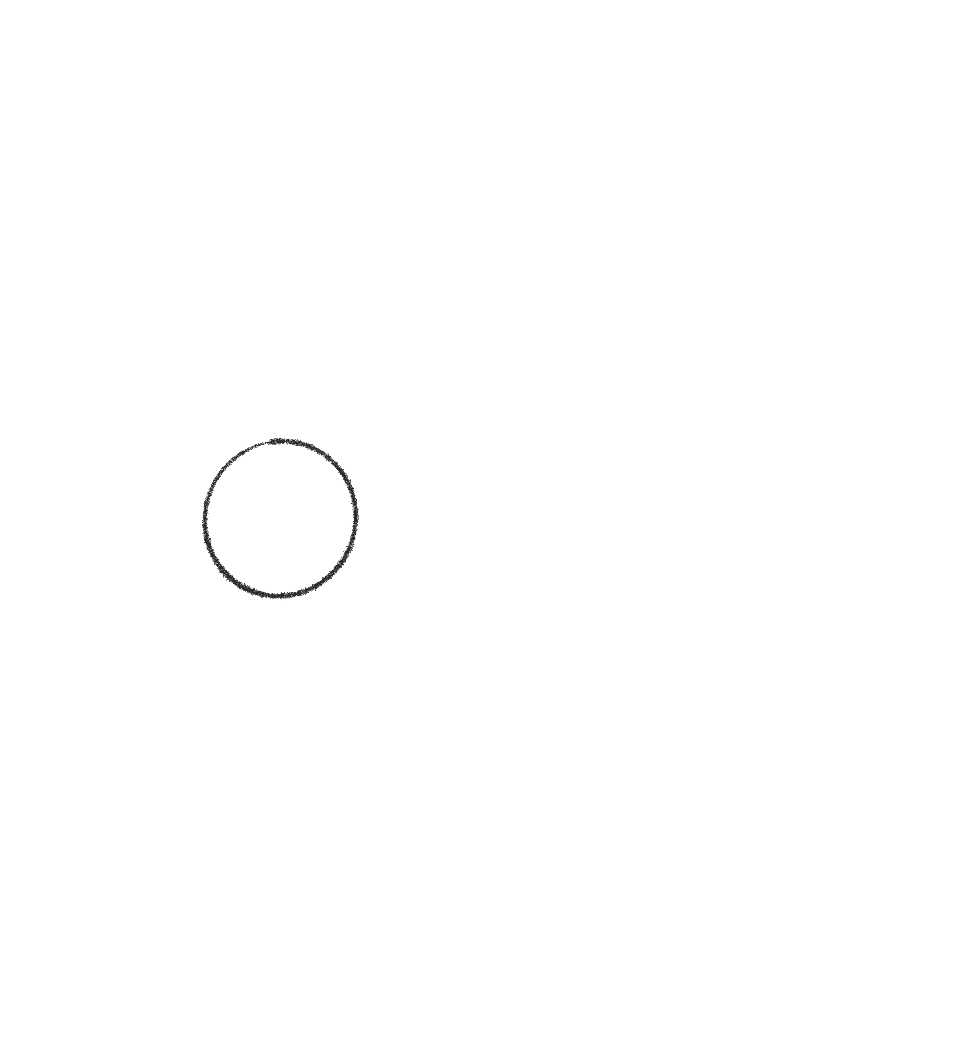
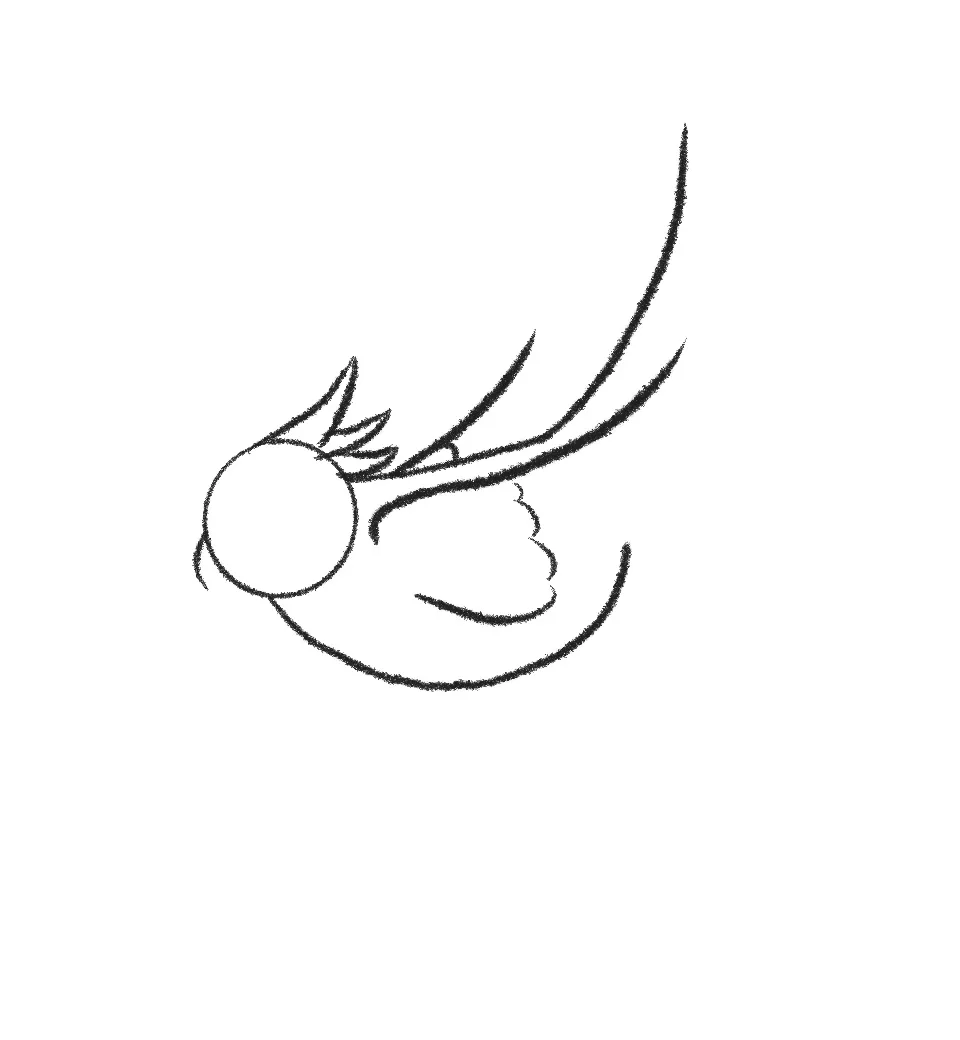
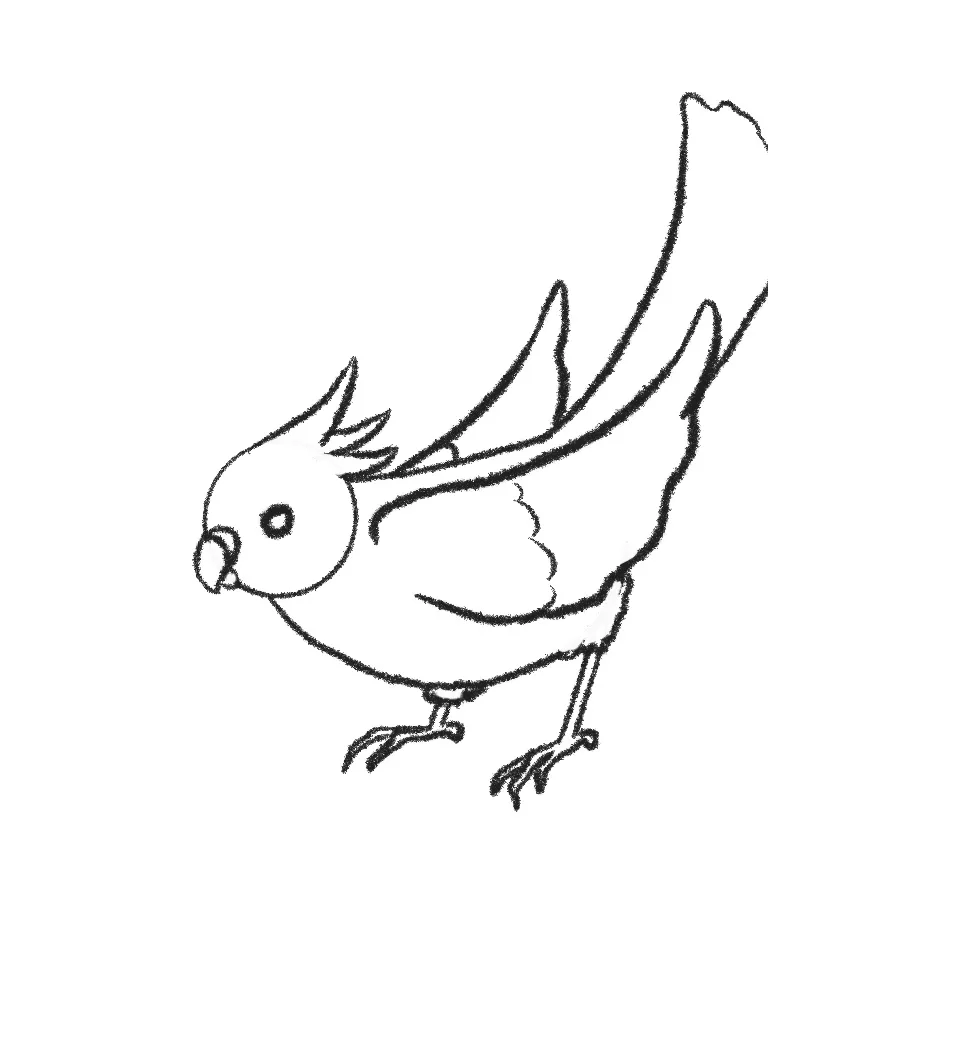
Step 1: Draw a circle for the small bird’s head

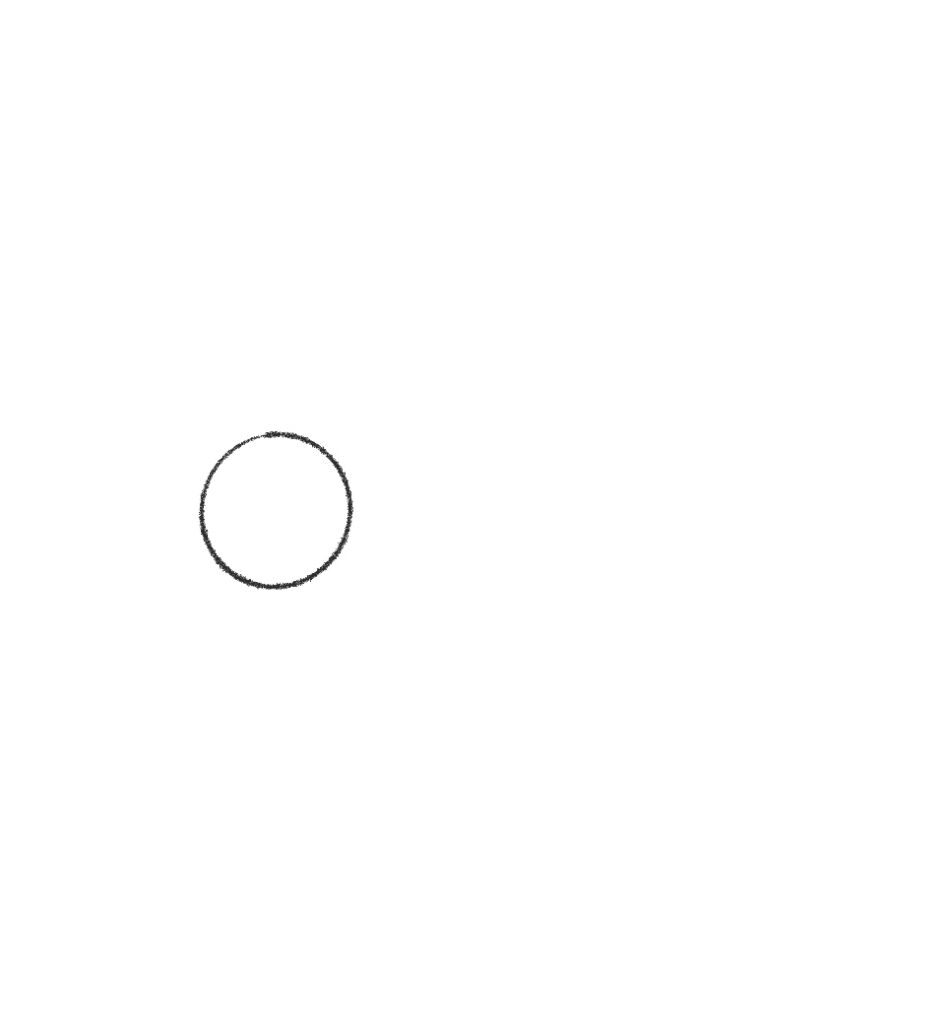
Start with a circle, but not in the middle of the page.
Leave some room to the right!
Step 2: Draw a bowl-shape for the body of the small bird


Now starting from the bottom of the circle make a bowl shape, and on the top a straight line.
Don’t join those just yet!
Step 3: Draw curved lines from the bird’s head and body
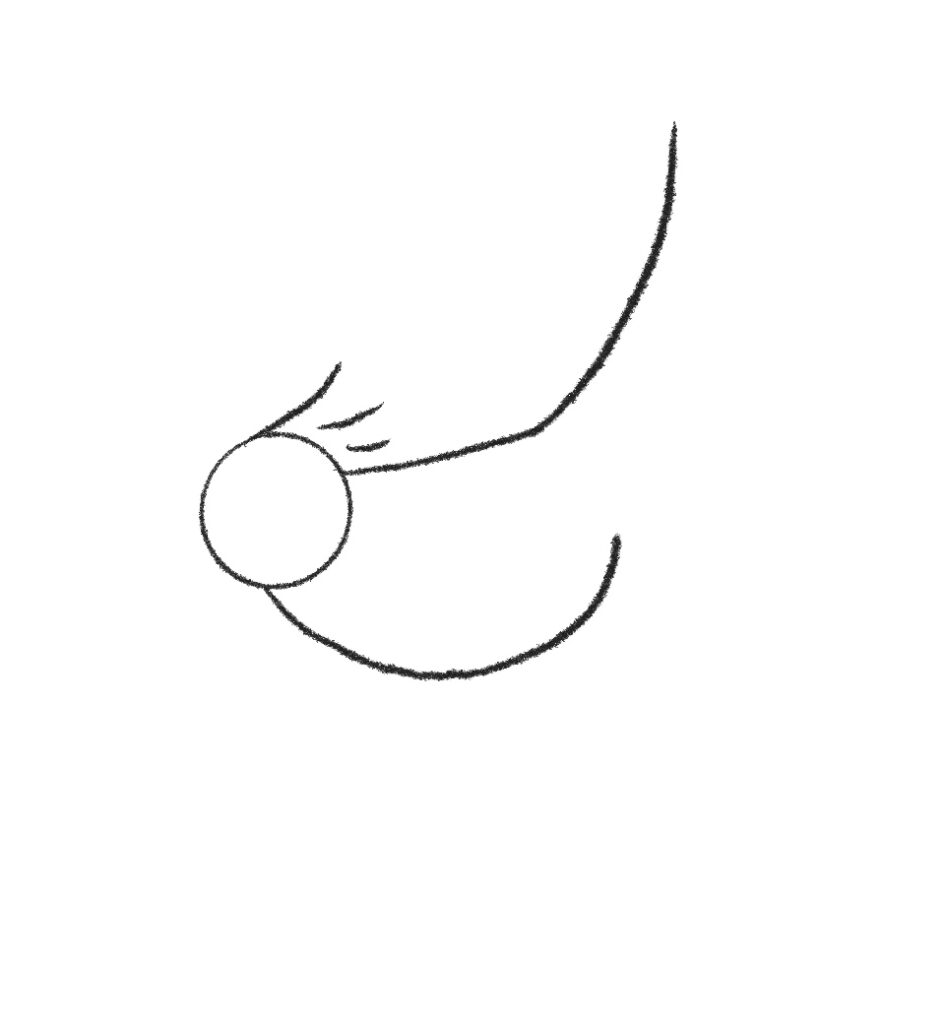

From the end of the straight line we’re going to make a curved line upwards towards the top of the page, and at the back of the circle put 3 slightly curved lines each one smaller than the last.
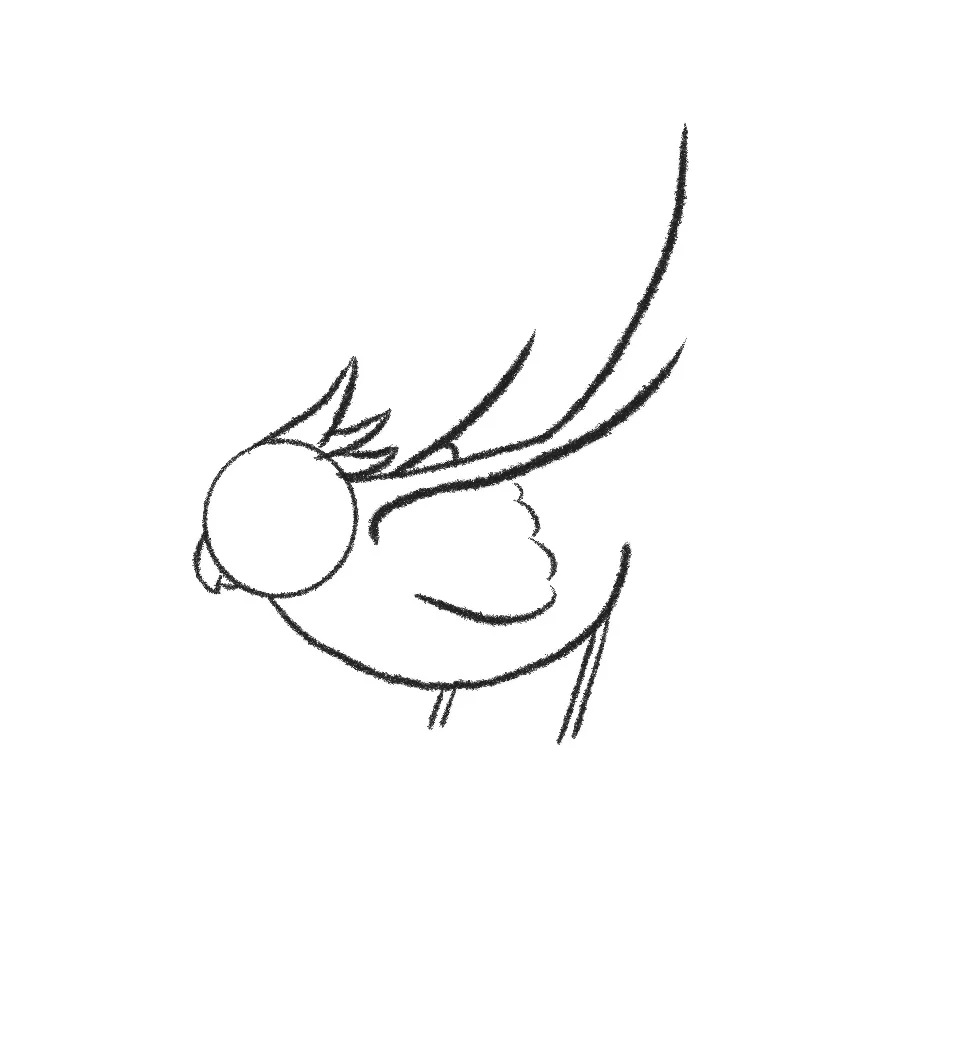
Step 4: Change lines into triangles
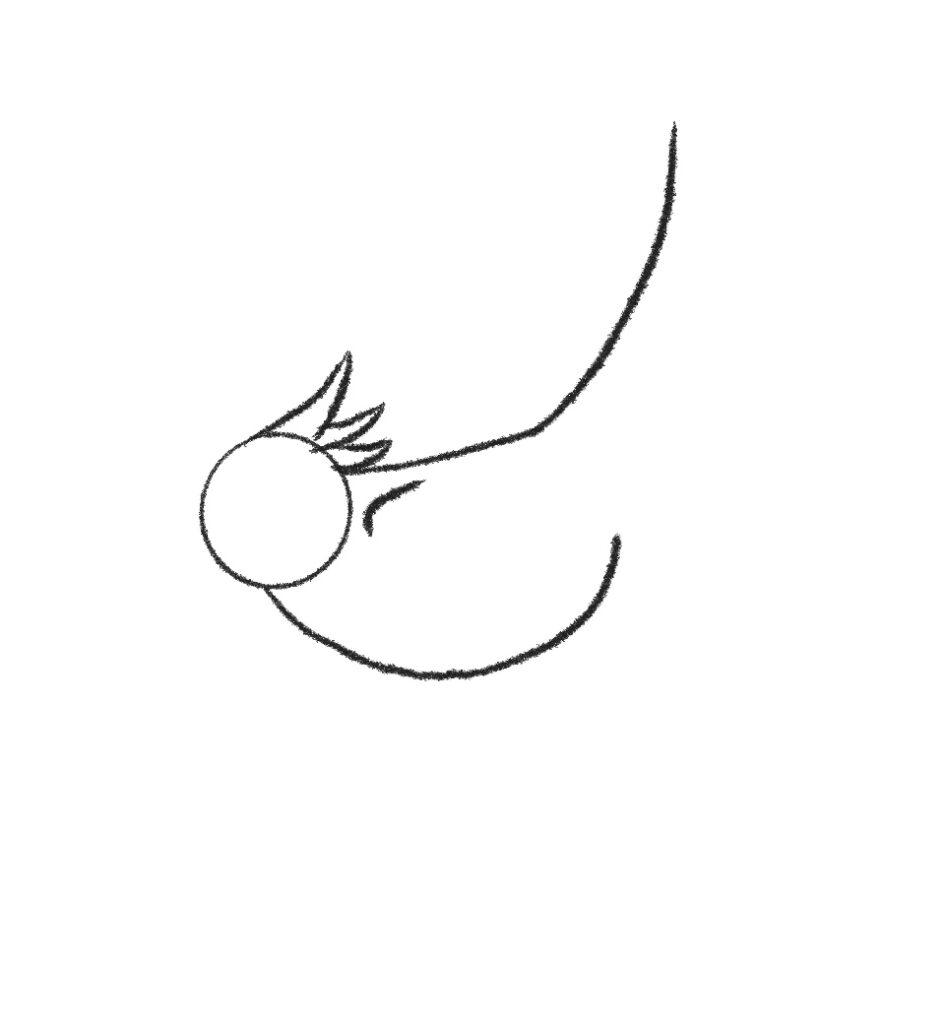

With those three lines at the back of the circle, we’re going to make 3 thin triangles.
Right below those triangles, inside the shape of the “spoon” (for the body) make a small curved line – this will be the shoulder joint.
Step 5: Add line for bird’s shoulder and start the bird’s beak


Right above where we put that shoulder joint we’re going to make a smaller curved line going towards the end of the “spoon shape”.
Then before moving on, at the front of the circle make a downward curving line, but don’t make it too long!
Step 6: Start drawing bird wings

Time to make those wings!
The extent that shoulder joint line we made in a slightly curved-upwards stroke.
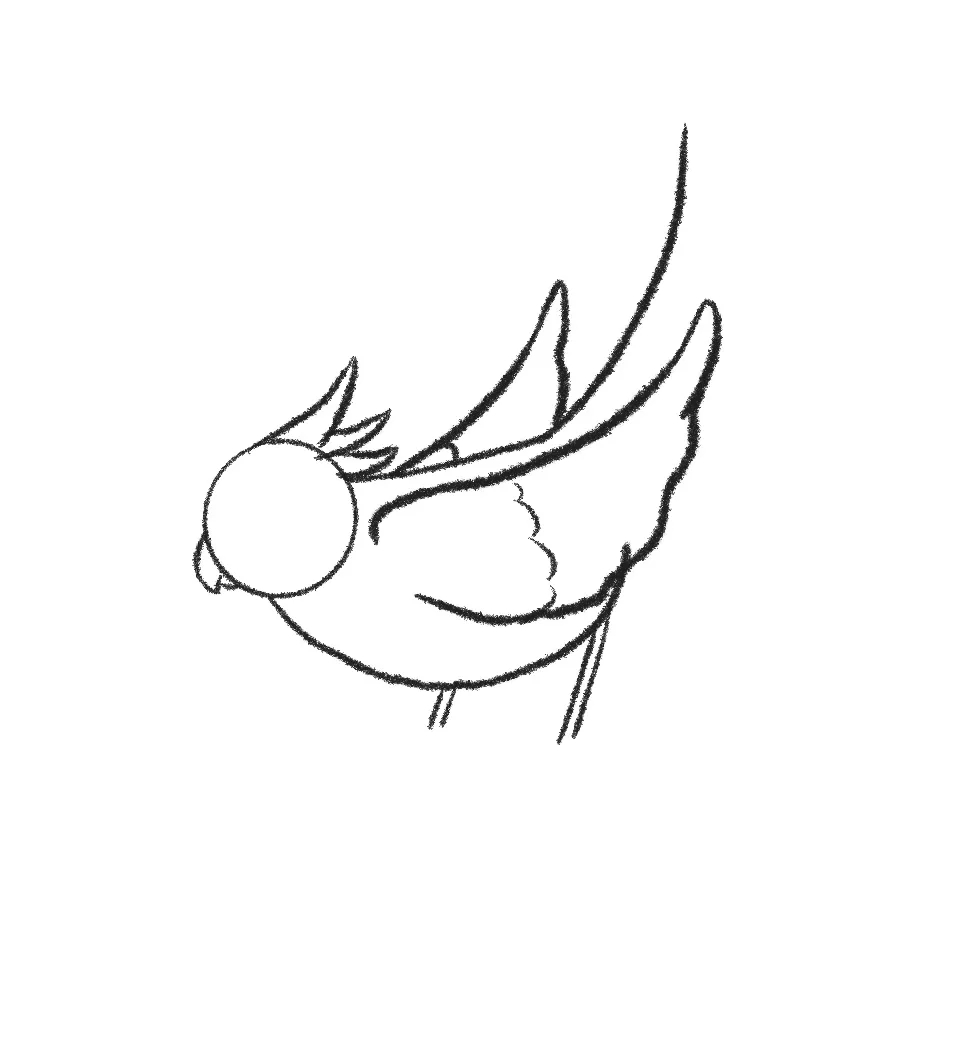
Step 7: Draw the top wing
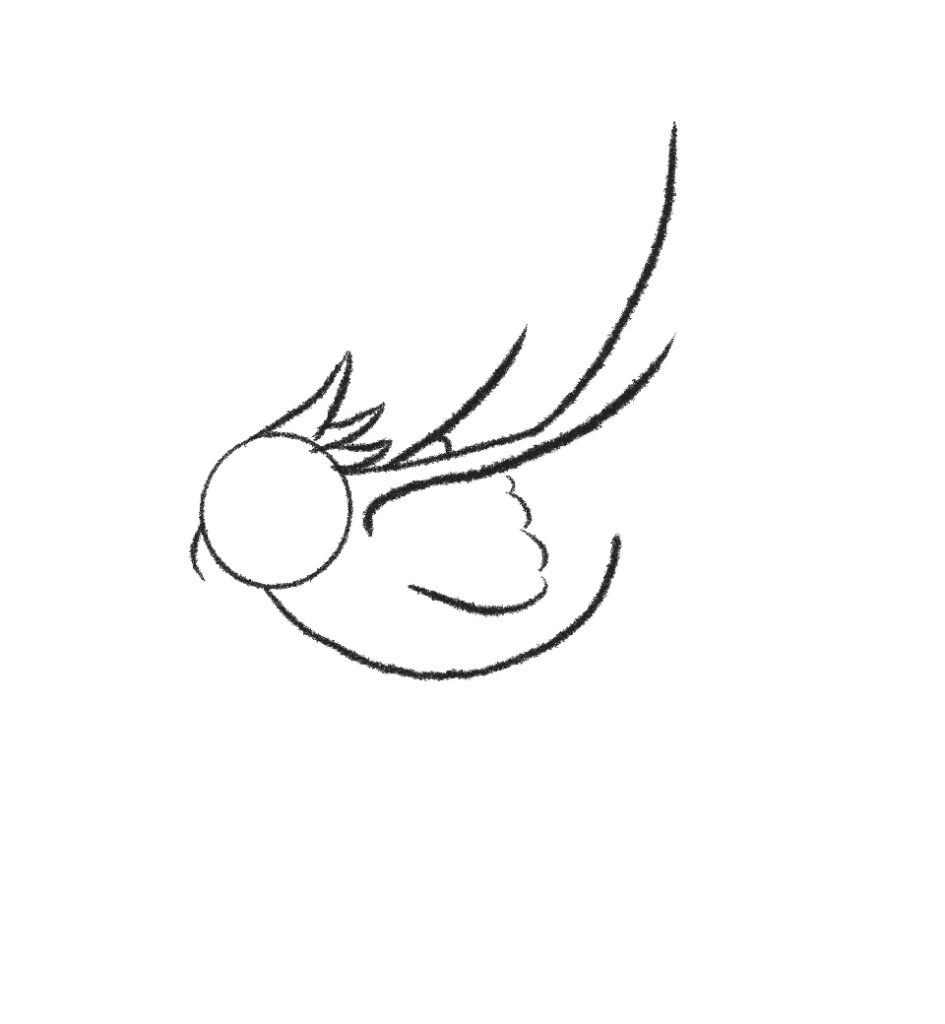

Leave some space below the shoulder joint before making the other curved line , which you will then continue in a cloud-like motion towards the thicker wing line.
This is the top of the wing! In the small space between the other wing line and the body, make whatever amount of cloud shapes you can there (Note that I only placed one).
Step 8: Start to add legs for our small bird


Now we’re going to mark out where the legs are before finishing the wings.
A little before the end of the bottom body line, create a forward slash and then give it a twin a little bit offset from it.
Repeat this, but with a shorter line, right below the top of the wing on the outside of the body.
Before moving on, carve out your beak shape by closing off that downward stroke from earlier, and adding a small bottom beak. It shouldn’t need a large stroke, just a bit to close off the jaw.
Use a reference if you need to see the shape!
Step 9: Close off the wings
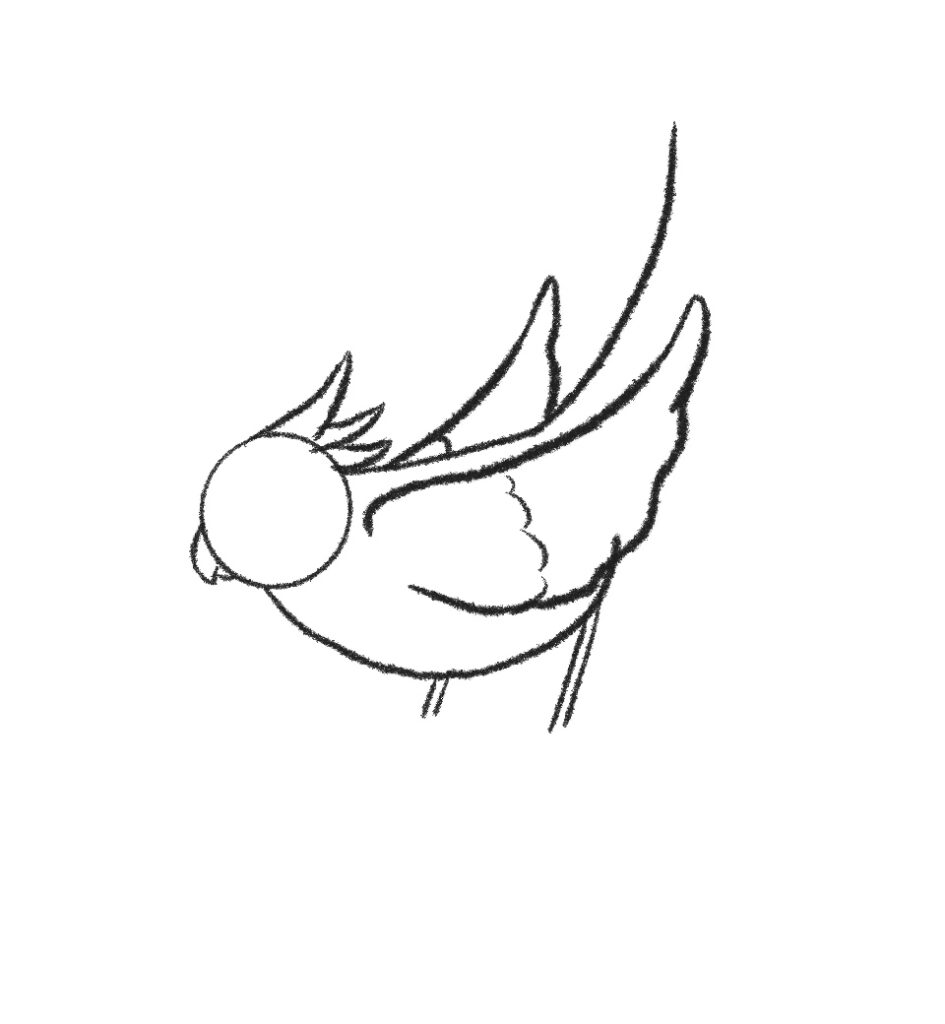

Time to close off those wings!
Using a much more elongated cloud shape (no sharp edges here) combine those two lines with the final feather being the longest one.
Mimic this on the other side.
You want the wing to get longer as it gets closer to the back of the body.
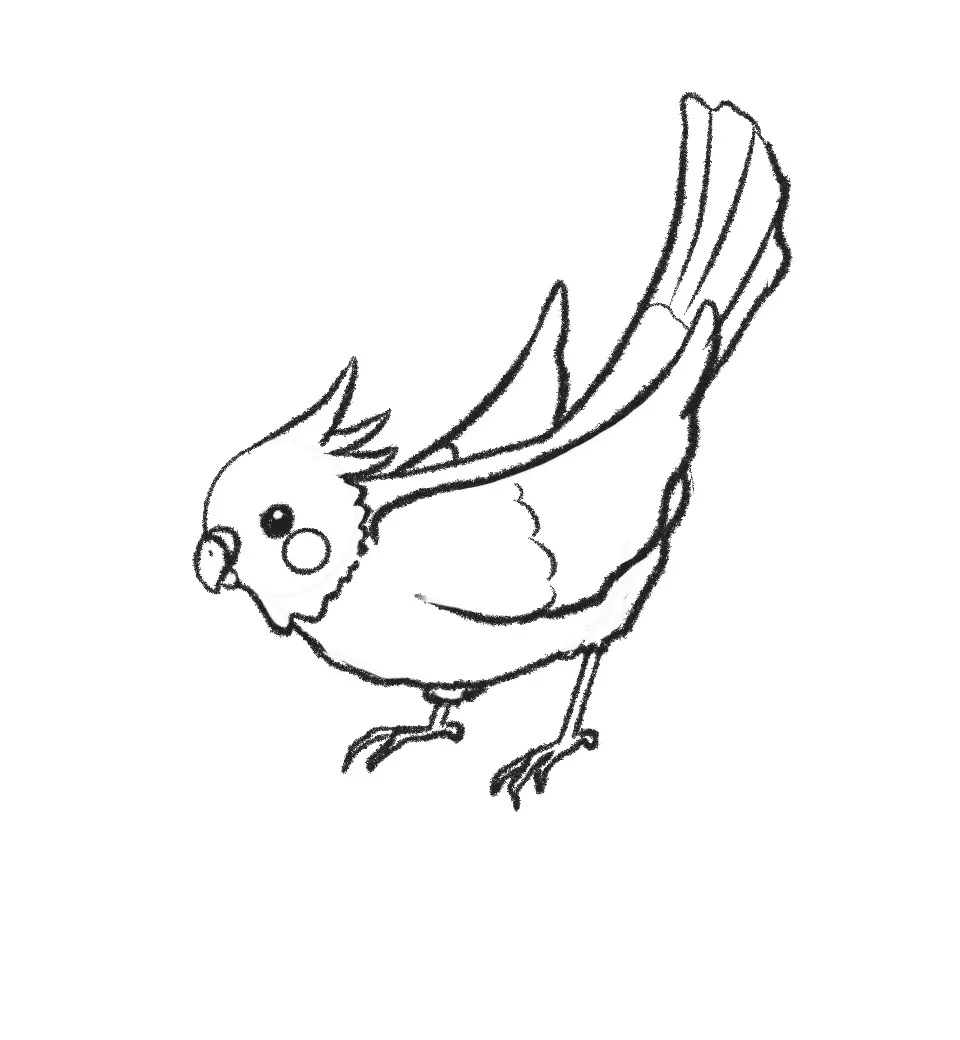
Step 10: Complete the beak of the bird

Here is where things get a little messy, but bear with it! We’re going to start at the beak.
Taking the top beak inside the circle just a little, meet the shape together with a rounded line.
Behind that create a crescent moon shape, this is what is known as the ‘ceres’ on a bird!
Now moving down the body, add some feather puffs at the top of the legs where it meets the body.
For the tail begin to use those cloud strokes to close the two lines together starting from the top and moving closer to the body as you make your way towards the other line.
Step 11: Finish drawing the legs


A little behind the ceres we made at the beak make a circle for the eye and then finish the legs with the feet.
The feet are 3 pronged in the front with the middle prong being the longest, and there is a back prong.
Due to the angle we’re making our birds’ back leg just a nub.
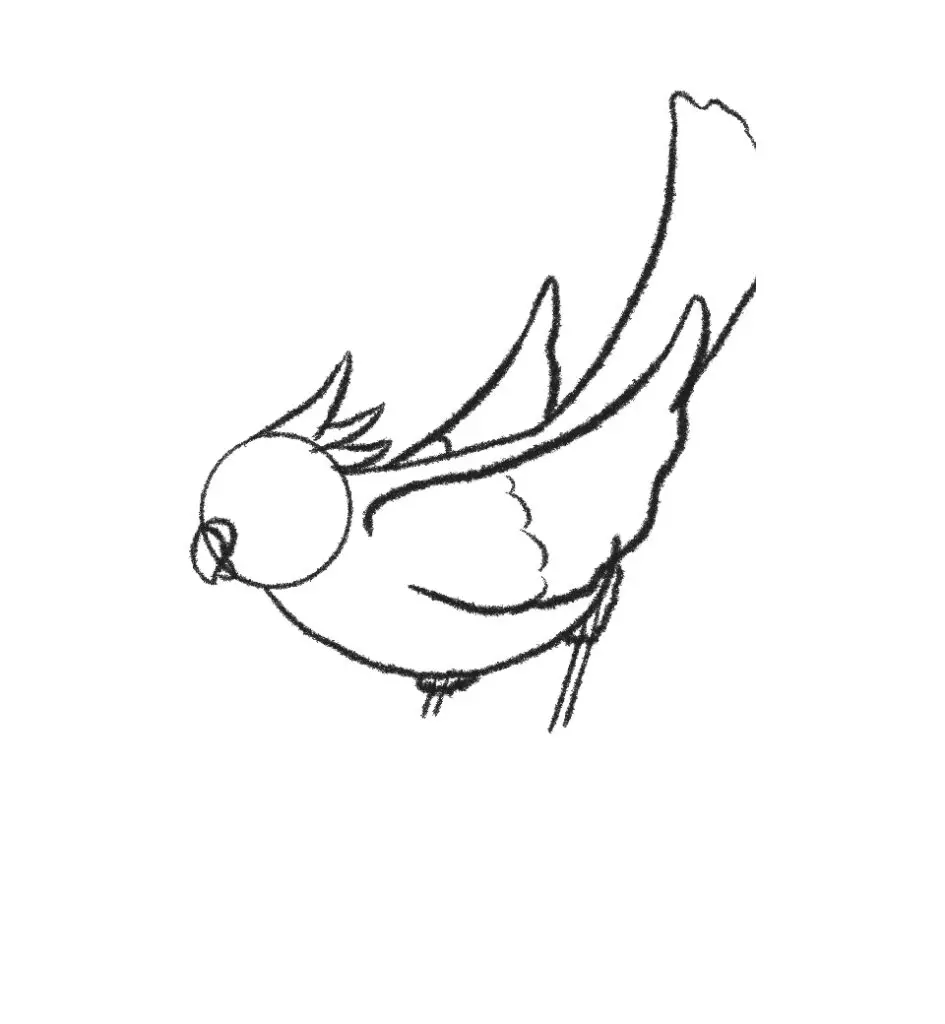
Step 12: Erase overlapping lines


Erase the overlapping lines!
Step 13: Add details around the neck
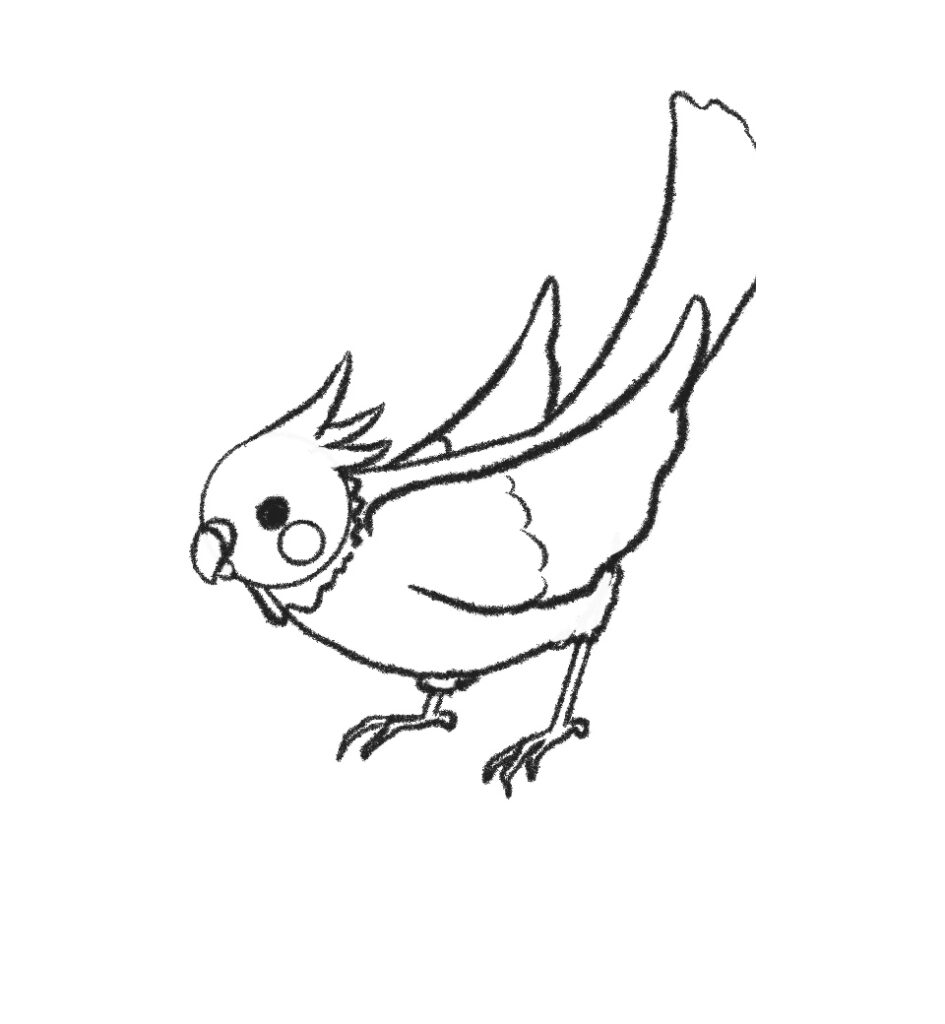

At the bottom of the circle, we’re going to extend the chin a bit downwards, not too much though, before using that same cloud shape to come around the neck.
Then, fill in the eye!
Step 14: Draw details for the bird’s tail


At the base of the tail, we’re going to add some lines in the dips of the cloud-shaped line.
Not all the way down but to about the longest wing line on the wing closest to us.
Then we’ll use a lighter stroke to mark those off from the rest of the tail.
Going back to the face and head, erase the rest of the circle before adding a highlight to the eye and a little nostril to the beak!
Finally, for this step, fine-tune the body so it looks a bit more organic.
Birds have a lot of feathers so their body isn’t just one solid perfect shape!
Step 15: Add color
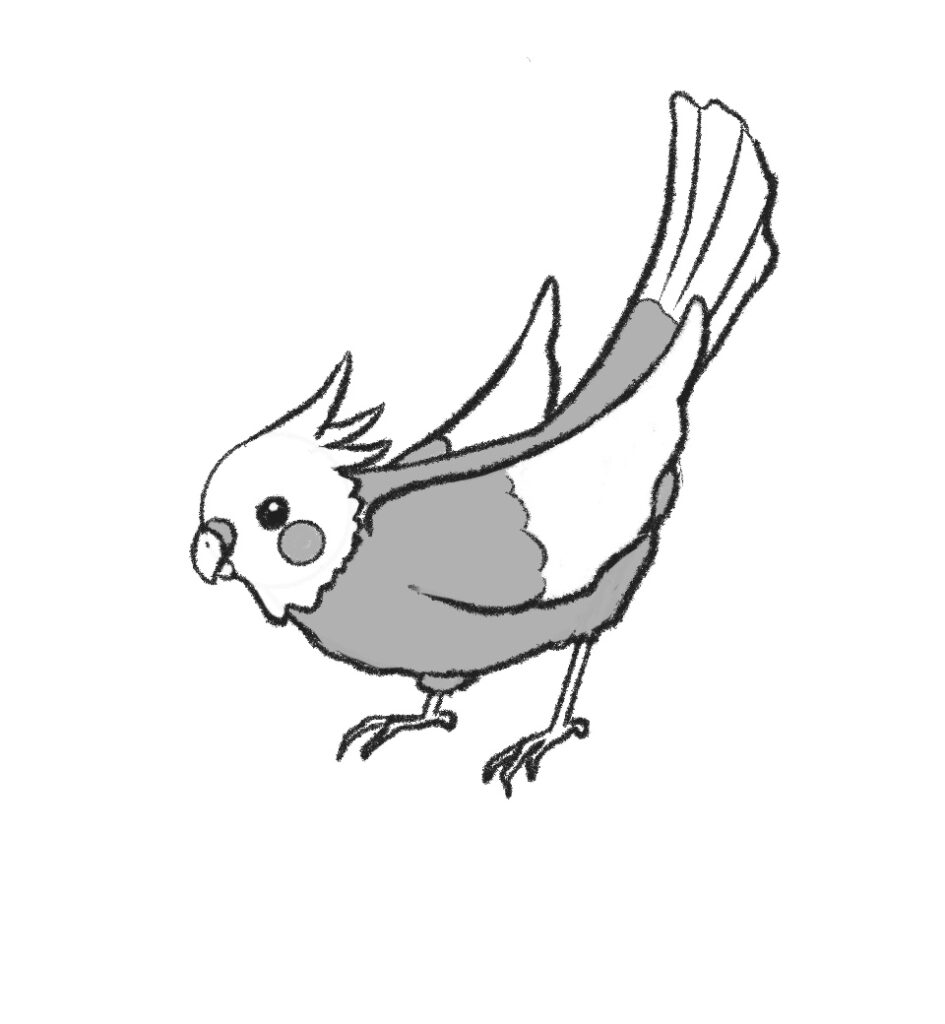

Color in the spots as outlined in the illustration and there you go! A bird!
This is a step-by-step process of drawing a small bird.
There are quite a bit of steps, but this drawing process is easy and simple to get a bird that is cute.
I’d like to thank Carolyn for sharing her process. Be sure to check out her social @ClazDesign if you enjoyed her illustrations. She also has some amazing prints and illustrations available in her shop.
Other step by step tutorials to help you draw:
- How to Draw a Realistic Cactus (5 Easy Steps)
- How to Draw an Eagle (Step by Step with Pictures)
- 8 Tips to Create Simple Flower Drawings (For Beginners)
- How to Draw a Frog (Step by Step with Pictures)
- How to Draw Realistic Trees Like a Pro

How to Draw a Small Bird

Step-by-step instructions on how to draw a small bird.
Materials
- Pencil
- Paper
- Or tablet and stylus
Tools
- Pencil
- Paper
- Or tablet and stylus
Instructions
- Step 1: Draw a circle for the small bird’s head
Start with a circle, but not in the middle of the page. Leave some room to the right!
- Step 2: Draw a bowl shape for the body of the small bird
Now starting from the bottom of the circle make a bowl shape, and on the top a straight line. Don't join those just yet!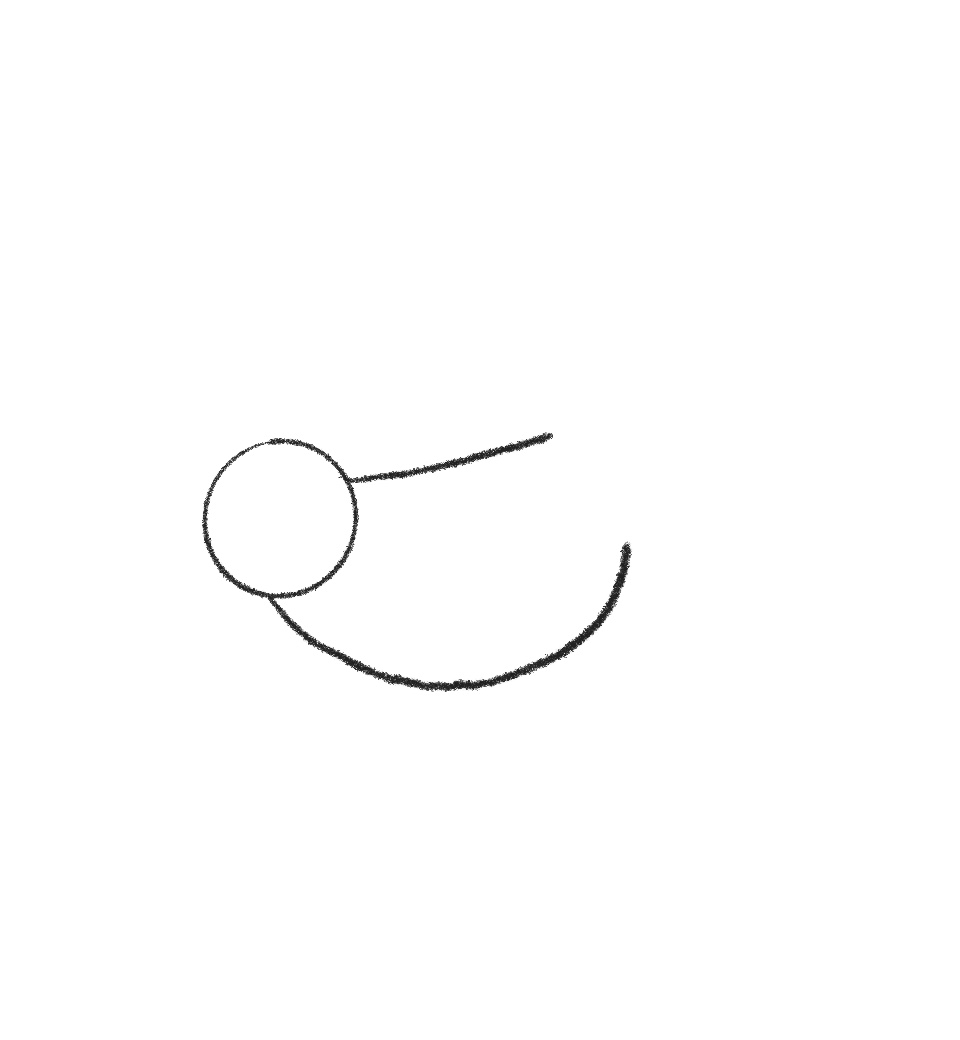

- Step 3: Draw curved lines from the bird’s head and body
From the end of the straight line we're going to make a curved line upwards towards the top of the page, and at the back of the circle put 3 slightly curved lines each one smaller than the last.
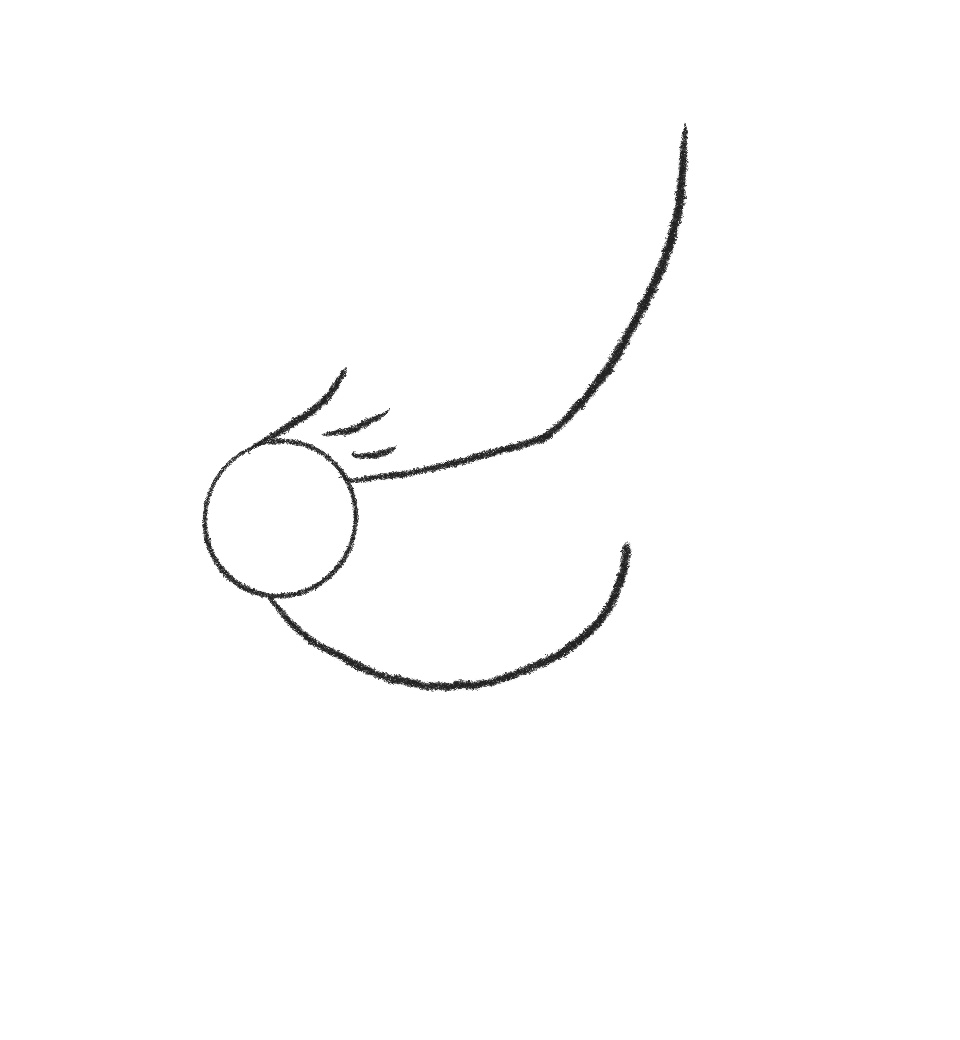
- Step 4: Change lines into triangles
With those three lines at the back of the circle, we're going to make 3 thin triangles. Right below those triangles, inside the shape of the "spoon" (for the body) make a small curved line - this will be the shoulder joint.

- Step 5: Add a line for the bird’s shoulder and start the bird’s beak
Right above where we put that shoulder joint we're going to make a smaller curved line going towards the long-on at the end of the "spoon shape". Then before moving on, at the front of the circle make a downward curving line, but don't make it too long!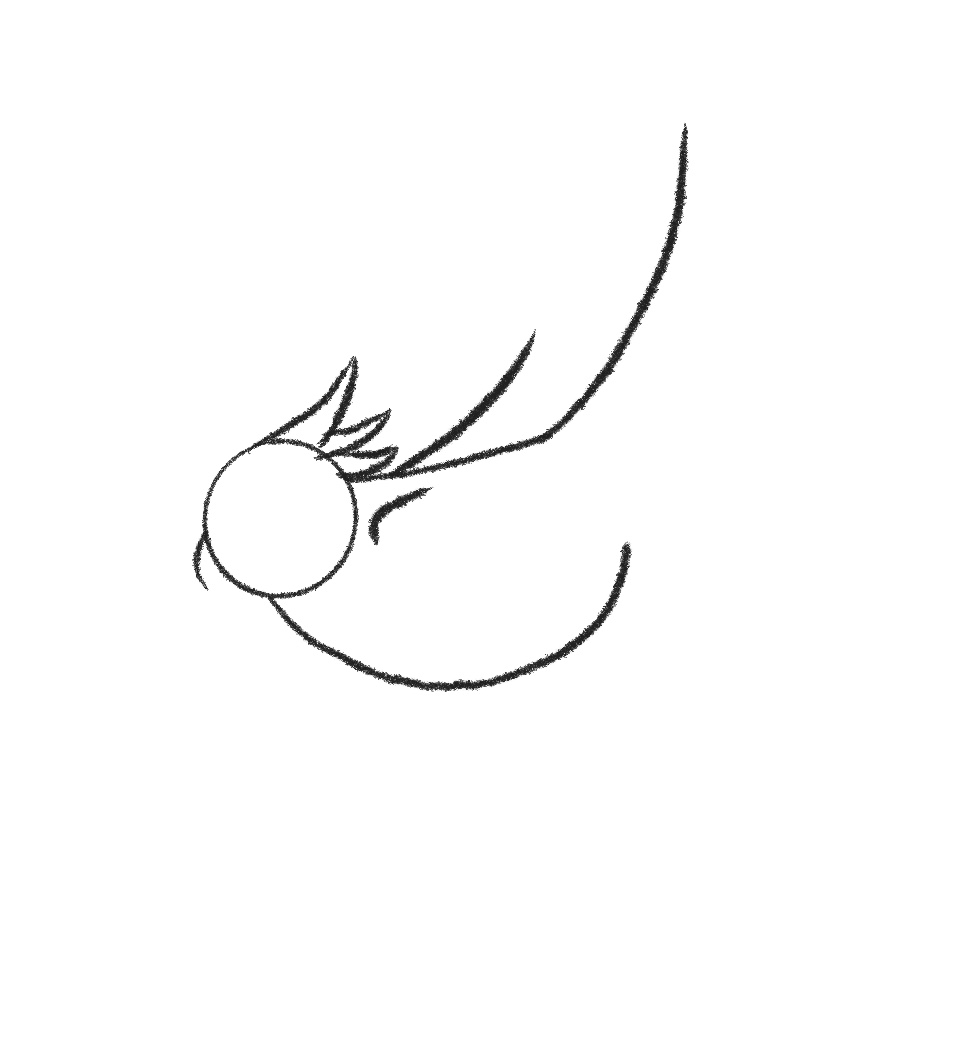

- Step 6: Start drawing bird wings
Time to make those wings! The extent that shoulder joint line we made in a slightly curved-upwards stroke.

- Step 7: Draw the top wing
Leave some space below the shoulder joint before making the other curved line, which you will then continue in a cloud-like motion towards the thicker wing line. This is the top of the wing! In the small space between the other wing line and the body, make whatever amount of cloud shapes you can there (Note that I only placed one)
- Step 8: Start to add legs for our small bird
Now we're going to mark out where the legs are before finishing the wings. A little before the end of the bottom body line, create a forward slash and then give it a twin a little bit offset from it. Repeat this, but with a shorter line, right below the top of the wing on the outside of the body.
Before moving on, carve out your beak shape by closing off that downward stroke from earlier, and adding a small bottom beak. It shouldn't need a large stroke, just a bit to close off the jaw. Use a reference if you need to see the shape!
- Step 9: Close off the wings
Time to close off those wings! Using a much more elongated cloud shape (no sharp edges here) combine those two lines with the final feather being the longest one. Mimic this on the other side. You want the wing to get longer as it gets closer to the back of the body.
- Step 10: Complete the beak of the bird
Here is where things get a little messy, but bear with it! We're going to start at the beak. Taking the top beak inside the circle just a little, meet the shape together with a rounded line. Behind that create a crescent moon shape, this is what is known as the 'ceres' on a bird!
Now moving down the body, add some feather puffs at the top of the legs where it meets the body.
For the tail begin to use those cloud strokes to close the two lines together starting from the top and moving closer to the body as you make your way towards the other line.

- Step 11: Finish drawing the legs
A little behind the ceres we made at the beak make a circle for the eye and then finish the legs with the feet. The feet are 3 pronged in the front with the middle prong being the longest, and there is a back prong. Due to the angle, we're making our birds' back leg just a nub.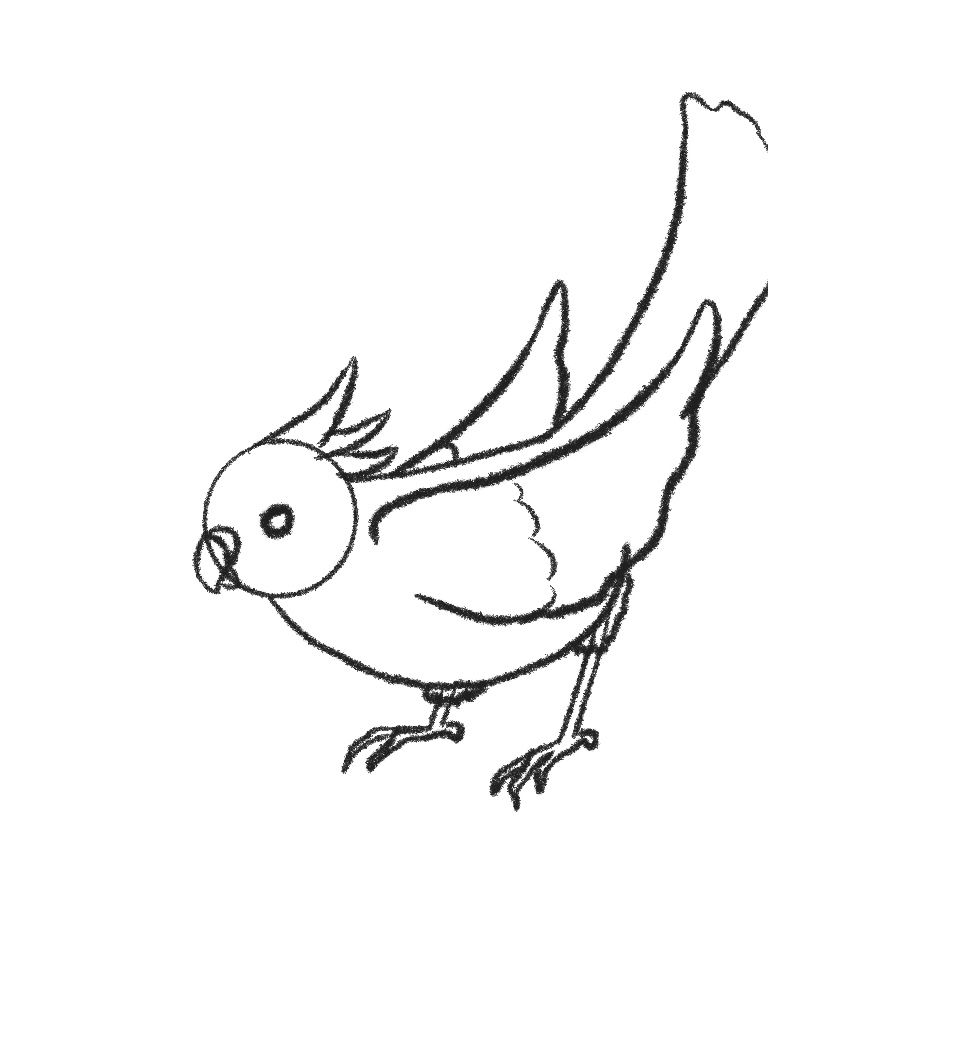

- Step 12: Erase overlapping lines
Erase the overlapping lines!
- Step 13: Add details around the neck
At the bottom of the circle, we're going to extend the chin a bit downwards, not too much though, before using that same cloud shape to come around the neck. Then, fill in the eye!

- Step 14: Draw details for the bird’s tail
At the base of the tail, we're going to add some lines in the dips of the cloud-shaped line. Not all the way down but to about the longest wing line on the wing closest to us. Then we'll use a lighter stroke to mark those off from the rest of the tail.
Going back to the face and head, erase the rest of the circle before adding a highlight to the eye and a little nostril to the beak!
Finally, for this step, fine-tune the body so it looks a bit more organic. Birds have a lot of feathers so their body isn't just one solid perfect shape!
- Step 15: Add color
Color in the spots as outlined in the illustration and there you go! A bird!
This is a step-by-step process to drawing a small bird. There are quite a bit of steps, but this drawing process is easy and simple to get a bird that is cute.
