

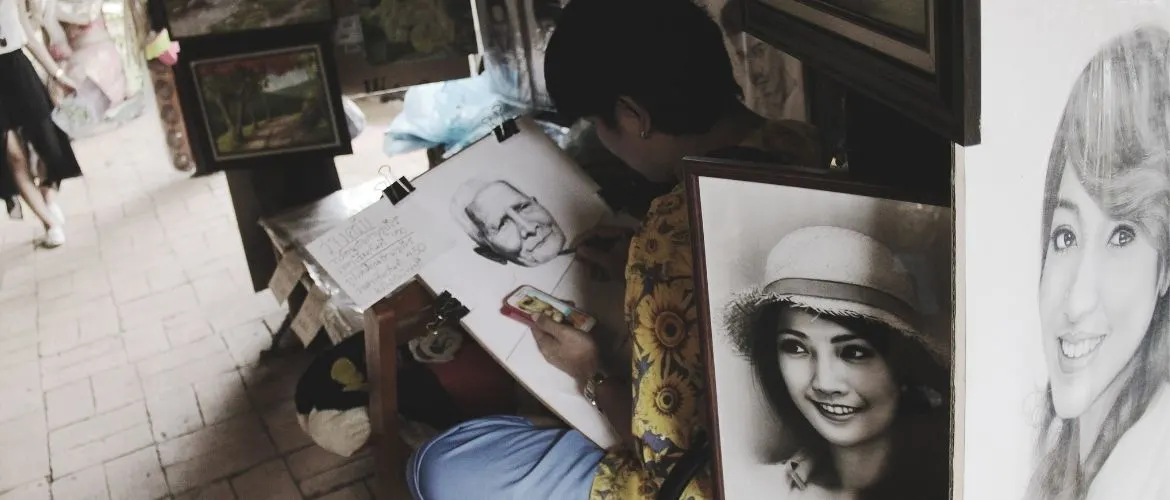
Are you trying to draw realistic portraits? Learning to draw amazing portraits doesn’t have to take years.
When you use some effective portrait drawing tips, you can improve your ability to capture the likeness of people much easier and become an expert at it sooner than you think!
Get your tools ready and practice using the below tips to draw lifelike portraits like someone who’s been drawing portraits for several years.


What are the Best Tips for Drawing Portraits?
If you want to draw a realistic portrait, it is essential to get to know how to sketch faces.
All these tips will help you in recreating every aspect of your model’s face.
01. Study Each Facial Feature Separately

The most important technique for drawing portraits is to study each facial feature separately.
From drawing the exact shape and position of the human head, eyes, and nose to depicting the expressions on a face, sketching a human face is complex.
To draw the exact size and shape of facial features, you must study each facial feature separately.
It is always recommended to understand the characteristics unique to every facial feature.
For example, if you are drawing a nose, understand its various parts and their characteristics and note them down.
Learn what shapes will be required for drawing a nose.
Similar is the case with drawing eyes, cheeks, lips, teeth, ears, hair, etc.
Once you have come to know what shapes are needed, what will be the size of each facial feature, and what are the different types of eyes, nose, lips, etc. you can get a basic understanding of making realistic drawings.
Hence, by studying each facial feature separately, the whole process of drawing portraits will become easier and faster!
What you have learned: For creating most effective human portraits or to enhance your artistic skills, make sure that you study each facial feature separately as it will assist you to understand the basics of facial proportions.
02. Use a combination of Light and Dark Pencils to Create Shadows
Want to know how to draw portraits with a pencil?
Always use a combination of light and dark pencils to create shadows.
Creating shadows in a pencil portrait is the most important part.
In the schools, we used to draw a face with a sharp pencil and then to create the effect of shadows, we used to rub the pencil marks until they got smooth or the paper became grey.
But to draw portraits in pencil, this is one of the most common mistakes most artists make.
Not only this but if you rub your pencil marks on the paper to create shadows, it will be much difficult to control the exact tone of shadow.
That is why it is always recommended to use a combination of light and dark pencils.
For creating the light areas of the skin or to make them look bright, you can use a hard pencil but to show the areas which are in shadow, it is better to use dark pencils.
It will result in creating an effect of lightness and darkness at the same time.
This technique will also result in creating an effect of luminosity even in the shaded areas.
One important thing to mention here is that for blending some areas of nose, ears, lips, etc. you can use blending stumps.
Plus, you can use smooth pencils for blending as well.
What you have learned: By using a combination of dark or light pencils for drawing portraits, you can get a bright skin tone even in the darker areas of a face.
It will also assist in having more control over your drawings.
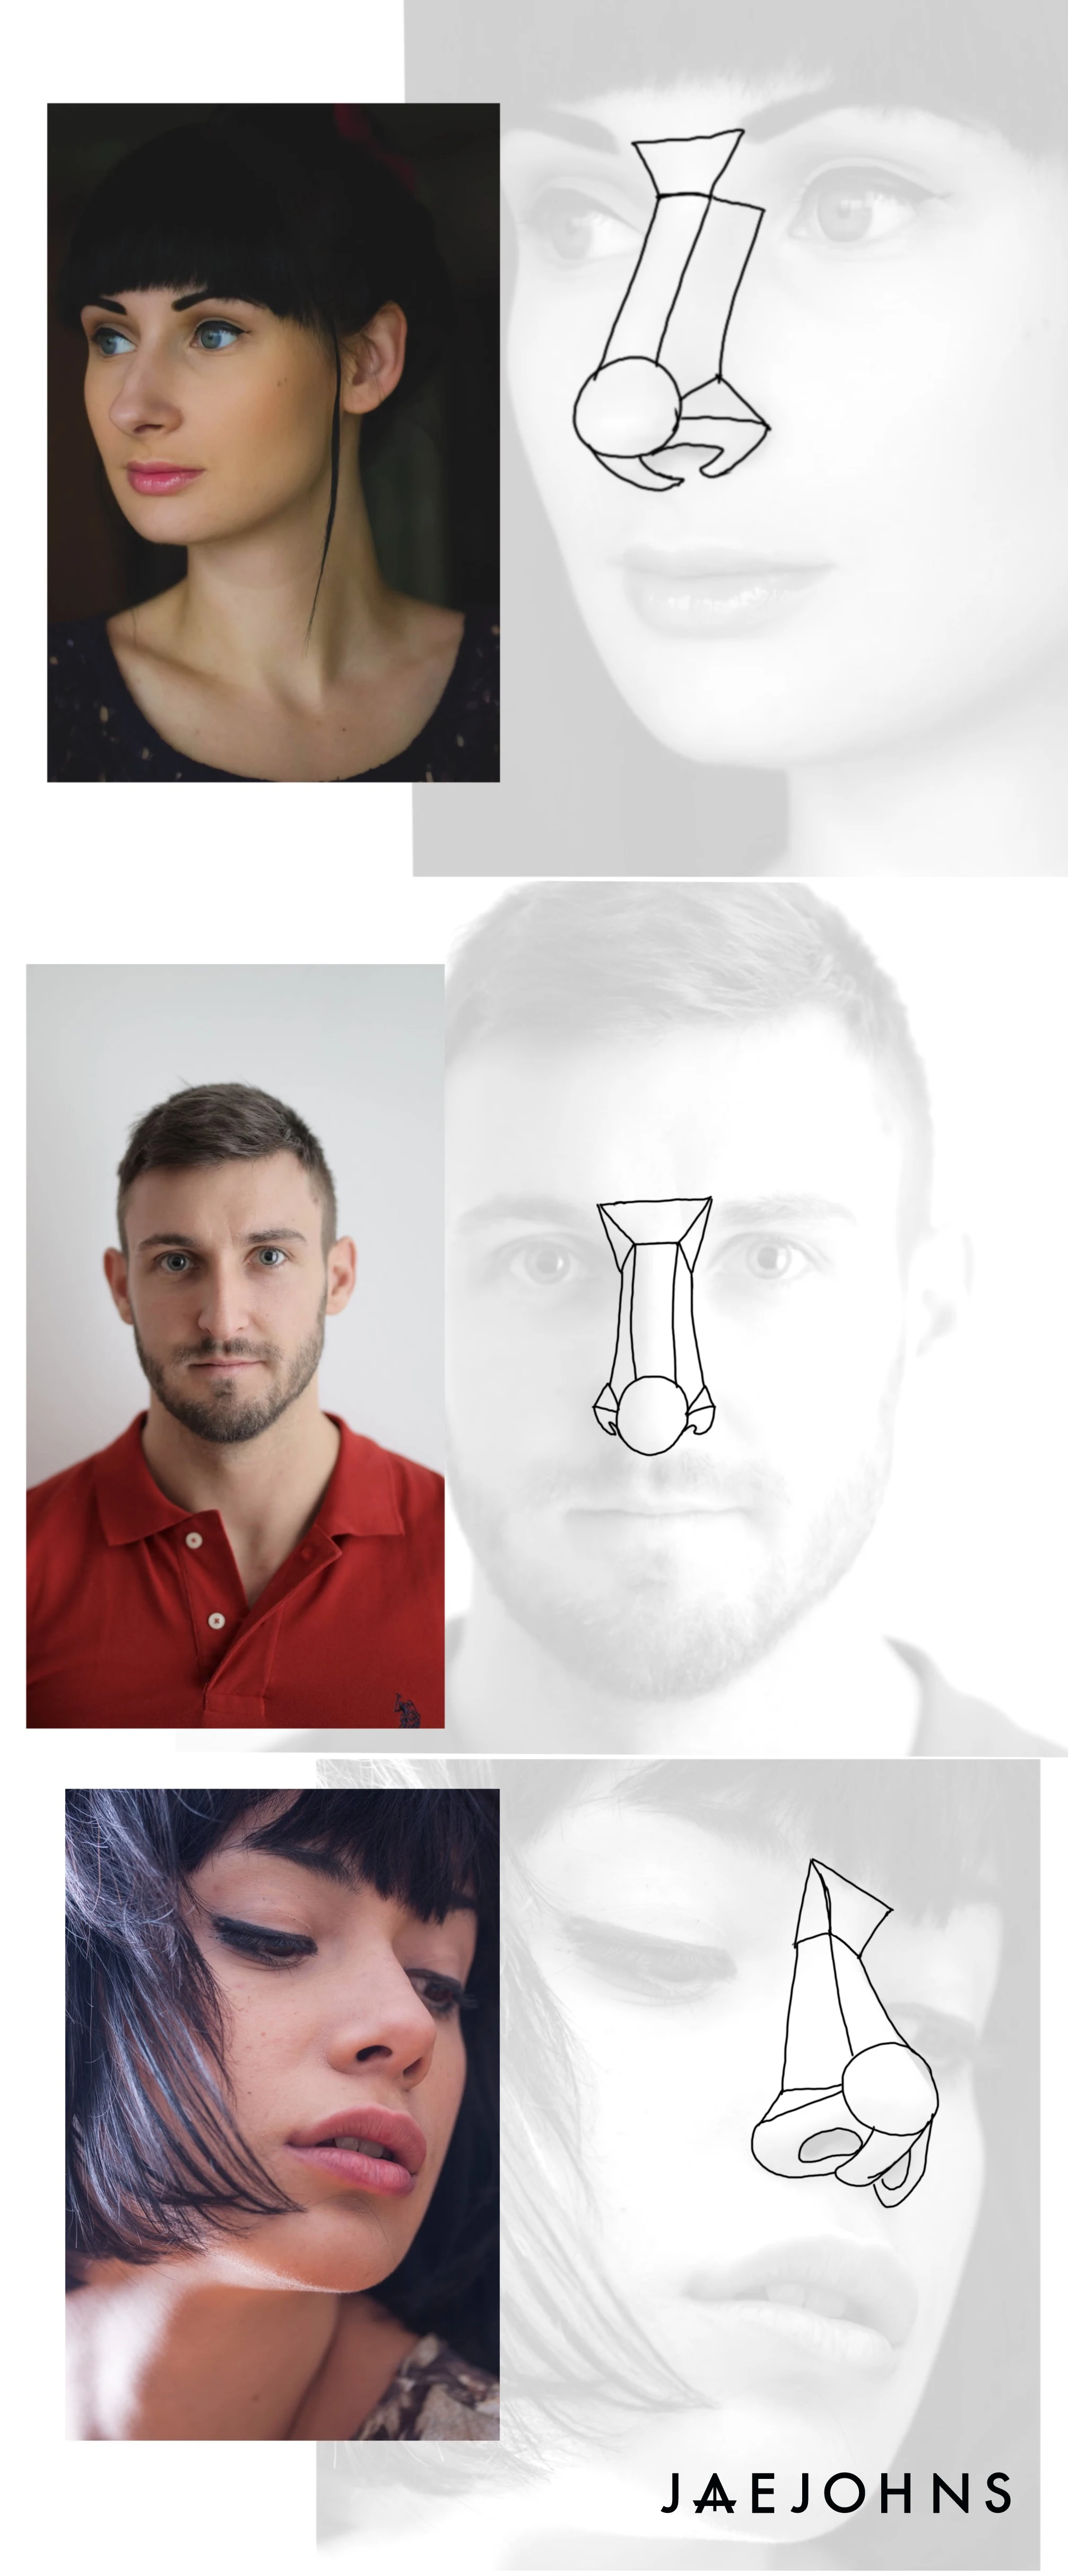
03. Break the Picture into Geometric Shapes


To draw a nice-looking portrait, it is always recommended to break a picture into geometric shapes.
But before that, you must choose a suitable portrait drawing tool.
Whether you are a beginner or an expert artist, the thing that matters the most is the drawing tool.
For portrait drawing, you can take any light pencil including B pencil.
There are other sketch pencils as well that you can use for portrait drawing.
And now here comes the most important part: breaking a picture into geometric shapes.
Now you must be thinking that you are drawing a portrait of a person, how geometric shapes are involved in it.
Always keep in mind that the human face or body is based on geometric shapes.
So, to make drawings of people, you can start the drawing by breaking down the face and body into a circle, square, oval or triangle.
For example, if you consider the forehead, it is in the oval shape, make a circle to draw cheeks and a triangle to draw the nose.
Hence the basic geometrical shapes can help you a lot in drawing portraits.
What you have learned: To enhance your skills in portrait drawing or to make the process a lot easier, experts always recommend breaking a picture into geometrical shapes (circle, oval, triangle, square, etc.).
If you follow this technique, your portrait drawing will look much better.
04. Never Undervalue the Mid Tones in a Drawing
Do you want to create dimensional portraits defined by value?
One of the most essential portrait drawing tips is to pay attention to the mid-tones in a drawing.
Mid tones are very important especially when it comes to drawing a face.
They provide a good foundation for portrait painting.
Most artists are focused on drawing the facial features so much that they often undervalue the mid-tones which makes the drawings look a bit awkward.
That is why it is always recommended to give value to the mid-tones in a drawing.
For drawing or refining the mid-tone areas, always use good-quality sketch pencils.
For example, you can use a B pencil for outlining the head or for refining the boundaries of an entire face.
Plus, for the darker areas, to give value to them or to reduce the saturation, you can use a 3B or 4B pencil
What you have learned: If you want to give value to your painting, the most important aspect that you should never ignore is the mid-tones.
Believe it or not, they are very essential when it comes to the design as well as the success of a portrait drawing.
Use a variety of pencils to draw or refine the mod tones.
05. Always Get the Perspective Right
Do you want to make your portrait drawings look realistic? Did you just say yes?
One of the most important portrait drawing tips is to get the perspective right.
Perspective plays a crucial role in portrait drawing.
With the help of a perspective, you can get to know the big picture of your drawing.
Most people think that drawing with a perspective is a challenging task but the fact is once you get to know to draw with perspective, the whole portrait will become easier for you to draw.
When it comes to drawing a face, getting the perspective right is what makes the whole portrait look accurate as well as realistic.
To get the perspective right in a drawing, you must understand the relationship between the features of a face.
For example, you must study the relation of ears to the eyes and that of mouth to the corner of the nostrils.
Mark the relationships with vertical, horizontal or diagonal lines.
In short, this technique may help you a lot in placing all the facial features at the correct space because you can create an illusion of depth and spec with the help of perspective.
To get some essential knowledge on getting perspective right, make sure to be aware of these crucial things regarding perspective.
What you have learned: For drawing a portrait, putting things into perspective has an important role.
It is quite easy, especially for the beginners, to draw a painting with perspective.
For getting the perspective right, you must study the relationship of one facial feature with another.
06. Use a Combination of Highlights and Shadows


Whether you have just entered the field of portrait drawing or you are an expert artist, it is necessary to use a combination of highlights and shadows.
Yes, you heard me right.
Although highlighting and shadows are important in all paintings, when it comes to drawing the portraits, shadows and highlights play a vital role.
They can give a shape and form to the subject.
Using a combination of highlights and shadows will definitely help you to improve your portrait artwork.
For highlighting, do not leave the area plain.
Similar is the case with drawing shadows.
For shadows, never leave the area too black or too defined.
There are highlights and shadows present in almost every part of a face but they are not to be ignored when you are drawing eyes or nose.
For example, if you make the highlight on the eyeball a bit larger than it really is, the eyes will look awkward.
As a result, the whole drawing will look dull and will lack life as well.
Moreover, focus on the shadows while drawing a nose.
For example, the colour of the nostrils is a bit darker than the entire nose.
So, the nostrils should not be too black in colour. Instead, they should be shadowed properly.
In short, this technique may definitely aid you in improving your drawing skills.
What you have learned: While drawing a portrait, highlights and shadows are essential.
Never leave the areas too plain or too dark.
They should be shaded or blended well if you want to give depth and dimension to your artwork.
07. Assess and Compare the Shapes and Distances when Drawing Portraits

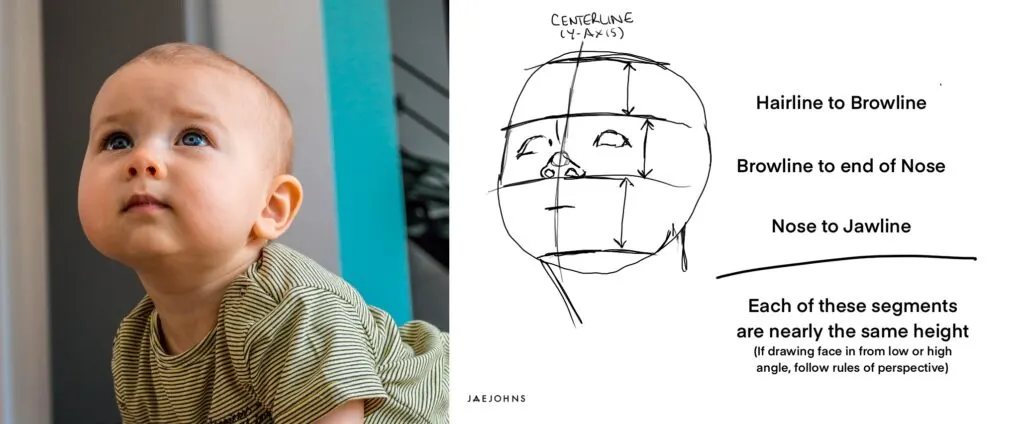
An important tip that can make your portrait drawing easy is to assess and compare the shapes and distances.
Most people believe that artists have natural eye-to-hand coordination by which they can draw things very well.
This is right but what about the people with no such coordination.
Can they draw or not?
The answer is: yes, they can draw.
Do remember that drawing is not magic; it is all about assessing and comparing the shapes and distances between the shapes.
If you are drawing a portrait, imagine that there is an axis line that runs down the face.
On both sides of the axis, you can draw eyes and ears along with other facial features.
By examining the proportions, you can get to know easily where the eyes are situated, what the exact position of the nose and mouth is, and at what angle the head is tilted.
Moreover, with this technique, you can also get to know the eyes with other facial features.
What you have learned: From starting basic drawing to refining the details, what you need to know is assess and compare the shapes and distances.
08. Collect Some Close-Up Photos
One of the most essential portrait drawing tips is to collect some close-up photographs.
This technique is very important, especially for beginners.
Remember, it is not easy to draw eyes, nose, lips, mouth, cheeks, etc.
It requires a special technique by which you can draw the facial features.
For example, apart from getting the perspective right and assessing the shapes and distances between them, you must collect some high-quality close-up photos.
Because the close-up photographs may help you to draw the facial features at a different perspective or angle.
Moreover, you can also get to know the different types of lighting and shadows that you can use in a portrait drawing.
It is a great way to get away from your initial fear.
How?
You can draw different shapes (oval for eyes, triangle for a nose, etc.) on your reference photograph before drawing them on paper.
In this way, you can get a good understanding of proportions.
What you have learned: Collecting some close-up photographs is a great method to draw special facial features.
If you have started drawing portraits for the very first time, this method may assist you a lot – from drawing the basic shapes to adding highlights and shadows.
09. Draw Lines to Measure the Distances
So, here comes another technique from my list of portrait drawing tips.
Although it is closely related to the previous one, in this technique the lines are drawn to measure the distances.
For example, the distance between two eyes, between eyes and nose, between nose and mouth, and between the nose and ear.
This step is very important if you want to create a characteristic look of a character.
What you have learned: If you want to improve or refine your artistic skills and analyze the proportions and distances, you must draw lines to measure the distance and relationship between each facial feature.
10. Use Such Drawing Supplies with Which You Are Comfortable
Do you want to draw realistic portraits?
Do you want to focus on texture, form, or value placement while drawing a portrait?
One of the best yet mandatory portrait drawing tips is to use such drawing supplies with which you are comfortable.
It means that instead of practising new drawing equipment, you must use such equipment that you have used before or with which you are comfortable.
In this way, you can focus more on understanding or drawing the facial features instead of practicing different drawing supplies.
What you have learned: To improve your portrait artwork, you must use such drawing supplies with which you are comfortable.
11. Never Make the Dark Areas Too Dark
One of the top tips to drawing portraits is to never make the dark areas too dark, especially in the early stages.
Why?
Because in the early stages, if you make the dark areas too dark, it will be difficult to change the dark areas if you want.
The dark areas play an important role in every type of drawing.
They can give a depth and dimension to a painting.
When it comes to drawing pencil portraits, dark areas can be found everywhere, for example, in some parts of the nose, lips, eyes, and ears.
If you add too dark a shade in the beginning and then you realize that a certain portion should be a little bit light in shade, what will you do?
It will be difficult for you to make out the light of the too dark area.
This is the reason that it is always recommended to replace the dark areas with the grey areas so that if you want to make some modifications, you can easily do that.
In short, making the dark areas a little bit grey in color is very useful if you want to create beautiful as well as awe-inspiring portraits.
What you have learned: Dark and light areas are present everywhere in the portrait drawing. In the early stages of drawing, never make the dark areas too dark as it may cause problems while making modifications at the end.
12. Draw Portraits by Drawing the Eyes First


The last technique for portrait drawing in this list is to start by drawing the eyes.
Now you must be thinking that you have to draw an entire face then why start with eyes?
Let me tell you: the eyes are said to be the window to the soul.
If you don’t get the eyes right, then your entire portrait can look weird.
There’s so much expression in the eyes, that eyes give so much life to your portrait.
What you have learned: Although all facial features are important to draw, the eyes are the feature that you should try to draw first.
And that’s it!
Conclusion
Portrait drawing is a bit of a challenging task.
It is important to capture the likeness of a person whose portrait you are creating.
For this, you need to learn the techniques for portrait drawing.
I have faith that with the above tips, you can be a master of portrait drawing.
Yes, all the above-mentioned portrait drawing tips will make the overall process of drawing portraits less daunting for you.
They will really help you to make your drawings stand out from the crowd.
So, if you want to improve or refine your artistic skills, you must study each facial feature in isolation, use a combination of light and dark pencils, break the picture into geometric shapes, start drawing eyes first as well as get the perspective right.
In addition, use high-quality drawing supplies including sketching pencils.
So, what are you waiting for now?
If you want to enhance your portrait drawing skills, you must learn the important tips for drawing faces including eyes, nose, cheeks, ears, lips, and mouth.
Do give a try to the above techniques and in just a few attempts, you will realize that there is a significant improvement in each sketch you create.
Have you tried any of the above portrait drawing techniques before?
If yes, let me know your experience in the comments section!
Pedro Martinez
Wednesday 8th of September 2021
Jae great work, thanks.
I did not received Lesson #6, please re send.
Jae Johns
Wednesday 8th of September 2021
Can you email me?