
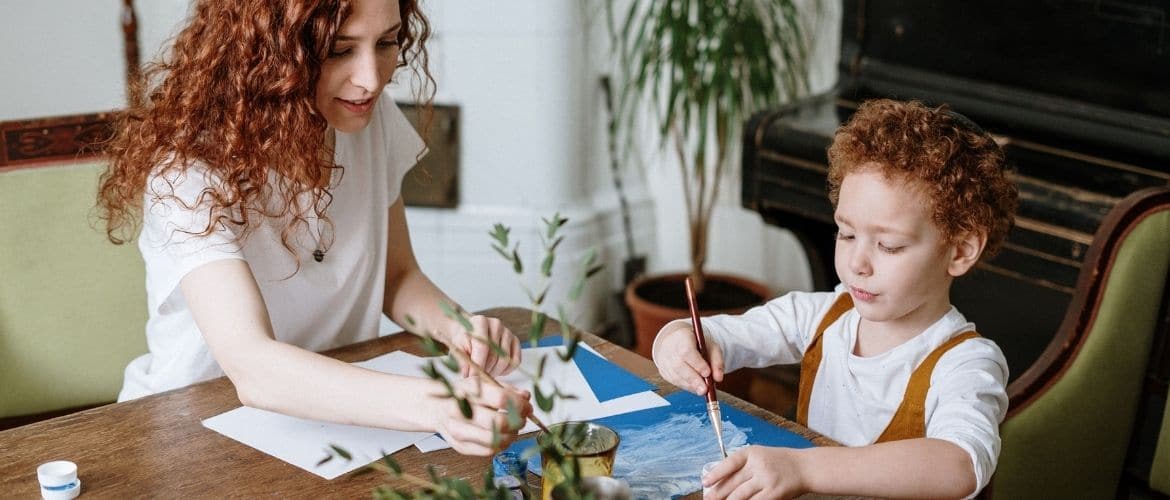

Does your child love painting? Are you on the lookout for some interesting and fun painting activities that may hone the artistic skills of your child? Did you just say yes? No worries as today, I am here with a detailed guide where you can get your painting easel for your kid and get started with some amazing painting ideas. So, read the guide till the end!
Every child loves painting. Every child is an artist. At first, he or she uses a paintbrush and paper but if a child sticks to it, they cannot be creative. At times, painting with a regular paintbrush gets boring.
Then how can a child be creative in art? How can we keep our kids as artists? The answer is simple: By using new and creative painting tools and methods that may capture their hearts and imaginations!
Painting is one of the favorite art activities of kids. It is not only a great learning opportunity but a way to make your children explore their creative side of personality. There are various art projects that your kids can try.
It may be acrylic painting, watercolor painting, pastel art, and much more. Painting ideas may involve a little more than paper and paint. In other words, we can say that the approach to each painting idea is unique and different.
In today’s guide, let’s talk about the painting ideas for kids. Below, I will be sharing various methods, recipes, tools, and techniques that kids can easily use for painting. These include painting on different surfaces, with different tools, and at different sizes.
These ideas will surely inspire fun and creativity and will make kids create something new with them. Although there are thousands and thousands of ways to paint, I am sharing a few ideas by which your kid can get creative. And guess what? These ideas are not only unique but your child will have a lot of fun to experiment with them.
The painting ideas mentioned below may range from simple painting with hand or a brush to some amazing painting techniques such as cherry blossom painting, spin painting, marble painting, Q-tip painting, painting with forks, painting with cotton balls, and a lot more.
Go through the list of painting ideas and get ready to grab a new method or painting tool for your kids. Are you ready to make your child grab the chance to get creative today?
[lwptoc]
Unique and Best Painting Ideas and Methods for Kids
The following are some of the best and unique painting ideas for children. I hope that you will find a lot of inspiration from them.
Enjoy!


Using Cotton Balls to Paint Cherry Blossom
Using cotton balls is one of the amazing and fun painting ideas for kids. It gives a unique texture to an artwork that is difficult to get with a brush. And if cotton balls are used to paint cherry blossom trees to give a fluffy texture to it in pink color, the technique will enhance the whole painting.
Whether your child wants to paint a cherry blossom tree, clouds, leaves, or paint an orange tree, using cotton balls makes the painting even more beautiful, giving it depth and interest. Painting cherry blossom trees with cotton balls is quite easy. All you need to have is:
- Paper (Good-quality that holds paints very well)
- Paintbrushes
- Acrylic paints
- Paint palette
- Clothespins (for holding cotton balls)
- Cotton balls
After getting a paper or canvas, it is time to mix the paints. You will need two shades of pink, one sky blue color and a black or brown color (to paint the branch). If the painting palette already has these paints, it is good then. If not, you need to mix the colors to get blue and pink (a combination of red and white).
To get a sky blue color and lighter shades of pink, you need to add white in it. First, ask your child to paint the sky and branch and let them dry completely.
Now here comes the exciting part of the painting and that is, painting the cherry blossom flowers with dark and light shades of pink. You can paint with both colors at the same time or paint dark first and then go for a lighter shade.
In short, painting with cotton balls is a great idea that kids of every age will love. The shades of blue and pink add a vibrant touch to the paintings. Do try this technique because the final look of the painting will turn out great!

Pour Painting Idea for Kids
If your child loves to squeeze the whole tube of paint, he/she will definitely love the technique of pour painting. Using this technique, you can decorate your garden by painting the garden pots. The pots painted through this method will definitely add some color to your garden. This technique is not only super easy but a great way to make your child try something new and creative.
For pour painting, the materials your kid will need is a flower pot, paint, beads, or laces for decoration, and a big tray to hold all the painting mess. First, you need to let the paint drip over the pot naturally. You can use your fingers or paintbrush at this point if you want.
But the best way is to let it drip naturally to make the pot look good. For adding two or more colors, pour the first paint over the top of the pot and then the second paint. It will allow the paint to drip in layers which will add a dramatic appearance to the pot.
At the end, when the paint is dry, you may use different bead necklaces or laces to decorate the pots.


Painting a Rainbow with a Sponge
Another fun, easy, interesting, and experimental idea is painting a rainbow with a sponge. If your child wants to play with colors and wants to be super-creative as well, why not let your child try this method? It will make the artwork beautifully and colorfully painted. Probably your child has already tried the basic sponge painting but now it is time to use this technique in a different way.
For this type of painting, you can use acrylic paints or watercolors. Moreover, a large sheet of paper with one or two sponges is also required. Put all the seven colors of the rainbow over the palette (You can also put colors on the sponge directly from the paint tube).
Make sure that you have put all colors in order as present in a rainbow. Take a sponge and swipe each color on it. You can also use a paintbrush to add colors to a sponge.
Once the colors are added on the sponge, let your child be creative by applying the rainbow-painted sponge on the canvas in whatever direction he/she wants.
This painting method is super cool and will make your child notice what happens when the colors mix together. Moreover, your child can also get to know what primary and secondary colors made when certain colors are mixed together.
Note: If your child wants to apply the sponge on the whole canvas, be very careful because when the colors are mixed together, they will create a muddy brown shade.

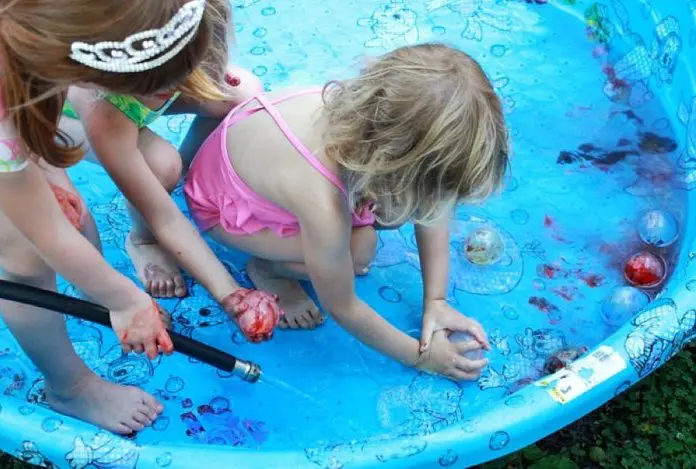
Painting in a Swimming Pool using Water Balloons
Sounds a bit different? Yes, it is! It really works well and in fact, exciting for the kids also! Painting in a swimming pool using water balloons is another fun summer outdoor art activity for kids.
If the summer is here and your child wants to have fun in the swimming pool, it is time to let your child get creative by painting in a swimming pool. Every child wants to play with water balloons, filling them with water, and then throwing them. So, it will be a great idea if your paints use water balloons.
For this type of painting, you need to have a swimming pool, cardboard or a large piece of paper, paints, a paint palette, and water balloons.
- First, put the paper on the base of the swimming pool.
- Put paints in a paint palette.
- Fill the balloons with water and do not fill them so much otherwise the balloons will burst.
- Dip the balloons in the paint. Just make sure that all parts of the balloons are covered with paints. Throw the balloons over the paper in a pool.
- When the water balloons roll around, the paint is transferred from the balloon to the paper.
- In the last step, remove the balloons and paper and let the painting dry. Once the paints are dry, it will result in a unique abstract painting!
Painting Idea for Kids Using Paper Towel Tubes
One of the fantastic and fun painting ideas for kids is painting on a paper towel tube. The materials you will need for this painting method include an empty paper towel tube, a glue, and a paper towel to cover the tube, high-quality paints, a paintbrush, and a cardboard box.
- Take a cardboard box and ask your kid to put his/her favorite colors in the box. It is better to go for bright colors as it will make the painting even more beautiful.
- Apply glue with a paintbrush over an empty paper towel tube and then paste a paper towel over the tube to cover it.
- Now, it is time to let your child play with bold colors. Ask your child to put a paper towel tube on one side of the cardboard box and roll it towards another side of the box. As the tube rolls, your child will see a beautiful pattern of colors on the tube.
Your child can do it repeatedly if he/she wants to get more unique patterns and colorful effects on the tube.
Once the painting is done, put out the tube and let the paints dry. Once dried out, put the colorful tube on your side table as decoration or you can hand it using ribbons.


Dot to Dot Painting Idea for Kids
If your child wants to do some fun art and try something new, dot to dot painting is an ideal option. How? Because this painting challenge does not only make your child get creative but also helps him/her to build concentration in an artwork. As the name implies, dot to dot painting technique involves combining dots of the same colors to create a wonderful painting.
Dot to dot painting is quite easy for kids. All your kids need to have is a paper, paints, a paint palette, and paintbrushes. You can use watercolors or acrylic paints to create such a painting. At first, you can take two colors.
For example, take red and yellow. Put red dots and yellow dots over the paper and ask your child to combine same-color dots. It means that the red dots should be mixed with red dots and yellow dots must be mixed with yellow dots. Both colors should not be mixed together.
When your child starts doing the dot to dot challenge, I am sure that he/she will find it really fun and exciting. At some points, both colors may overlap with each other but it is fine at some parts of the painting. Remember to take two paintbrushes for each color of the paint.
For adding a more neat touch to the painting, your child can use masking tape. Ask your child to apply the tape on all the sides of the paper like a border. When the painting is complete, remove the masking tape to create a frame of the painting.


Using Q-Tips to Paint Butterflies
Painting butterflies using Q-tips is the next painting idea in our list that is suitable for the children of every age group. It is an easy painting project. And especially painting butterflies is so fun to paint.
The materials that your child will need are a good quality paper, paint, a palette, and some Q-tips. For each color, there should be a separate Q-tip so that the colors do not mix with each other.
- To paint butterflies, take a butterfly template and cut it out. Draw a butterfly on a paper using the template.
- Dip one Q-tip in each color and first draw unique patterns on the wings of the butterfly. Your child can draw dots or can draw different patterns using different colors.
- Once the wings are done, it is time to apply paint over the butterfly body. Let the paint dry on the body so that your child can add dots with Q-tips over the body as well.
Believe me, the results of the paintings are really fantastic no matter what sort of pattern your child has drawn.
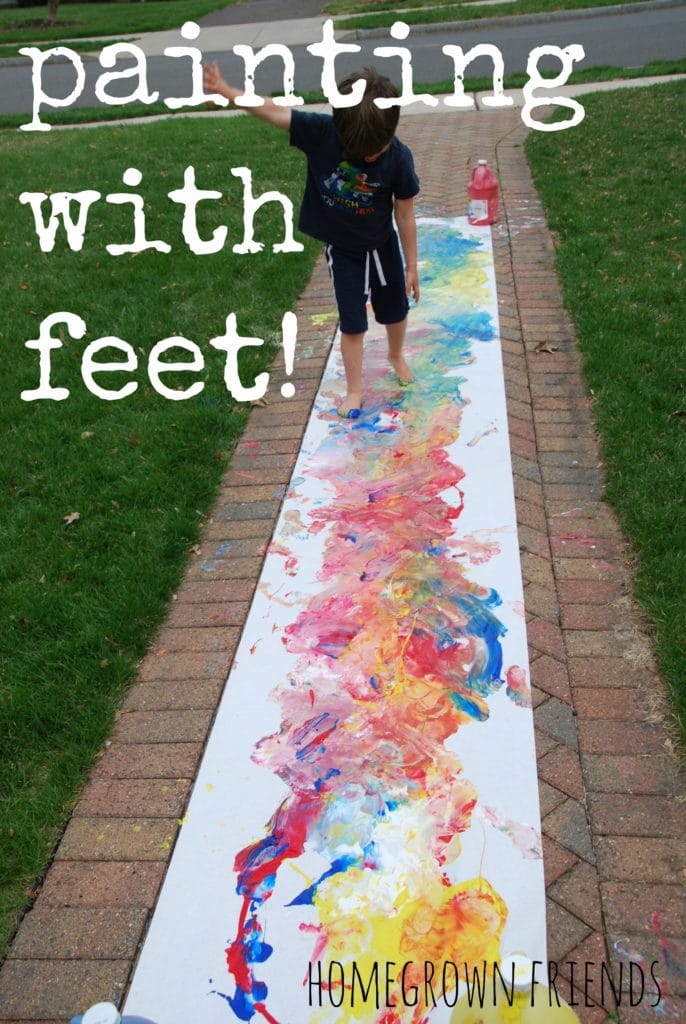

Painting with Feet | Every Child’s Favorite Art Activity
Painting with feet is a fun painting activity that every child loves to do. As kids enjoy painting with hands, similarly, painting with feet is also an enjoyable activity for the little ones. By painting with feet, they cannot only discover different colors and learn cause and effect but can also get creative as well through color mixing technique.
The best thing? Once the painting is complete, you will surely love the results. And guess what? You can use the painting as a gift wrapping paper!
The materials required for this painting technique includes a long roll of paper, quality paints, a paint palette.
- First, take a long roll of paper and place it on some clean surface.
- Secure the paper with some weight at all four sides.
- Ask your child to select his favorite paints. Try to go for four or five colors.
- Sprinkle the paints over the paper roll.
- Now it is time for the kids to have fun with paints. Ask them to stand over the paper roll and then walk over it.
Painting with feet can be a bit messy. Even the whole surface can become slippery for kids. So, be careful while allowing your child to paint with his/her feet!
Tip: Try to do this activity outdoors. However, if you are doing it indoors, just make sure that you have put a cloth first to protect your floor.
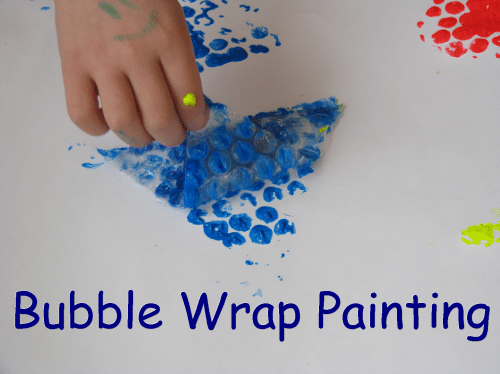

Paint with Bubble Wraps
The next in our list of painting ideas for kids are painting with bubble wraps by which kids can create colorful and interesting prints. Now you must be thinking of how bubble wraps can be used for painting.
Remember bubble wraps are not only used for wrapping a certain product, they also act as a great painting method, especially for the little ones. Your kids can explore using the bubble wrap technique. They can feel different textures formed by the bubble wraps, discover different colors, and can also hear the noise of popping the wraps.
For painting the bubble wrap with the favorite color, your kid can use hands or a sponge. This is where the fun part starts! Because once the bubble wrap is painted with different colors, it is time to take a large piece of paper, flip the bubble wrap and press it over the paper.
Your child can press the bubble wrap, again and again, to make the shades of paints look more vivid and clear. Let the paints dry. The last step is to draw any shape on the paper, be it a butterfly, a house, or a bird, and cut the paper.
Another way of using bubble wraps in painting is to cut the wraps in different shapes such as square, circle, or triangle. Ask your child to apply paint on the bubble wraps and then press them on the paper to see the magic of shapes.

 Use a Large Canvas
Another best painting method for children is to use a large canvas. A large canvas can help a child discover the colors in a broad range.
Your children can draw anything on a large canvas because now the paintings are not just limited to a dragonfly, an apple or a house. Things are now bigger with a large canvas.
- First, take a big-sized canvas.
- Get some acrylic paints and apply white paint over the canvas.
- Instead of using two or three colors, you can use a variety of colors.
- They can draw a big castle, a solar system, or a beautiful ocean. Always take high-quality paints as colors look clearer on the large canvas.

 Painting with Marbles
Painting with marbles has always been an exciting and fun activity for the children. They love to do this type of painting over and over again. With this art activity, your children can learn what happens when the paints mix together.
For painting with marbles, all you need to have is a pack of marbles, a paper, paints, a muffin tray, and a spoon, and a cardboard box.
- Ask your child to place the paper in the cardboard box.
- Put your child’s favorite paints in a muffin tray and put a marble in each color.
- Coat a full layer of paint on marble using a spoon.
- Once the marbles are fully coated with paints, put them in a paper that is placed in the cardboard box.
- It is good to transfer no extra paint with marbles but if a few drops of extra paint are transferred with the marbles, it is completely okay.
As the marbles roll (you can also tilt the cardboard box), your child can see different colors adding unique patterns, ultimately creating an abstract piece of art.

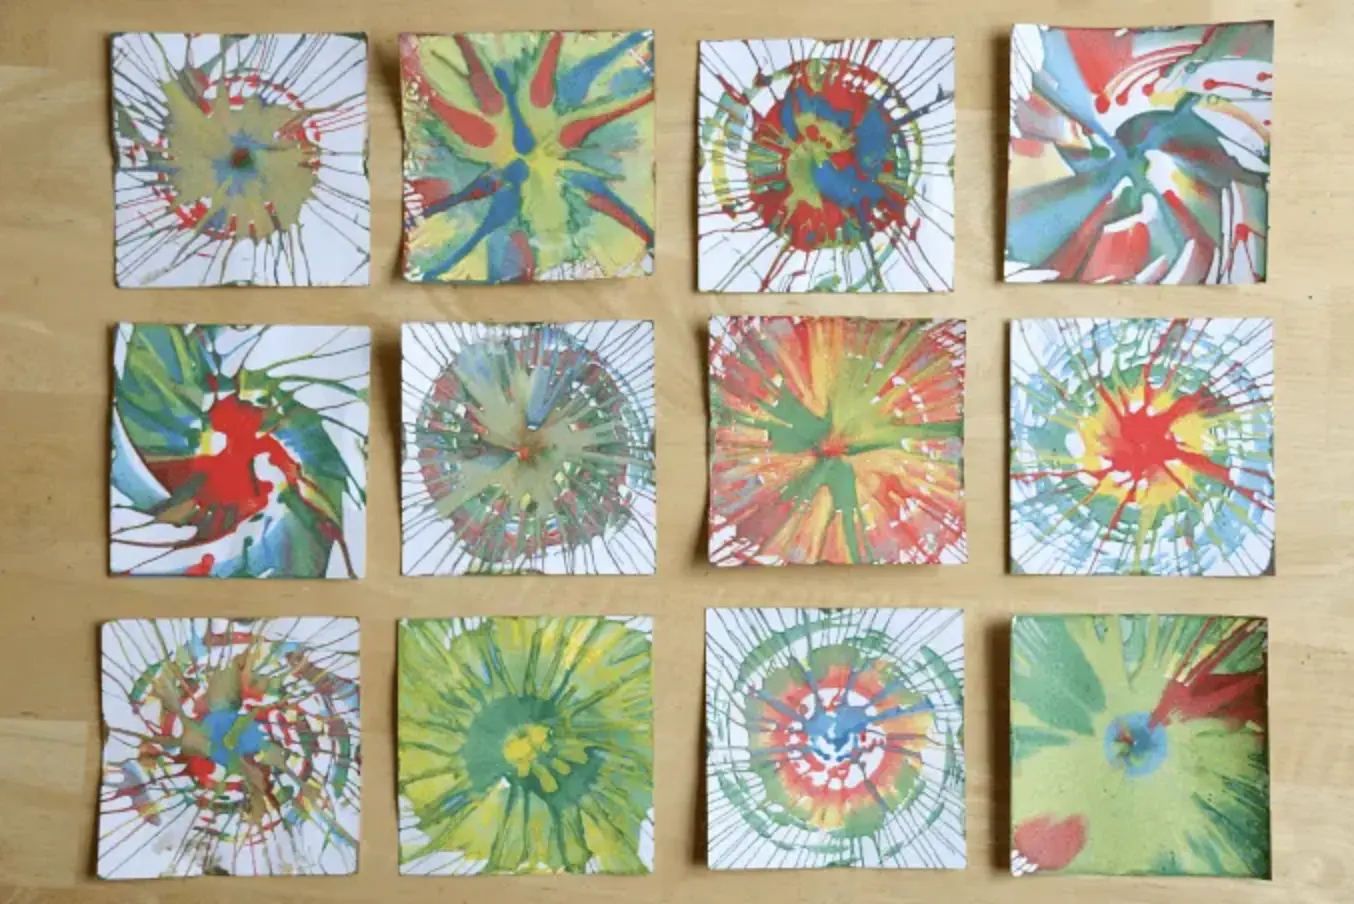 Spin Art
Another exciting painting activity for kids is a spin art. It is one of the amazing painting ideas that your kids will have fun creating. For this type of art, you can use a spin art machine or a salad spinner.
In case of using a spin art machine, you should get a spin painter that is specially made for kids. A spin painter usually has a transparent lid so the children can see and enjoy the whole process of spinning. Although it comes with paper and paint bottles, you can also use other papers or paints.
Believe it or not, this action art activity is super easy and super fun. Your child can get to know about the combination of colors. Once the painting is complete, your child can use the papers for making notecards, or he/she can paste them on a poster board as a collection of art.
If you are using a salad spinner, you can use paper plates instead of paper. For this, ask your child to first put his/her favorite paints on the plate and then start spinning the salad spinner. The final result of this painting is so unique and beautiful.

 Splatter Painting Idea for Kids
If your child loves to explore different painting techniques, then this is one of the most creative paint ideas to try. Splatter painting is one of the best action painting ideas for kids. With this art technique, your kids can have an opportunity to do action art on their own.
They can draw trees of different seasons using the splatter painting. Splatter painting is very easy. Not only the process is easy but the materials needed for such art are also basic. Your child just needs to have a paper, two or more paintbrushes of medium size, acrylic paints, and a paint palette.
You can also take a tree template. If not, ask your child to draw a tree on the paper.
- First, paint the branch of the tree with black or brown color.
- Now it is time to apply the splatter technique. For this, the paints you are using should be thin (you can also add water in thick paints as well).
- Ask your child to dip a medium-sized brush in the paint and then splatter the brush on the paper. There are two methods of splatter painting. The first one is to put two fingers on the brush near its tip and tap it. And the second way is to put the brush over two fingers and tap the brush on the fingers.
With splatter painting, your child can learn about different colors and their appearance when they are mixed together in a splatter technique.
It is a fun activity and the results are really magical!

 Watercolor Paintings with Wet Paper and Salt
Another lovely painting idea is watercolor paintings using wet paper and salt. We all know that watercolors create some amazing paintings. And when the paper is wet and the salt is used, the results are even more wonderful to look at. For this type of painting, the materials required are:
- Good-quality paper that can be wet easily
- Watercolors
- A paint palette
- One or more paint brushes
- Fine or coarse salt
The method of applying watercolors to a wet paper is very simple and straightforward. The first step is to take a paper and apply masking tape on all sides but make sure that the paper is also stuck to the table or wherever you have placed it. Take a brush dipped in water and apply it to the paper. Make sure that the paper is not too wet!
Ask your child to take out two or three watercolors in a palette.
- Dip the brush in paint and apply it over the paper.
- Make sure that the colors do not mix with each other on the paper otherwise the result will look muddy.
- As paints are applied, take fine or coarse salt and sprinkle it over the paper.
- To sprinkle the salt, paints on the paper should be wet. You can use both fine salt and coarse salt for this type of painting but let me tell you the results of using coarse salt looks better.
- After the salt is sprinkled, let the painting dry completely.
- Now you can take any dark shade of watercolor (paint should be thick) to draw anything on the paper.
Your child can draw a house, a sunset, or trees in the northern areas. Whatever your child draws, the final result of the painting will look just incredible.


Painting Galaxy on Rocks
Painting on the rocks has always been a very fun painting technique for the kids. This type of painting allows the children to get out of their regular paintings using paper and try something new and different.
Your child can paint anything on the rock. If your child likes to draw stars, moon, or galaxy, why not try painting on the rocks. Most people believe that painting on rock is a bit difficult but the fact is it is very simple.
For painting galaxies on the rocks, your child will need a few rocks, acrylic paints, a paint palette, sponge, or a round foam brush and a toothbrush.
- Ask your child to paint a rock with black color.
- Now, take a sponge or a round foam brush, dip it in the paint, and apply over the rock. A foam brush works really well instead of a sponge.
- Apply light and dark shades of color.
- For painting the galaxy, light and dark blue shades are the best. If your child wants to draw stars on it, take a toothbrush, add some white acrylic paint to it, and ask your child to run his/her fingers through the bristles of the brush. This will create white stars, adding a sparkling effect on the rock.

Finger Painting
Another interesting painting idea for your kids is finger painting. It is the most fun activity that kids love to do. Instead of giving them a paintbrush, let them paint using their fingers. You can also use edible paints for this type of paint if your little one is a toddler.
At times, the results of the finger painting look messy. To make the painting beautiful and unique, I suggest you take a painter’s tape or masking tape and cut it in a specific shape. For example, if your child wants to draw a solar system, you can cut the tape in the shapes of planets.
If your child wants to make a painting of the first letter of his/her name, cut the tape in the shape of a letter. Apply the masking tape over the paper, give your child some paints, and let him/her apply paints with fingers. Once done, remove the masking tape and let the painting dry, resulting in a beautiful and abstract piece of art.


Apply Paints using Toy Car or Truck Wheels
There are a variety of ways to apply paints other than a paintbrush. Applying paints using a toy car or truck wheels is one of them. It is right! It is one of the exciting painting ideas for kids that is easy as well.
With this technique, your kids can explore painting in a completely new way. And if your child loves cars, then it is the perfect way to indulge him/her in this kind of activity.
For painting with wheels, take a good-quality paper of your desired size. You can also take cloth if you want.
- Apply masking top on each corner of the paper so that it may stick to the table. Here comes the fun part.
- Ask your kids to roll a car or truck in the paint and then roll it again over the paper, cardboard, cloth, or whatever you are using, ultimately creating colorful tracks.
Painting with car wheels is always an awesome idea to make your child think creatively. It allows children to see the magic of paints when applied through wheels.

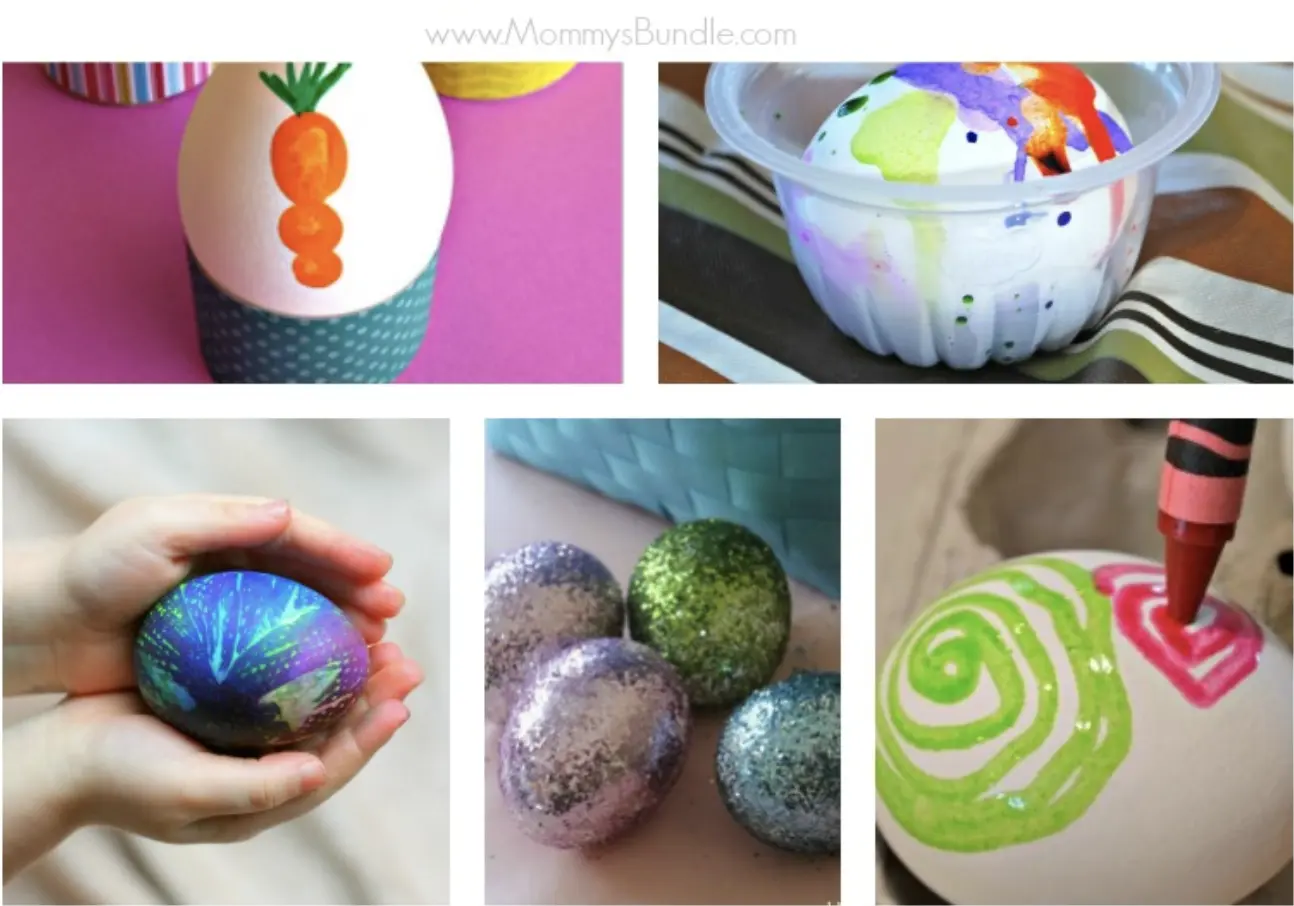 Painting the Eggs
If your child wants to paint something new and different, you can have him/her to paint the eggs in your fridge. And you know what? Your child will love panting the eggs and making your fridge colorful. The process of painting the eggs is simple. The basic painting materials will be required such as paints, a paint palette, a paintbrush, and some eggs. Ask your child to pick his/her favorite shade of paints and apply color to each egg. Tell your child to be careful while painting the eggs so that they won’t break.
After painting the eggs, your child can decorate them using small buttons, or by creating a cross-stitch design.

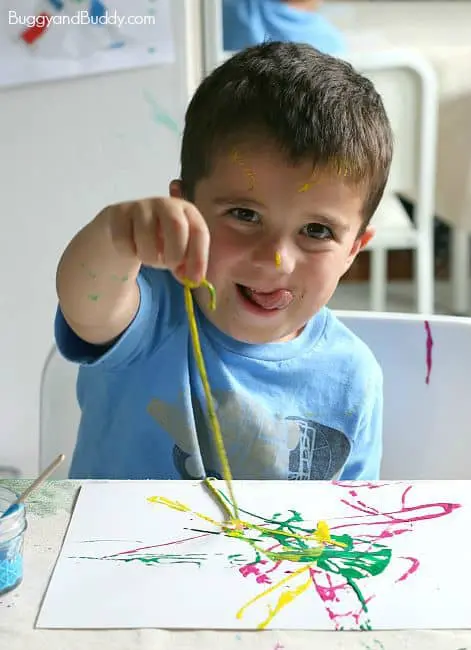
Painting using Yarn
Want to surprise your child with some fun art activities when he comes from school? Here is another fantastic painting idea and that is painting with yarn. This type of paint can create a beautiful and unique pattern on the paper, increasing the skill of creativity in children, especially in preschoolers.
The materials required for yarn painting are very simple. These include a good value paper, watercolors, and yarn. Liquid watercolors work best in this case but you are free to use any type of paint.
- First, take a few jars or containers to put the paints in them. Whether you are using a jar or container, just make sure that they have a large opening so it will be easier for your child to insert his/her little hands.
- Ask your child to cut some pieces of yarn (you can also cut by yourself) and dip them into the paint and swirl it over the paper.
- Use different colors to create a colorful piece of art.
- For a darker effect, press the yarn on the paper and then move it in different directions.
This painting method is very unique. Believe me, your kids will love to explore the designs created by painting with yarn.


Scrape Painting
The next painting method that your children can try is scrape painting which involves color-mixing using credit cards, cardboard or hotel cards, etc. It is a fun activity as your kids will love to see the patterns forming when they scrape the paper. In fact, this type of activity is perfect for kids of all ages.
- The first step is to take a paper and ask your kid to draw something on which he/she wants to paint. You can also use printable templates in this case.
- Squeeze a few drops of acrylic paints over the painting and then scrape them using a credit card or any other type of stiff card.
- Take a paper towel as well to remove any excess paint.
Scraping the paint will give a scatter and abstract look to an artwork.
Conclusion
All these painting ideas mentioned above are quite easy. They are for all the holidays or seasons or at any time of the year. We are sure that you will find one or more painting ideas that your child will want to try.
Believe me, your child will love these ideas and will definitely explore and create something with paint. So, are you ready to change the traditional painting methods and give these amazing painting ideas a go? Do not wait anymore and try these creative painting ideas because it is time to be creative with your kids. Have fun!
What are your child’s favorite painting crafts and activities?
Dylanleo
Wednesday 16th of February 2022
Thank you for your post. Enjoyed it !
Jae Johns
Wednesday 16th of February 2022
You're welcome. Thank you for letting me know you enjoyed it.