
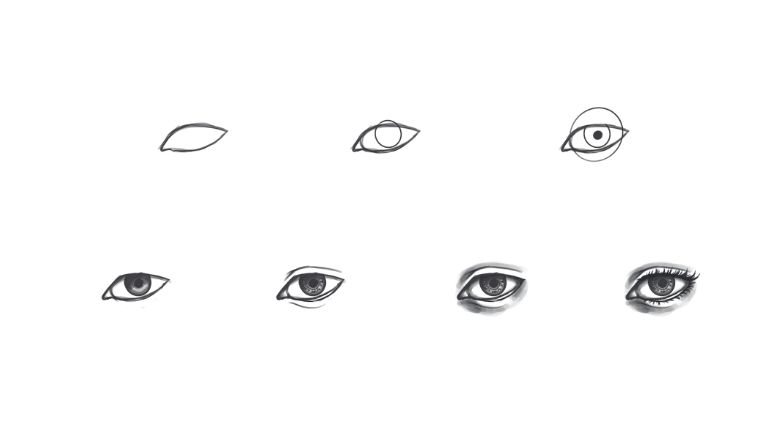
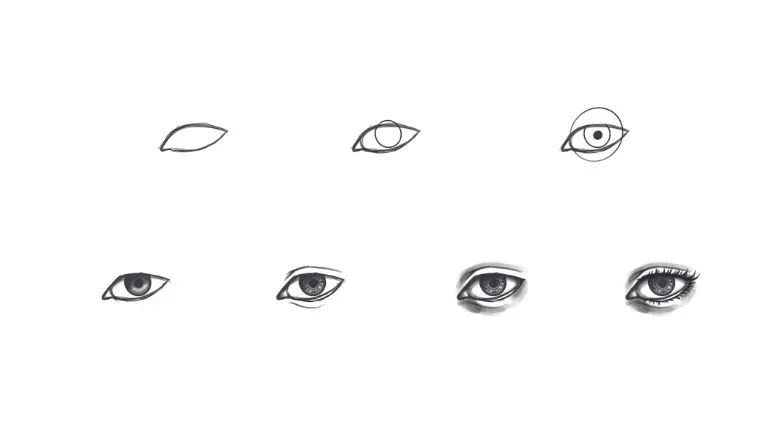
To know how to draw an eye the real key is shading, so we’ll go over that as we build out this drawing together. Use a soft grip on your pencil, or if you are digital, use a round brush with good pressure sensitivity.
Other how to draw topics to help you:
- How to Draw a Deer (Easy Step by Step with Pictures)
- How to Draw a Dolphin (9 Easy Steps with Pictures)
- Draw a Butterfly (10 Easy Steps)
- How to Draw Curly Hair Like a Master
- How to Draw a Dragon (Step by Step with Pictures)


Supplies you need to draw
You can use anything as long as you have a sheet of paper and pencil but click on the following link to another article I posted to discover the best tools for drawing.
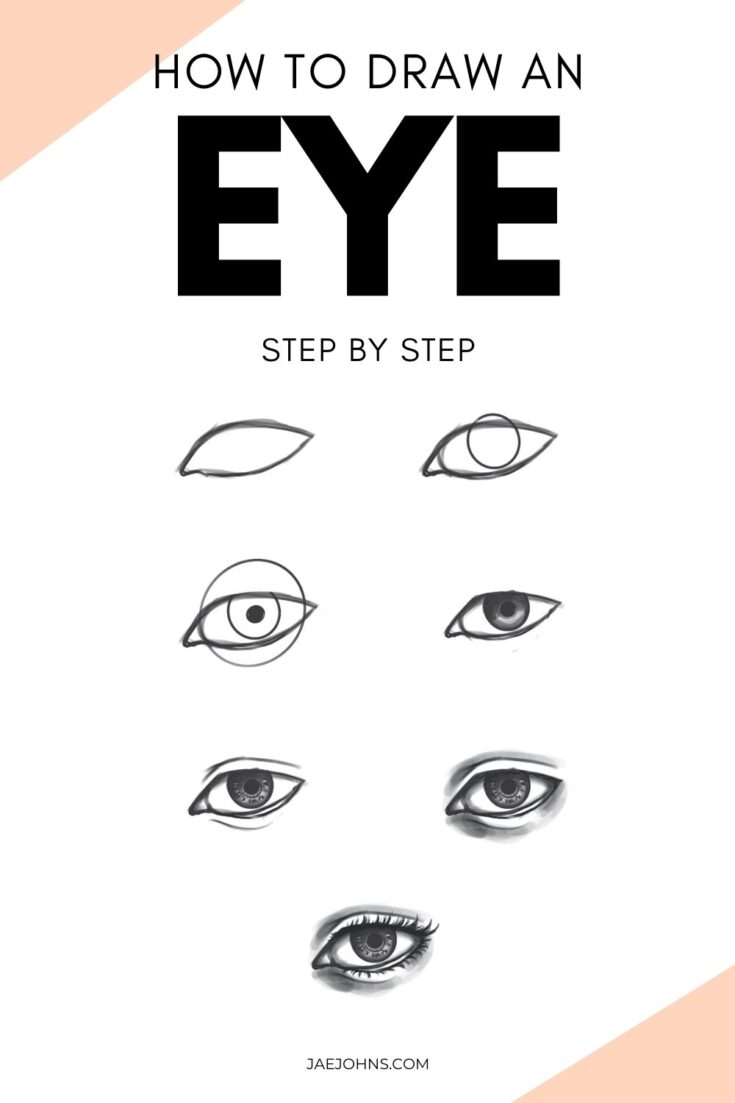
Step 1: Sketch almond shape for the eye


Start with an almond shape
Step 2: Add circle for iris
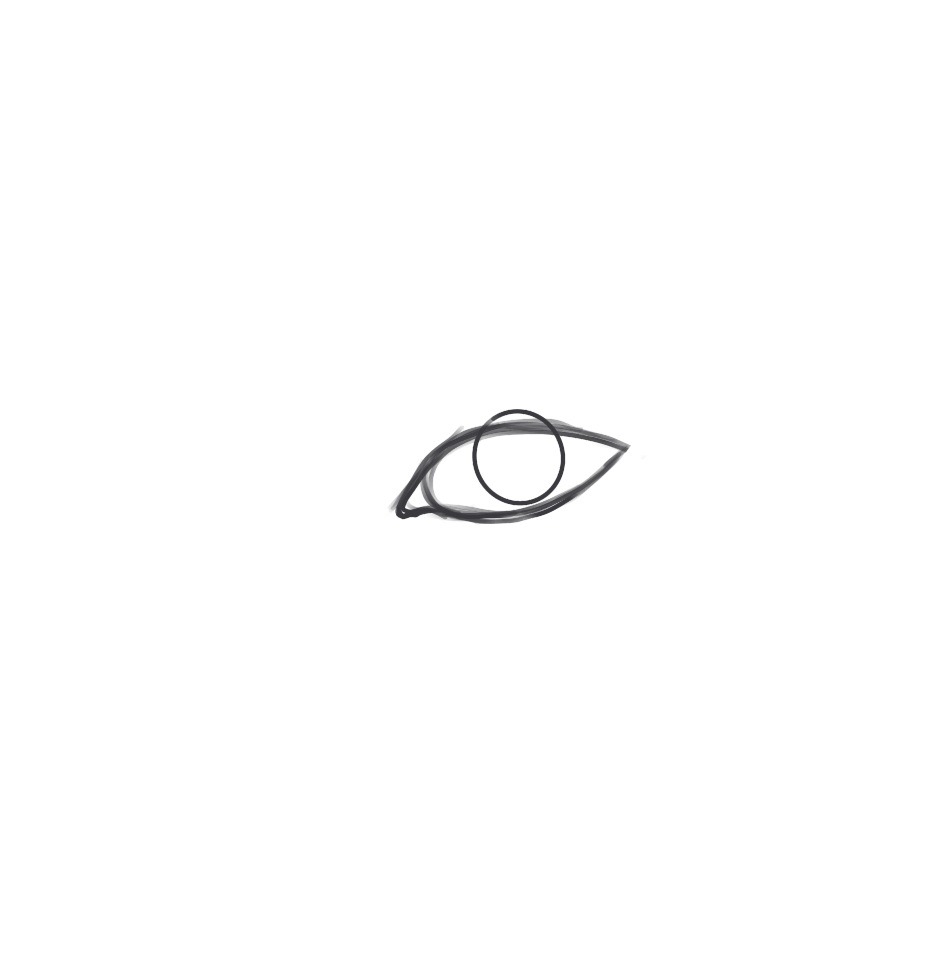

At the tip of the almond close off that little soft triangle, this will be your tear duct.
Now, around the midpoint of the almond shape make a circle with a bit of the top of the circle outside the almond.
Step 3: Draw a bigger circle for the eyeball


Add a smaller circle in that first circle, and make a much larger circle that is a continuation of the line you used to close off the tear duct.
This is our eyeball and will help us guide where the shading will do for our lids.
Fill in the smallest circle for the pupil.
Step 4: Erase details and start shading
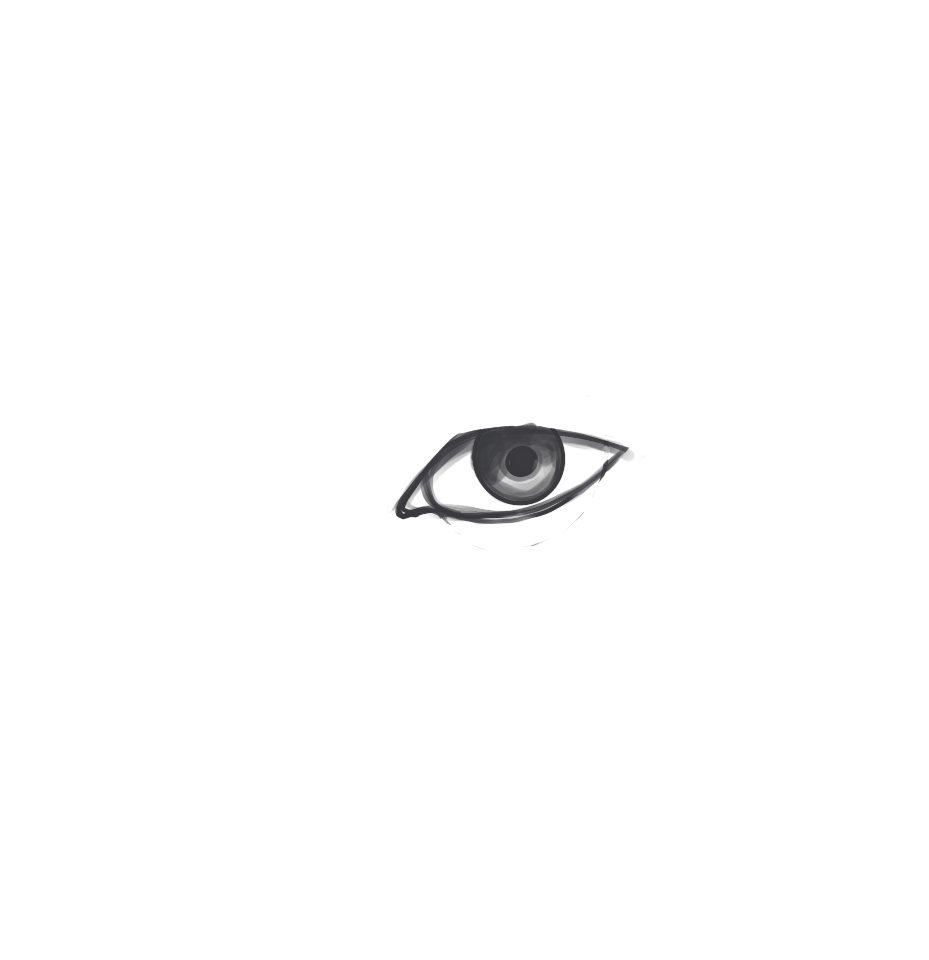

Now erase all but a little bit of the eyeball guide on the bottom of the eye, just enough so you can still see the curve.
This will come in handy later.
Now we’re going to start shading! But before that, let’s define the eye shape a bit more.
Erase a little bit of the almond where the tear duct is to define that downward slope a bit more.
This would be a good time to use a reference as everyone has different eye shapes!
Build out your almond shape to match what shape you’re going for.
For the shading: The big thing to keep in mind is that the lid casts a shadow on the eye!
First, let’s create a light shadow all across the eye under the lid. Now that you’ve done that let’s go into the eye proper.
First, you want to make a little bit of a darker shadow around the eye (inside the circle but along the edge) and then start layering in shading on the top half of it in a half-circle motion (following the contour of the eye).
The top part of the iris should be darker shaded than the bottom part.
Step 5: Add lines around pupil and details for iris

Take a darker color in the iris and add little lines around the pupil, and then do the same with a much lighter color.
Now, let’s add some depth to the tear duct.
Darken just the top and bottom of that arced line that closed off the tear duct from earlier and lightly shade the corner, not too dark!
Then, we’re going to add the waterline by making another line below the bottom of the almond shape, but connected at the tear duct and the outer corner.
This is the waterline!
Time for lids! Remember where you left some markings of the big circle from the previous steps?
Follow that direction for the lower lid, but come up closer to the tear duct. The line shouldn’t be a perfect curve, it should have some movement to it.
The upper lid is similar, closer near the tear duct than the outer corner. Only this time it’s a bit of 2 lines!
Start with the line from the tear duct side, and go up to where the almond shape peaks and stop, then extending just a bit past that line we’re going to make a long arc towards the outer corner for the lid.
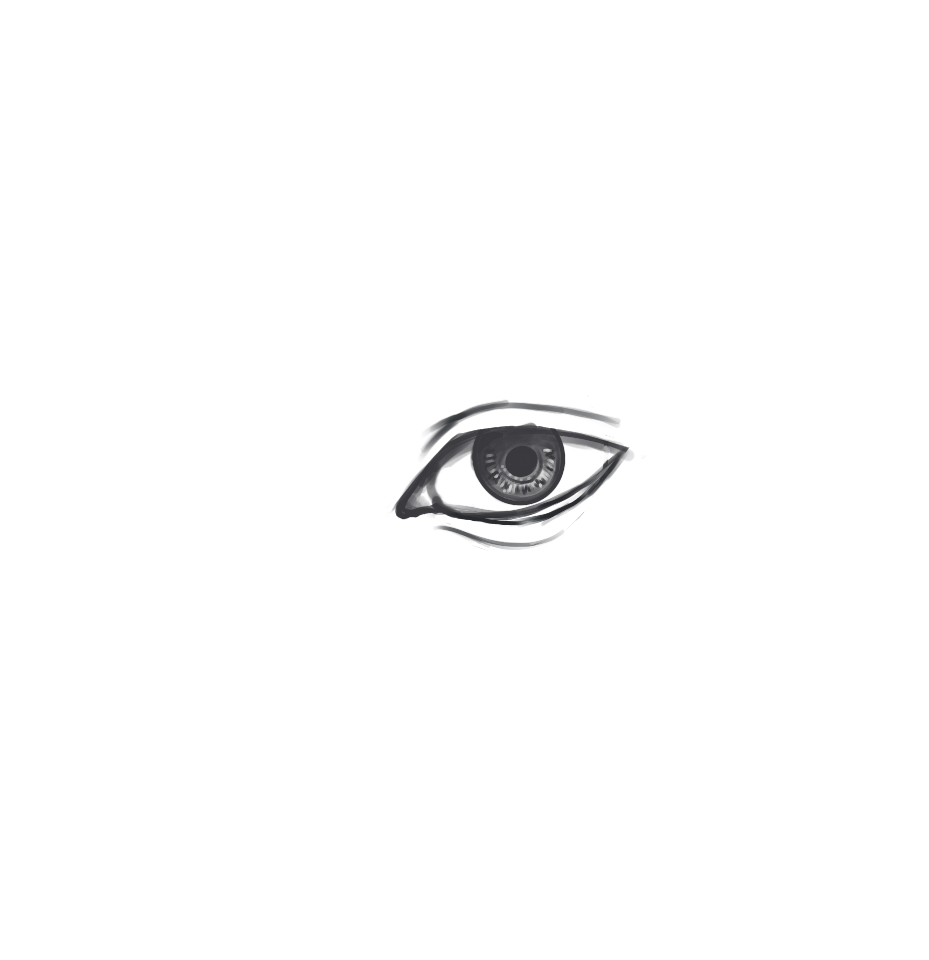
Step 6: Add darker shading around eyelids


Now, where those two lines meet on the lid from the previous step, we’re going to add some darker shading.
Go slow and add it one later at a time. Once it’s dark enough you’re going to then add lighter shading along the top of the arcing lid line before moving to the eye itself.
On the eye itself, we’re going to add some shading to the outer corner area and the tear duct area, just a little bit in a curved motion to give the eyeball some shape and definition.
But don’t add too much or it’ll get too dark!
Now for the lower lid. Where you have the tear duct you’re going to use darker shading, this is where your eye socket is so it’s a bit sunken in on most eyes.
As you follow the curve of the line you made earlier, you’re going to go lighter with your shading, leaving the area between the waterline and the lower lid line untouched.
Below the outer corner, you will add some light layered shading as well to make that lower lid line look like it really has some shape to it.
Step 7: Draw eyelashes
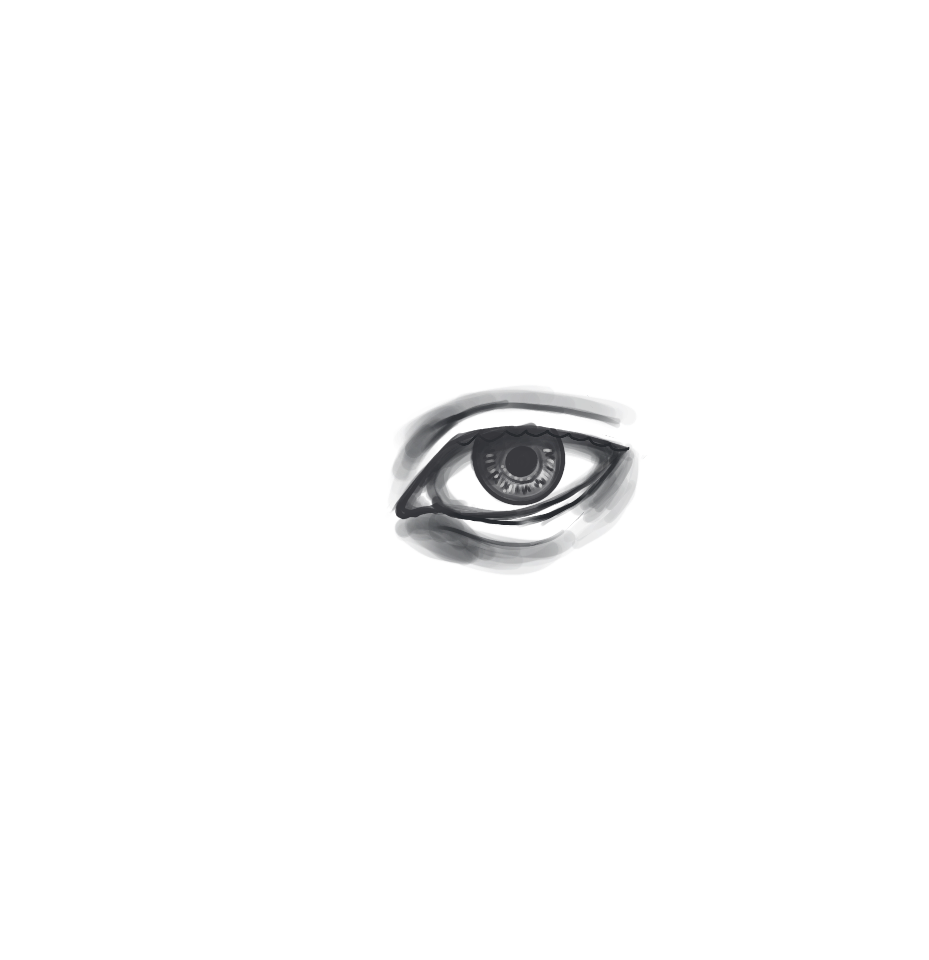

Time to get some lashes going. At the top of the almond shape make a line that has dips and peaks.
It should look like ~~~~~~ going towards the outer corner of the eye. this will be our guideline for lashes
Step 8: Curve eyelashes upward
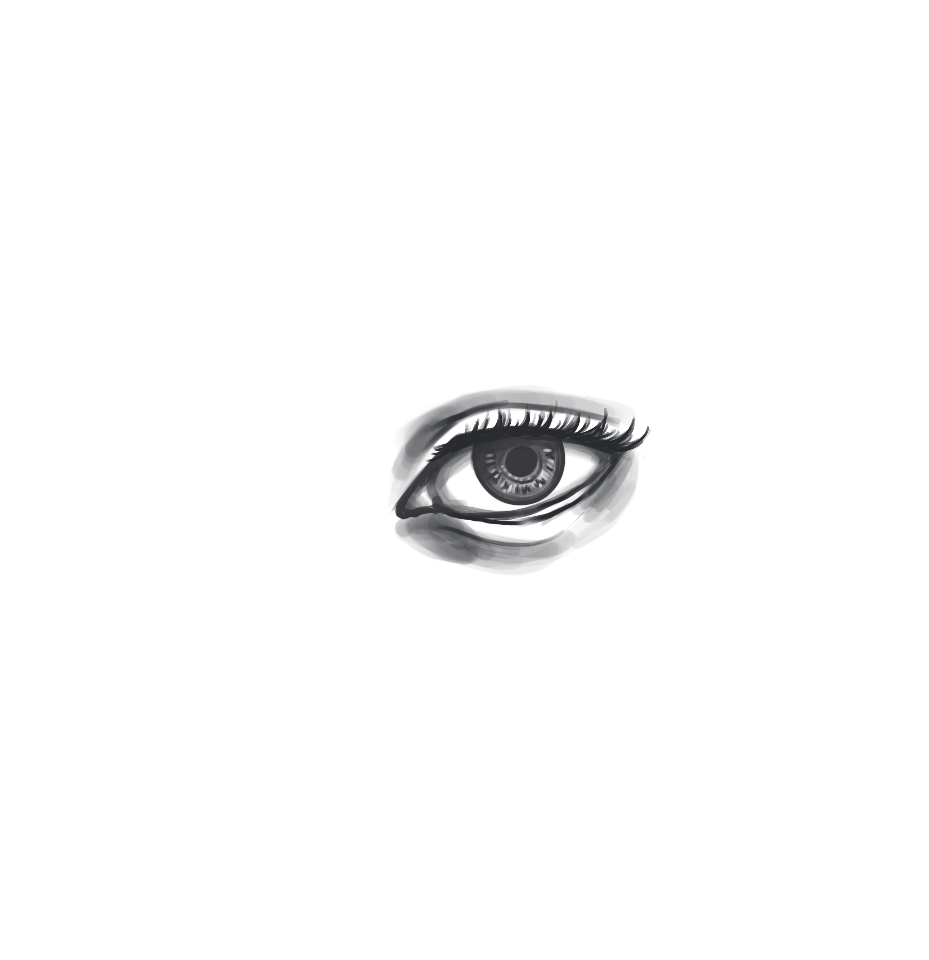

Now, from the bottom of the dips in that squiggly line, we’re going to use light pressure to curve lines upward.
Try not to keep them too orderly, lashes have a bit of chaos to them with smaller and thinner lashes and groups of thicker lashes together.
If you have some trouble figuring out how lashes look try looking at yours in a mirror or using a reference! They’re tricky even for me sometimes!
Step 9: Draw eyelashes on lower eyelid


Now for the bottom lashes, they’re going to be much smaller and shorter and start from the outer corner going in towards the ear duct.
About where they meet the middle of the eye their direction will begin to shift towards the tear duct so be mindful. They don’t just stay going in one direction.
Step 10: Add more dark shading


Fill in the spaces between the squiggly line on the top lid and the almond shape, making it as dark as the lashes.
At this point you can add more shading if you want more contrast in your drawing
Step 11: Add highlight on pupil
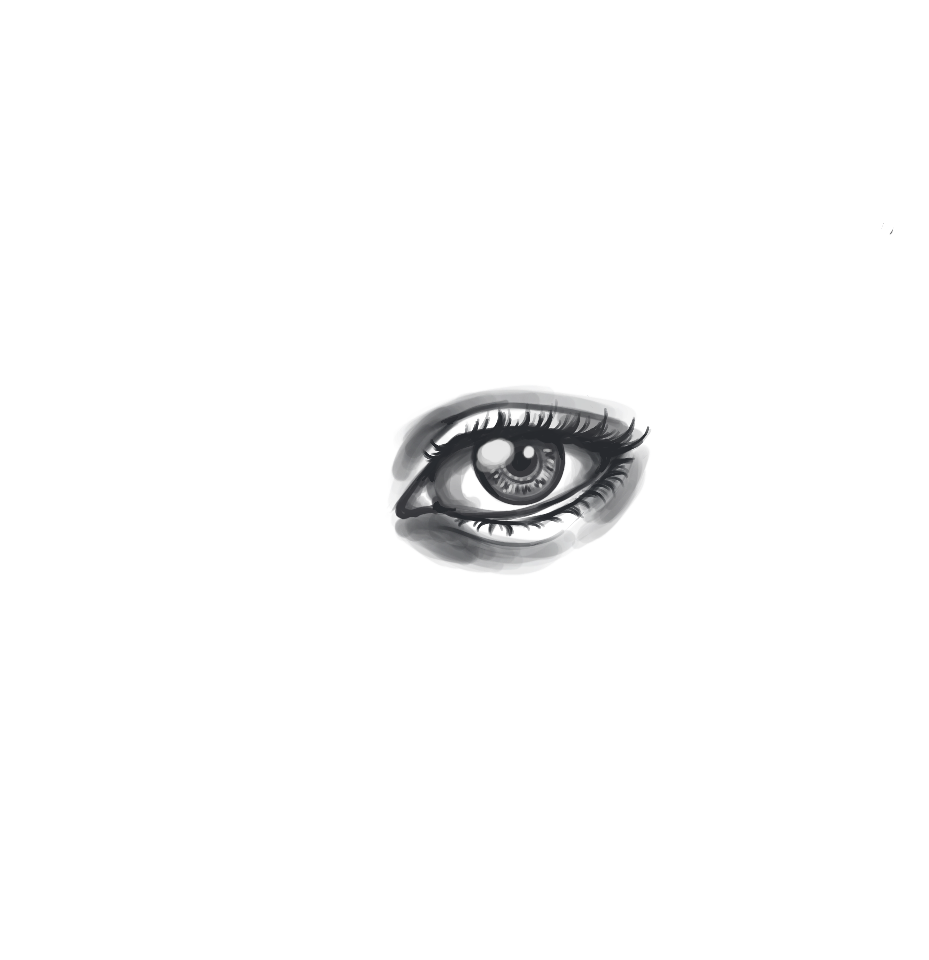
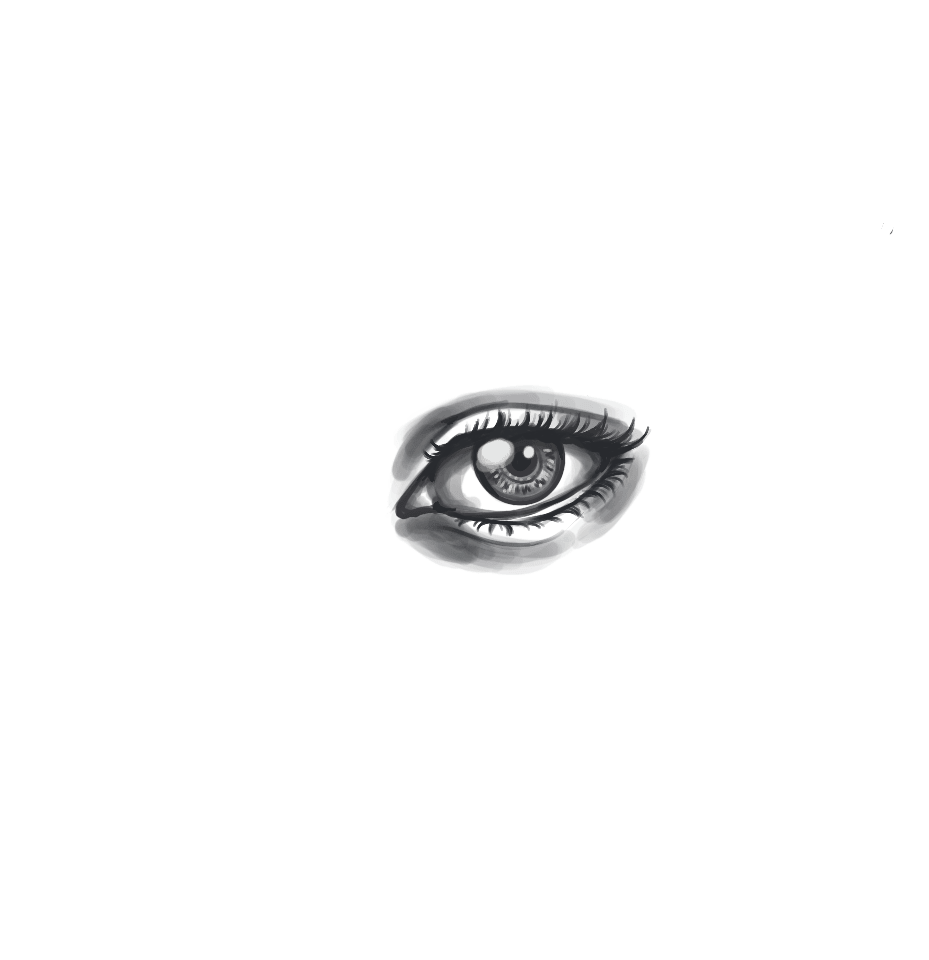
Take a light color, not completely white, but close, and begin laying down the light in the eye.
Go slow, adding layer by layer to make it a bit more realistic than just a white dot on the eye!
It should be more concentrated towards the center of the highlight. There you have it, you just drew an eye!
Thanks to Carolyn for sharing her process. Please check out her social @ClazDesign if you enjoyed her illustrations. She also has some amazing prints and illustrations available in her shop.
How to Draw an Eye Printable Guide

Step-by-step instructions on how to draw an eye.
Materials
- Pencil
- Paper
- Or tablet and stylus
Tools
- Pencil
- Paper
- Or tablet and stylus
Instructions
- Step 1: Sketch almond shape for eye. Start with an almond shape
- Step 2: Add a circle for the iris. At the tip of the almond close off that little soft triangle, this will be your tear duct. Now, around the midpoint of the almond shape make a circle with a bit of the top of the circle outside the almond.
- Step 3: Draw a bigger circle for the eyeball. Add a smaller circle in that first circle, and make a much larger circle that is a continuation of the line you used to close off the tear duct. This is our eyeball and will help us guide where the shading will do for our lids. Fill in the smallest circle for the pupil.
- Step 4: Erase details and start shading. Now erase all but a little bit of the eyeball guide on the bottom of the eye, just enough so you can still see the curve. This will come in handy later. Now we're going to start shading! But before that, let's define the eye shape a bit more. Erase a little bit of the almond where the tear duct is to define that downward slope a bit more. This would be a good time to use a reference as everyone has different eye shapes! Build out your almond shape to match what shape you're going for.
For the shading: The big thing to keep in mind is that the lid casts a shadow on the eye! First, let's create a light shadow all across the eye under the lid. Now that you've done that let's go into the eye proper. First, you want to make a little bit of a darker shadow around the eye (inside the circle but along the edge) and then start layering in shading on the top half of it in a half-circle motion (following the contour of the eye). The top part of the iris should be darker shaded than the bottom part. - Step 5: Add lines around the pupil and details for the iris. Take a darker color in the iris and add little lines around the pupil, and then do the same with a much lighter color. Now, let's add some depth to the tear duct. Darken just the top and bottom of that arced line that closed off the tear duct from earlier and lightly shade the corner, not too dark! Then, we're going to add the waterline by making another line below the bottom of the almond shape, but connected at the tear duct and the outer corner. This is the waterline!
Time for lids! Remember where you left some markings of the big circle from the previous steps? Follow that direction for the lower lid, but come up closer to the tear duct. The line shouldn't be a perfect curve, it should have some movement to it. The upper lid is similar, closer near the tear duct than the outer corner. Only this time it's a bit of 2 lines!
Start with the line from the tear duct side, and go up to where the almond shape peaks and stop, then extending just a bit past that line we're going to make a long arc towards the outer corner for the lid. - Step 6: Add darker shading around eyelids. Now, where those two lines meet on the lid from the previous step, we're going to add some darker shading. Go slow and add it one later at a time. Once it's dark enough you're going to then add lighter shading along the top of the arcing lid line before moving to the eye itself.
On the eye itself, we're going to add some shading to the outer corner area and the tear duct area, just a little bit in a curved motion to give the eyeball some shape and definition. But don't add too much or it'll get too dark!
Now for the lower lid. Where you have the tear duct you're going to use darker shading, this is where your eye socket is so it's a bit sunken in on most eyes. As you follow the curve of the line you made earlier, you're going to go lighter with your shading, leaving the area between the waterline and the lower lid line untouched. Below the outer corner, you will add some light layered shading as well to make that lower lid line look like it really has some shape to it. - Step 7: Draw eyelashes. Time to get some lashes going. At the top of the almond shape make a line that has dips and peaks. It should look like ~~~~~~ going towards the outer corner of the eye. this will be our guideline for lashes.
- Step 8: Curve eyelashes upward. Now, from the bottom of the dips in that squiggly line, we're going to use light pressure to curve lines upward. Try not to keep them too orderly, lashes have a bit of chaos to them with smaller and thinner lashes and groups of thicker lashes together. If you have some trouble figuring out how lashes look try looking at yours in a mirror or using a reference! They're tricky even for me sometimes!
- Step 9: Draw eyelashes on the lower eyelid. Now for the bottom lashes, they're going to be much smaller and shorter and start from the outer corner going in towards the ear duct. About where they meet the middle of the eye their direction will begin to shift towards the tear duct so be mindful. They don't just stay going in one direction.
- Step 10: Add more dark shading. Fill in the spaces between the squiggly line on the top lid and the almond shape, making it as dark as the lashes. At this point, you can add more shading if you want more contrast in your drawing.
- Step 11: Add highlight on the pupil. Take a light color, not completely white, but close, and begin laying down the light in the eye. Go slow, adding layer by layer to make it a bit more realistic than just a white dot on the eye! It should be more concentrated towards the center of the highlight. There you have it, you just drew an eye!