

Would you believe that you can make incredible illustrations in Procreate in a short time and improve your speed significantly? It may seem like an impossible thing, but it can happen, only if you know the secret!
You can take your illustration game to the next level by using Procreate masking.
The renowned app includes three types of masking: layer masks, clipping masks, and alpha channels. There is no doubt that masking is one of the most powerful features, which can significantly improve your workflow and make your illustration procedure enjoyable, especially when combined with different free Procreate brushes.
Keep reading this article to know everything about masking in Procreate.
Without further ado, let’s dig in!
Other related topics to help you with Procreate:
- Use Procreate without Apple Pencil (What You Oughta Know)
- How to Use the Procreate Animation Tool
- 34 Procreate Artists Speak Out: “One Procreate Tip I Wish I Knew Before Using It”
- 18 Must-Know Procreate Tips for Beginners
- Procreate Watercolor Brush Set

What Does Masking Do in Procreate?
Concealing or hiding is called masking.
We use masking in Procreate to cover or hide a portion of our image.
Masking in Procreate is similar to masking tape.
When you cover part of a blank canvas with masking tape before painting, the canvas will expose itself as a blank canvas when you remove the masking tape.
In Procreate, masking can be a destructive or non-destructive way to hide an area of your image.
You can quickly undo and edit your changes whenever you want because they are non-destructive.
For instance, drawing a Bob Ross-inspired forest illustration and wanting to remove a section of it, you might have previously erased it.
Since you’d have to draw it back on, if you changed your mind, this is a damaging method of getting rid of that part.
You can use masking to cover the part of the image.
It is non-destructive since it can be quickly unmasked and restored to its original state.
Following are the ways to apply masks in Procreate app:
- Clipping Mask
- Alpha Lock
- Layer Mask
The masking method that you choose totally depends on your purpose.
How to Use Masking in Procreate?
Let’s unleash the procedure of using each type of masking:
Clipping Mask
A clipping mask is a layer that sits on top of your original art.
Any work that is mounted on a clipping mask layer will be clipped to the layer below it.
In Procreate, clipping masks function similarly to clipping masks in Photoshop.
How to Use a Clipping Mask?
You can use a clipping mask in Procreate in the following ways.
Create a new layer above your template, fill it with color, texture, or desired file, and then choose “clipping mask” from the flyout menu.
The texture, color, or file will be limited to the layer in the layer panel just below it.
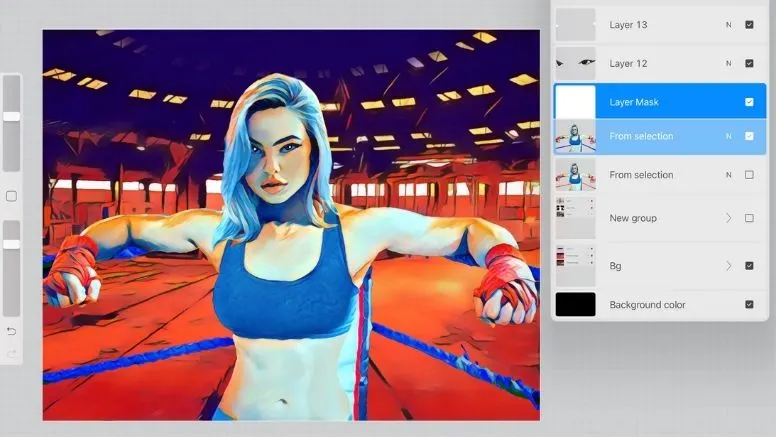
Layer Mask
You can use the layer mask when concealing or hiding an area of your artwork.
How Do I Turn a Layer into a Mask?
Pick the layer your artwork is on and choose “cover” from the flyout menu to use a layer mask in Procreate.
A layer mask will be applied to your artwork.
Next, use a white or black brush to draw on the layer mask layer.
White hides and black exposes.
To cover parts of your artwork, choose an acceptable brush size and paint black on the layer mask.
If you make a mistake and cover up too much of the artwork, simply change your brush color to white and paint over it to expose it again.
Alpha Lock
Many people use Alpha lock a lot before learning about clipping and layer masks, but it’s not recommended.
Let’s get to know how to use it, and then you can decide whether or not you want to incorporate it into your artwork.
How to Use It?
The alpha lock is a simple way to quickly add color or pattern to a section of your artwork.
You can draw on a layer by selecting it and selecting alpha lock from the flyout menu.
Anything you draw will be limited to the layer.
You are, however, drawing ON the sheet itself, not on a different layer.
As a result, the alpha lock is a disruptive editing technique.
You can’t undo what you’ve done after you’ve locked your layer and drawn on top of it without using the “undo” function.
The only way to get around this is to repeat your original layer to still have a backup.
Why Does My Procreate Not Have Clipping Mask?
Make sure to select both objects for your clipping shape without going into Isolation Mode.
Isolation Mode is a mode in which you isolate an object (or a group of objects) to operate on that (group of) object(s) and only that (group of) object(s).
The remainder of your item will be locked and ‘washed out.’ You are unable to communicate with them in any useful way.
It is perfect if you want to focus on a single object.
However, if you try to communicate with other objects again, it is exhausting as entering and exiting Isolation Mode is non-intuitive.
Use the Move tool (black arrow) to double-click on any group to enter Isolation Mode.
To return to Isolation Mode, click the arrow pointing left on the top left of the folder, right underneath the tabs with opened document names, or double-click with the Move tool on any place where there are no selectable items.
Difference between Alpha Lock and Clipping Mask
A clipping mask is a non-destructive editing technique, which ensures that you are not damaging the original artwork in the process.
The effects are actually layered onto your artwork, and those layers can be changed without affecting the original artwork.
On the other hand, Alpha Lock is a destructive technique that is not quite useful and does not come with an ‘undo’ function.
How to Fix a Layer Mask from Not Working?
The Procreate layer can stop working for many reasons.
Similarly, there are many ways to fix this issue:
- Check if the mask is selected
- Check if the layer is locked
- Verify if there is a layer above the layer
- Check color mode and default settings to determine if it works for the image mode you selected.
Conclusion
I hope this guide helps you use the masking feature in Procreate.
It is a powerful feature that you can use in your animations, illustrations, paintings, and all types of digital art!