

Many people have been waiting on a Procreate animation option, and recent additions to the system did not disappoint.
So, can you animate on Procreate? Absolutely, and they did an excellent job integrating it seamlessly into the platform.
For the first time, you can easily take your favorite drawing tool and use it to make stunning Procreate 2D animations.
If you are asking yourself, can you make animations on Procreate? Is Procreate good for animation? The answer is yes. Now is as good a chance as any to learn how to animate on Procreate.
If you love making art in Procreate and have been waiting to get animating, you will love this tool.
It brings all of the power of Procreate and offers you even more.
Already people are beginning to make absolutely amazing videos with these tools.
Procreate has really made animating simple, but they still offer everything that you need to make stunning animation on Procreate.
So, can you animate in Procreate? Let’s find out!
Why Animate in Procreate? (Key Benefits & Use‑Cases)
Procreate isn’t just a stellar drawing app—it also packs a surprisingly powerful Animation Assist module that lets you create frame‑by‑frame motion without ever leaving the canvas. The timeline sits neatly at the bottom of your workspace, giving you onion‑skin previews, instant playback, and per‑frame controls—all driven by the same Valkyrie graphics engine that keeps illustration strokes buttery‑smooth. Procreate Help Center
Key Benefits
- One‑App Workflow – Sketch, ink, paint, and animate in a single file—no round‑tripping to desktop software required.
- Apple Pencil Precision – Pressure, tilt, and the new barrel‑roll sensor (added in iPad Pro 2024 models) translate directly to each frame, speeding up clean‑ups and in‑betweens. Apple
- User‑Friendly Timeline – Drag to reorder frames, set hold times, and toggle loop or ping‑pong playback with intuitive gestures.
- Instant Share Formats – Export directly as looping GIF, APNG, MP4, or HEVC at up to 4K; Procreate auto‑optimizes file size while preserving alpha transparency. Procreate Help Center
- Built‑In Time‑Lapse Recording – Every stroke is captured, so you can share a behind‑the‑scenes process video alongside the finished animation—perfect for social media teasers.
- Affordable & Portable – Procreate’s one‑time price (≈ US $12.99) + iPad means professional‑grade 2D animation on the couch, plane, or classroom.
Popular Use‑Cases
- Looping GIF stickers for Instagram, iMessage, Discord, or GIPHY libraries
- Short explainer clips or motion comics for YouTube Shorts and TikTok
- Animated UI micro‑interactions for app prototypes
- Title cards and lower‑thirds for streaming overlays
- Storyboarding or animatics before moving to 3D or After Effects
- Practice drills for timing, squash‑and‑stretch, or walk cycles in a low‑overhead environment
With these strengths, Procreate sits nicely between rough‑sketch tools like Flipaclip and high‑end suites like Toon Boom or After Effects—offering illustrators a fast, friction‑free gateway into the world of animation.
What You’ll Need (iPad + Pencil + App + Storage)
Why this matters: Animation stacks up dozens—sometimes hundreds—of layers, so having the right hardware and enough free space keeps Procreate running smoothly.
iPad
- Best choice: 2024 M4 iPad Pro (8 GB or 16 GB RAM, tandem‑OLED). Handles huge canvases—up to roughly 1,000 layers on a 1080p file.
- Solid mid‑range: iPad Air 6 or iPad mini 6 (8 GB RAM). Expect about 500 layers—plenty for short clips at 24 fps.
- Budget‑friendly: Regular iPads from 2018‑2021 work fine for smaller projects if you keep total layers under ~60.
Stylus
- Apple Pencil Pro – Adds “barrel‑roll” rotation and a squeeze shortcut palette for lightning‑fast tool swaps.
- Apple Pencil (2nd gen) or USB‑C Pencil – Fully supported; you’ll only miss the newest gesture tricks.
Procreate App
- Current version: Procreate 5.3.15 (iPadOS 16.3 or later). Install updates as soon as they land; the next major release will add new brush and animation features.
Storage & File Management
- Free space: Aim for at least 20 GB of open storage. A 10‑second 4K animation can easily reach 1 GB.
- Backups: Export finished work (PNG sequences, GIFs, or HEVC/MP4) to iCloud Drive or an external SSD.
- Shrink time‑lapses: In Actions → Video, set Time‑Lapse Quality to “Lossy” before sharing; you’ll cut file size by ~80 % with minimal quality loss.
Quick Checklist
- iPad with 4 GB RAM minimum (8 GB+ recommended)
- Apple Pencil (Pro or 2nd gen preferred)
- Procreate updated to the latest version
- 20 GB of free storage or reliable cloud/external backup
Nail down these basics first—then you can dive into canvas setup without worrying about “Layer Limit Reached” pop‑ups or sluggish playback mid‑animation.

Setting Up Your Canvas for Animation (Dimensions, DPI, Background)
Getting these basics right keeps Procreate fast, prevents the “Layer Limit Reached” popup, and ensures your final export looks crisp.
1. Pick Canvas Dimensions That Match Your Platform
- Instagram / TikTok (Stories & Reels) — 1080 × 1920 px (vert 9:16)
- Instagram Feed (Square) — 1080 × 1080 px (1:1)
- YouTube & Web (HD) — 1920 × 1080 px (16:9)
- 4K Showcase — 3840 × 2160 px (16:9) Only if you’re on an 8 GB + iPad Pro; layer count drops fast.
Pro tip: Start a little smaller (for example 1600 × 1600) while roughing things out, then upscale at export if you need the extra resolution.
2. Balance Resolution Against the Layer Limit
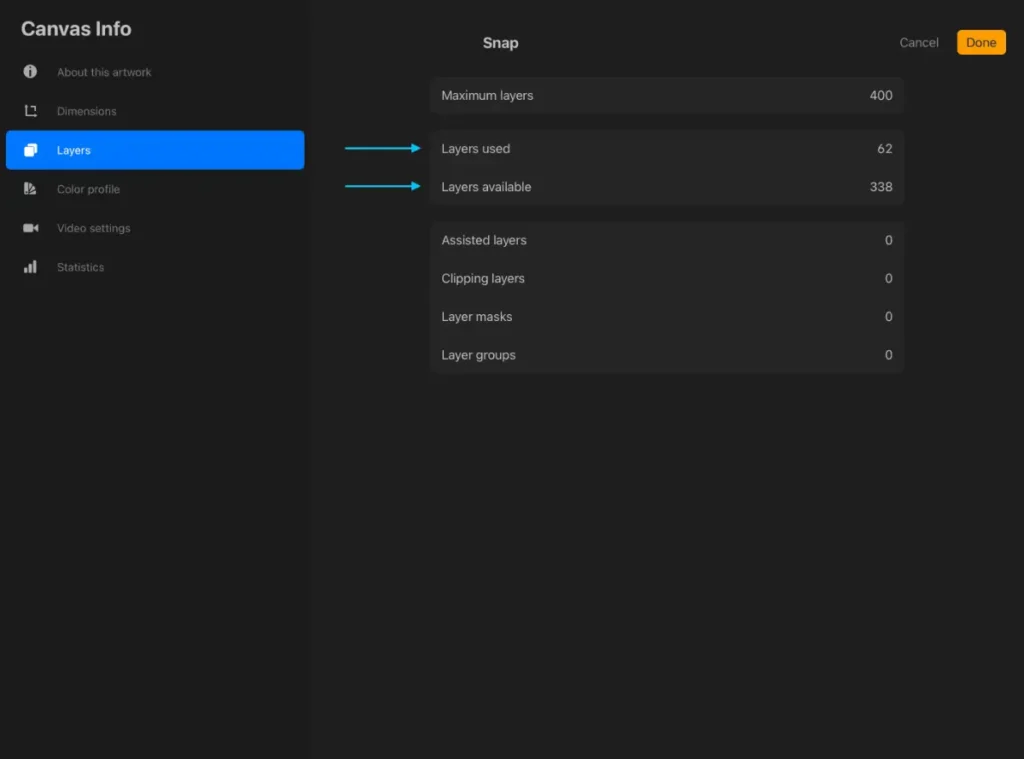
Procreate calculates a layer cap from your iPad’s RAM × total pixels:
| iPad RAM | Max layers at 1080 × 1080 (72 DPI) |
| 16 GB (M4 iPad Pro) | ~1 000 layers |
| 8 GB (Air 6 / mini 6) | ~500 layers |
| 4 GB (2018–2021 base iPads) | ~120 layers |
Check “Maximum Layers” under the DPI field before you hit Create.
3. Choose the Right DPI
- Digital‑only animation → 72 DPI (keeps file sizes down, no loss of on‑screen detail).
- Print‑ready still frames → 300 DPI (for posters, merch, etc.).
4. Set the Background
- Solid color: Layers › Background Color —pick a neutral mid‑grey for better onion‑skin contrast.
- Transparent GIF / PNG: toggle the background off before you export (Share › Animated GIF / PNG › Transparent Background).
- Locked backdrop: add your background art as the very first frame, then turn on “Background” in Animation Assist so it stays fixed beneath every other frame.
5. Quick Setup Checklist
- Actions › Canvas › Animation Assist → ON
- Tap Add Frame once to confirm the layer limit is healthy.
- Set FPS to 12 fps for roughs; bump to 24 fps for final polish.
- Hit the “+” in the Canvas picker to save these settings as a preset for next time.
Lock in these settings now and you’ll enjoy smooth playback, generous layer counts, and exports tailored perfectly to wherever you’re posting your animation.
Planning Your Animation: Storyboards & Thumbnails
Good planning prevents waste—every clean frame you draw sits on top of a clear roadmap.
1. Start With a One‑Sentence Logline
Write a single sentence that captures the essence of your animation.
Example: “A sleepy cat stretches, yawns, and curls back into a perfect loop.”
2. Rough Storyboards (4–12 Panels)
- Focus on beats, not details. Each panel should answer what happens and when it happens.
- Keep them tiny. 2‑inch squares (or a single Procreate canvas split into thumbnails) force you to simplify.
- Add arrows & timing notes. A quick “→ 8 f” tells future‑you that the action lasts eight frames.
3. Thumbnail Key Poses Inside Procreate
- Create a new layer group named “Thumbnails” above your storyboard layer.
- Drop the opacity to 40 % so thumbnails stay visible but unobtrusive.
- Sketch your key poses—the extreme positions that define movement (e.g., cat fully tucked, cat fully stretched).
- Label each pose with the frame number you think it belongs on. You’ll adjust later.
4. Test Timing With a Quick Animatic
- Toggle Animation Assist and duplicate key‑pose layers until they fill the timeline.
- Set FPS to 6–8 for a super‑rough timing pass.
- Play back. Does the action read? If not, reorder or add holds until it feels right.
5. Shift to Clean Keys & In‑Betweens
Once timing clicks, lower thumbnail opacity to 15 % and begin inking on a new layer group.
Tip: Keep thumbnails until final export—you can always toggle them on to troubleshoot spacing or arcs.
6. Checklist Before You Ink
- Logline written
- Storyboards tell a clear beginning–middle–end (or loop)
- Key poses thumb‑nailed and labelled
- Animatic plays smoothly at low FPS
- Timing feels natural, even without details
Locking these steps in early means every subsequent pass—cleanup, color, effects—builds on a solid foundation, saving hours of re‑drawing later.
Adding In‑Betweens (Tweening) for Smoother Movement
Key frames give your animation structure; in‑betweens create the illusion of fluid motion by filling the gaps.
1. Understand the Spacing Rule
- Even spacing = constant speed.
- Tight spacing near key frames + wide spacing in the middle = slow‑in / slow‑out (natural acceleration).
Tip: Count the number of “empty” frames between key poses first, then decide where easing should happen.
2. Duplicate, Then Draw
- In Animation Assist, tap your first key frame, choose Duplicate, and move the copy halfway between the two keys.
- Lower the duplicate layer’s opacity to 20 %.
- On a new blank frame in that same position, trace the middle pose—this is your breakdown.
- Repeat: duplicate the breakdowns to create quarter‑way guides, then trace new drawings until motion feels smooth.
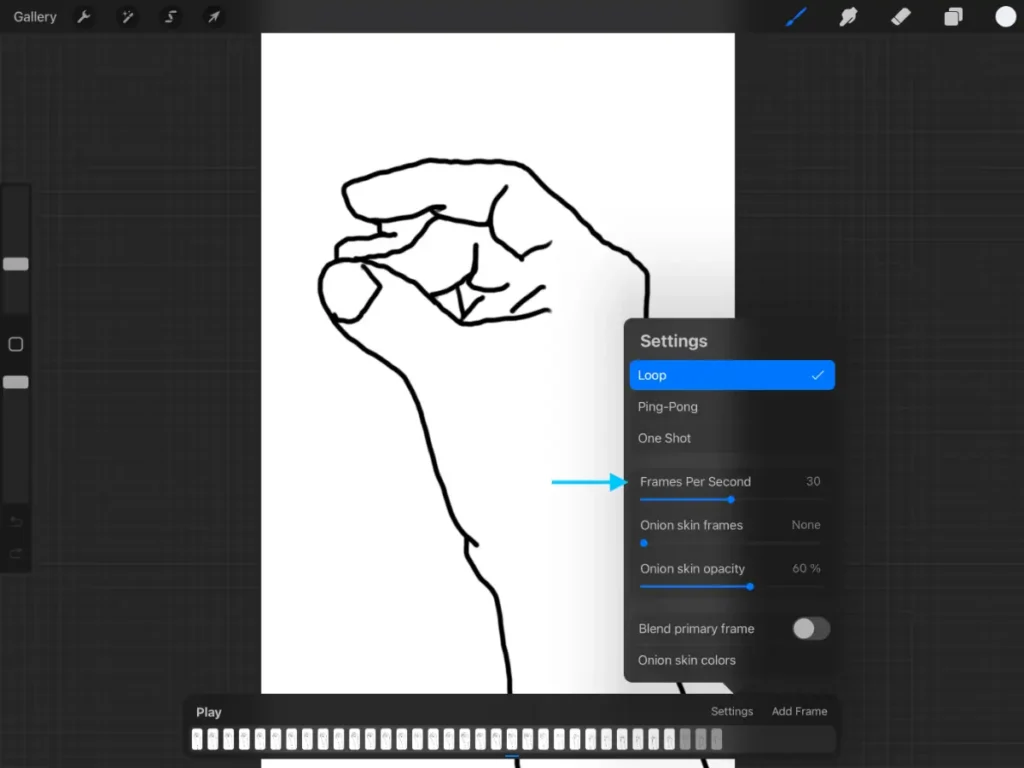
3. Use Onion‑Skin Settings to Your Advantage
- Frames Before / After: set to 3 so you see up to three previous and next drawings.
- Onion‑Skin Opacity: 20 % keeps reference faint but visible.
- Blend Primary Frame: leave ON—this lets you judge arcs more clearly.
4. Check Arcs & Volumes
- Flip quickly between frames (Two‑finger hold) to spot wobbling lines.
- Drag a QuickLine arc over multiple frames to ensure joints (elbows, knees) follow a smooth path.
- For complex parts (tail swishes, cloth), rough in a smaller‑sized path layer first, then animate the element to match.
5. Polish Timing
- Play at 12 fps while roughing—easier to see hiccups.
- When satisfied, switch to 24 fps for the final render.
- Add hold frames (duplicate the last frame of a motion) if you need an on‑screen pause before the next action.
6. Quick In‑Between Checklist
- Keys and breakdowns drawn
- Spacing adjusted for slow‑in / slow‑out
- Onion‑skin visibility set to 20 %
- Volumes stay consistent across frames
- Playback smooth at both 12 fps and 24 fps
Mastering in‑betweens turns stiff key‑pose flips into buttery animation—practice on short loops first, then apply the same logic to longer scenes.
The Flow of Procreate’s Animation
Procreate’s Animation Assist is based on classic ‘flip-style’ animation like that used by Disney and Studio Ghibli. It makes animation in Procreate so easy, anyone could do it.
There’s a simple timeline with layers built on ‘onion skinning’, allowing you to see multiple frames simultaneously.
The simple-to-use, almost true-to-life style lets you quickly get intuitive results.
Layers represent each frame in your animation sequence, and Animation Assist makes workflow easier. For example, if you need another frame, that’s as simple as adding a new layer.
Layer Groups allow you to select what is static in the background within an animation and separate it from what’s being animated.
Then, the onion skinning allows you to quickly flip back and forth in an animation to see how it’s working quickly.
It gets its name from the thin transparent sheets hand animators use to flip back and forth through different animations.
Animation Assist allows you to stack up to 12 layers of onion skin to easily see the before and after frames. You can alter each opacity for easier viewing and make adjustments on the fly as you’re working with it.
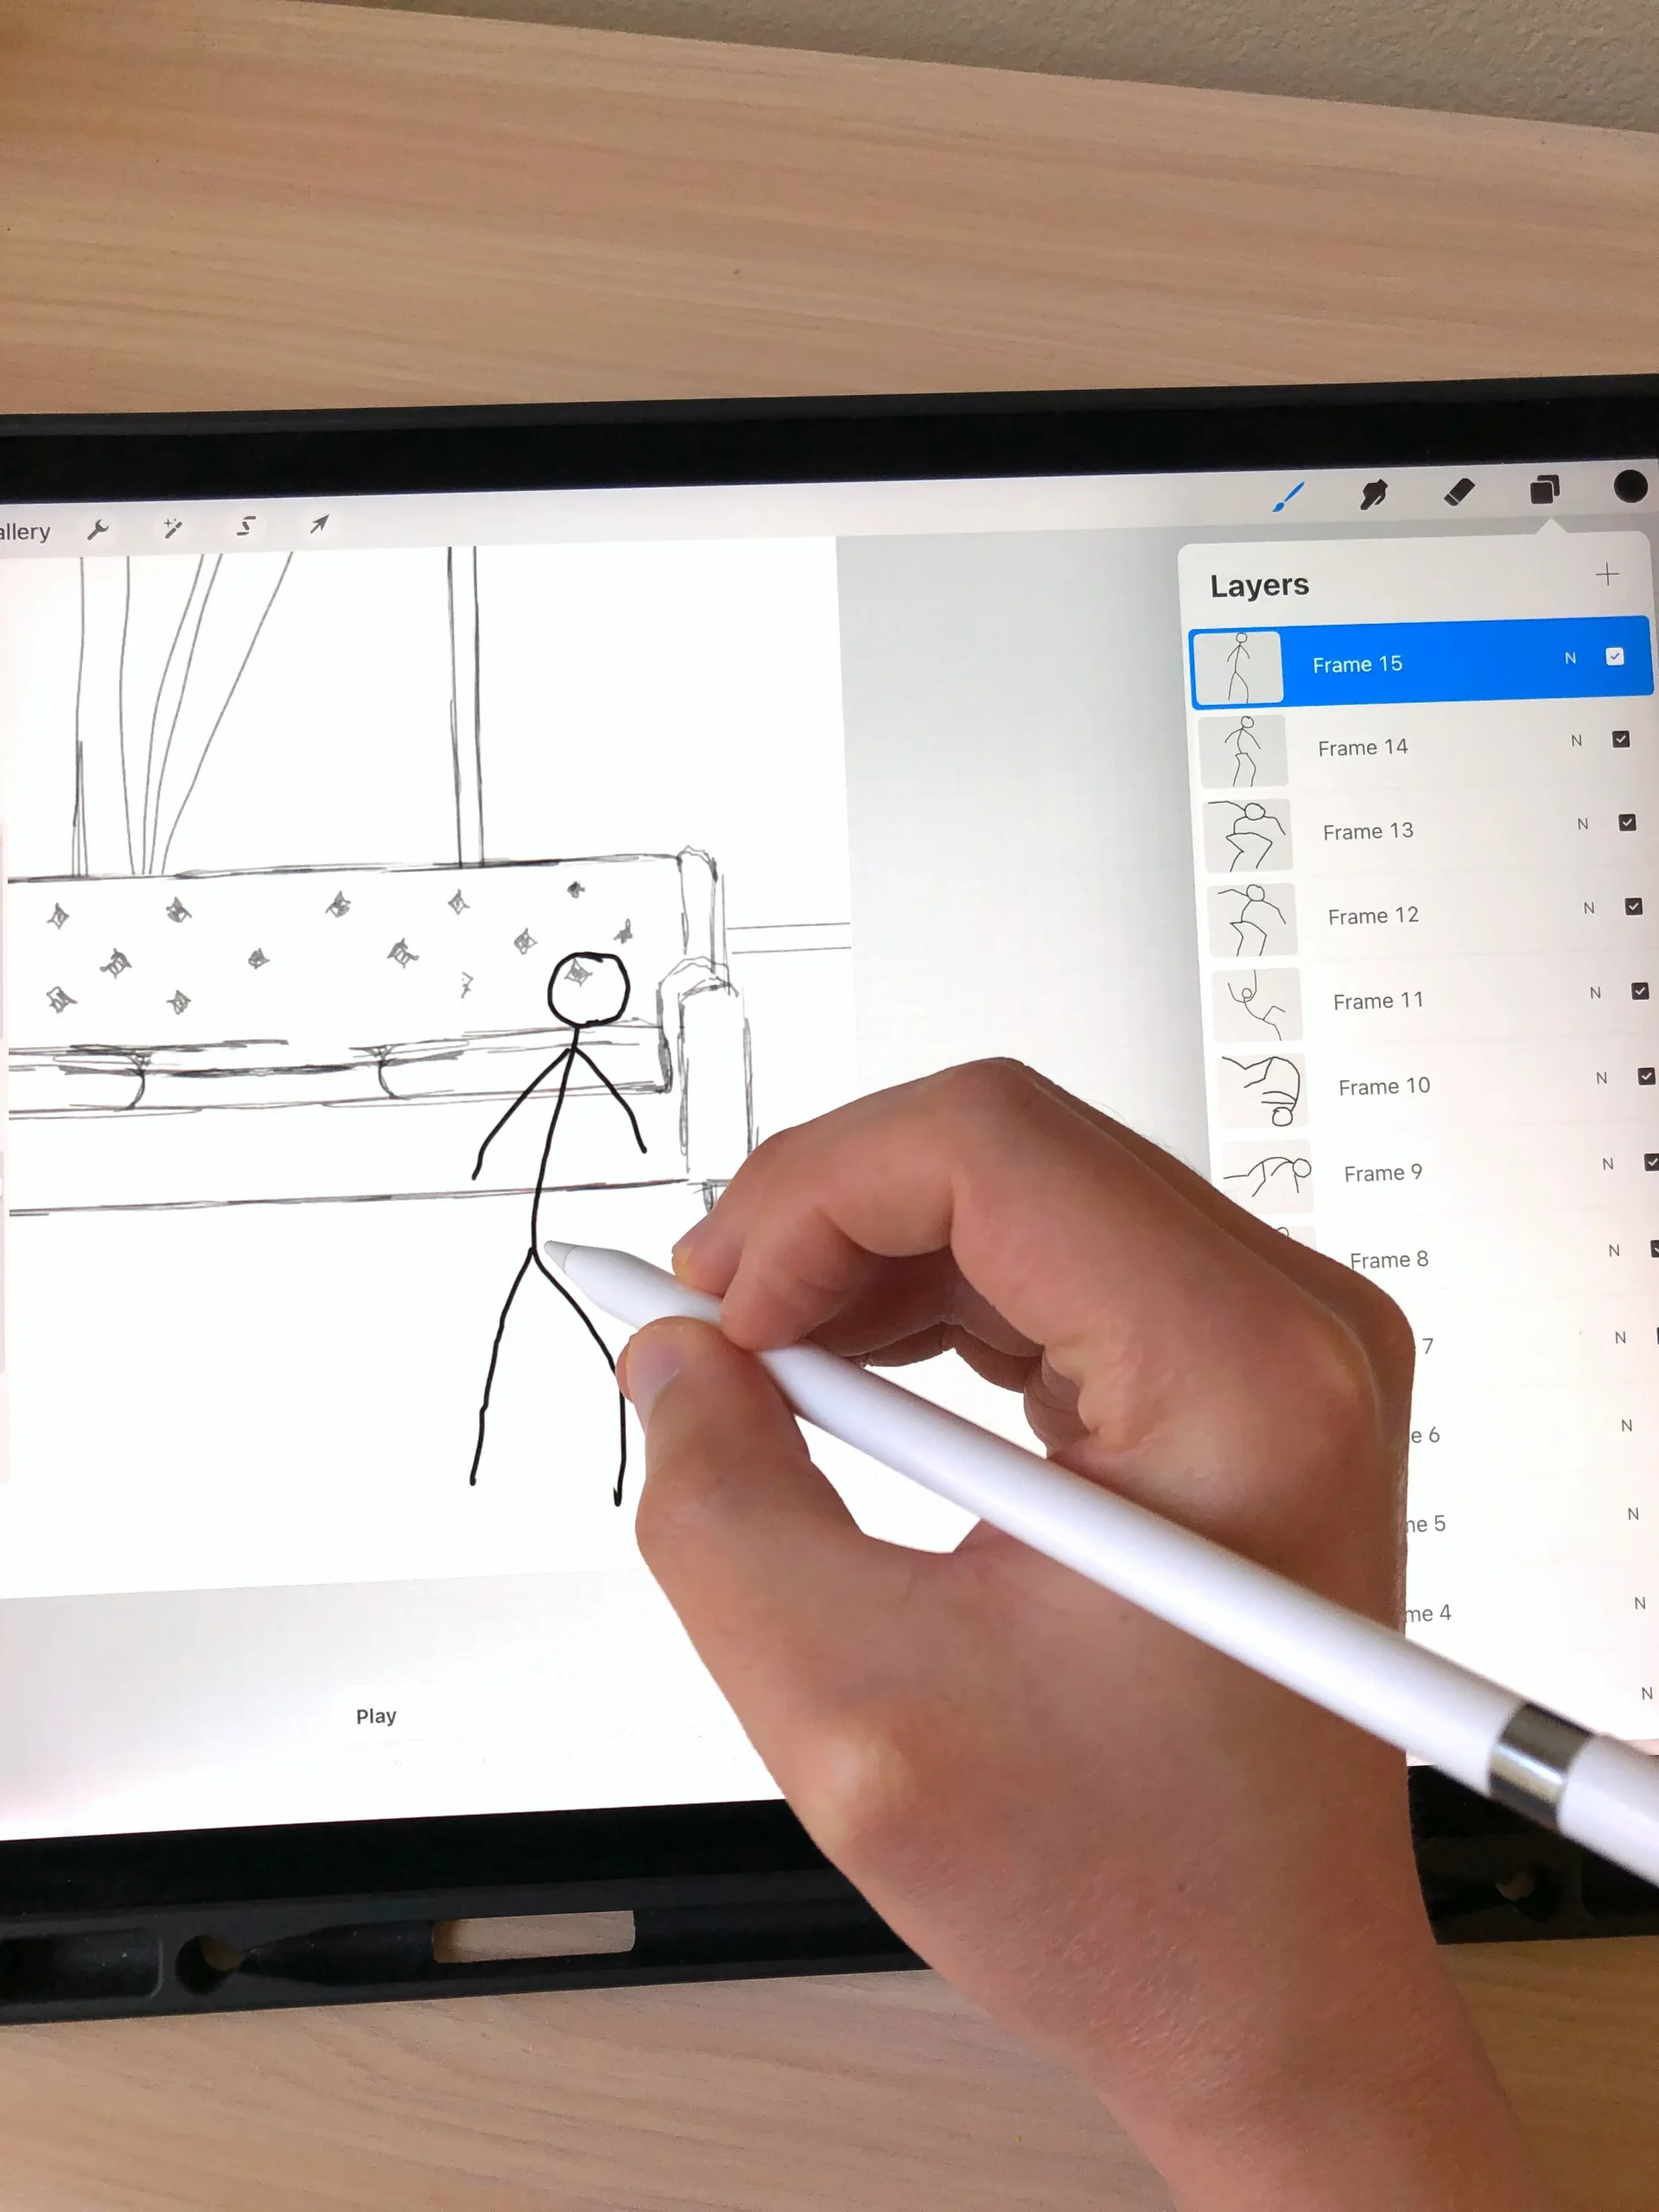
Creating and Managing Frames
The core of any animation tool is the ability to create and control frames.
Your ability to animate with Procreate well will come down to your frame management.
Frames are the different images that will eventually come together to create your 2D animation.
In order to use frames effectively, you must know how to create and manage them.
Procreate animation is a fairly simple process, and they have made it easy for you to get the right to work with a few simple taps.
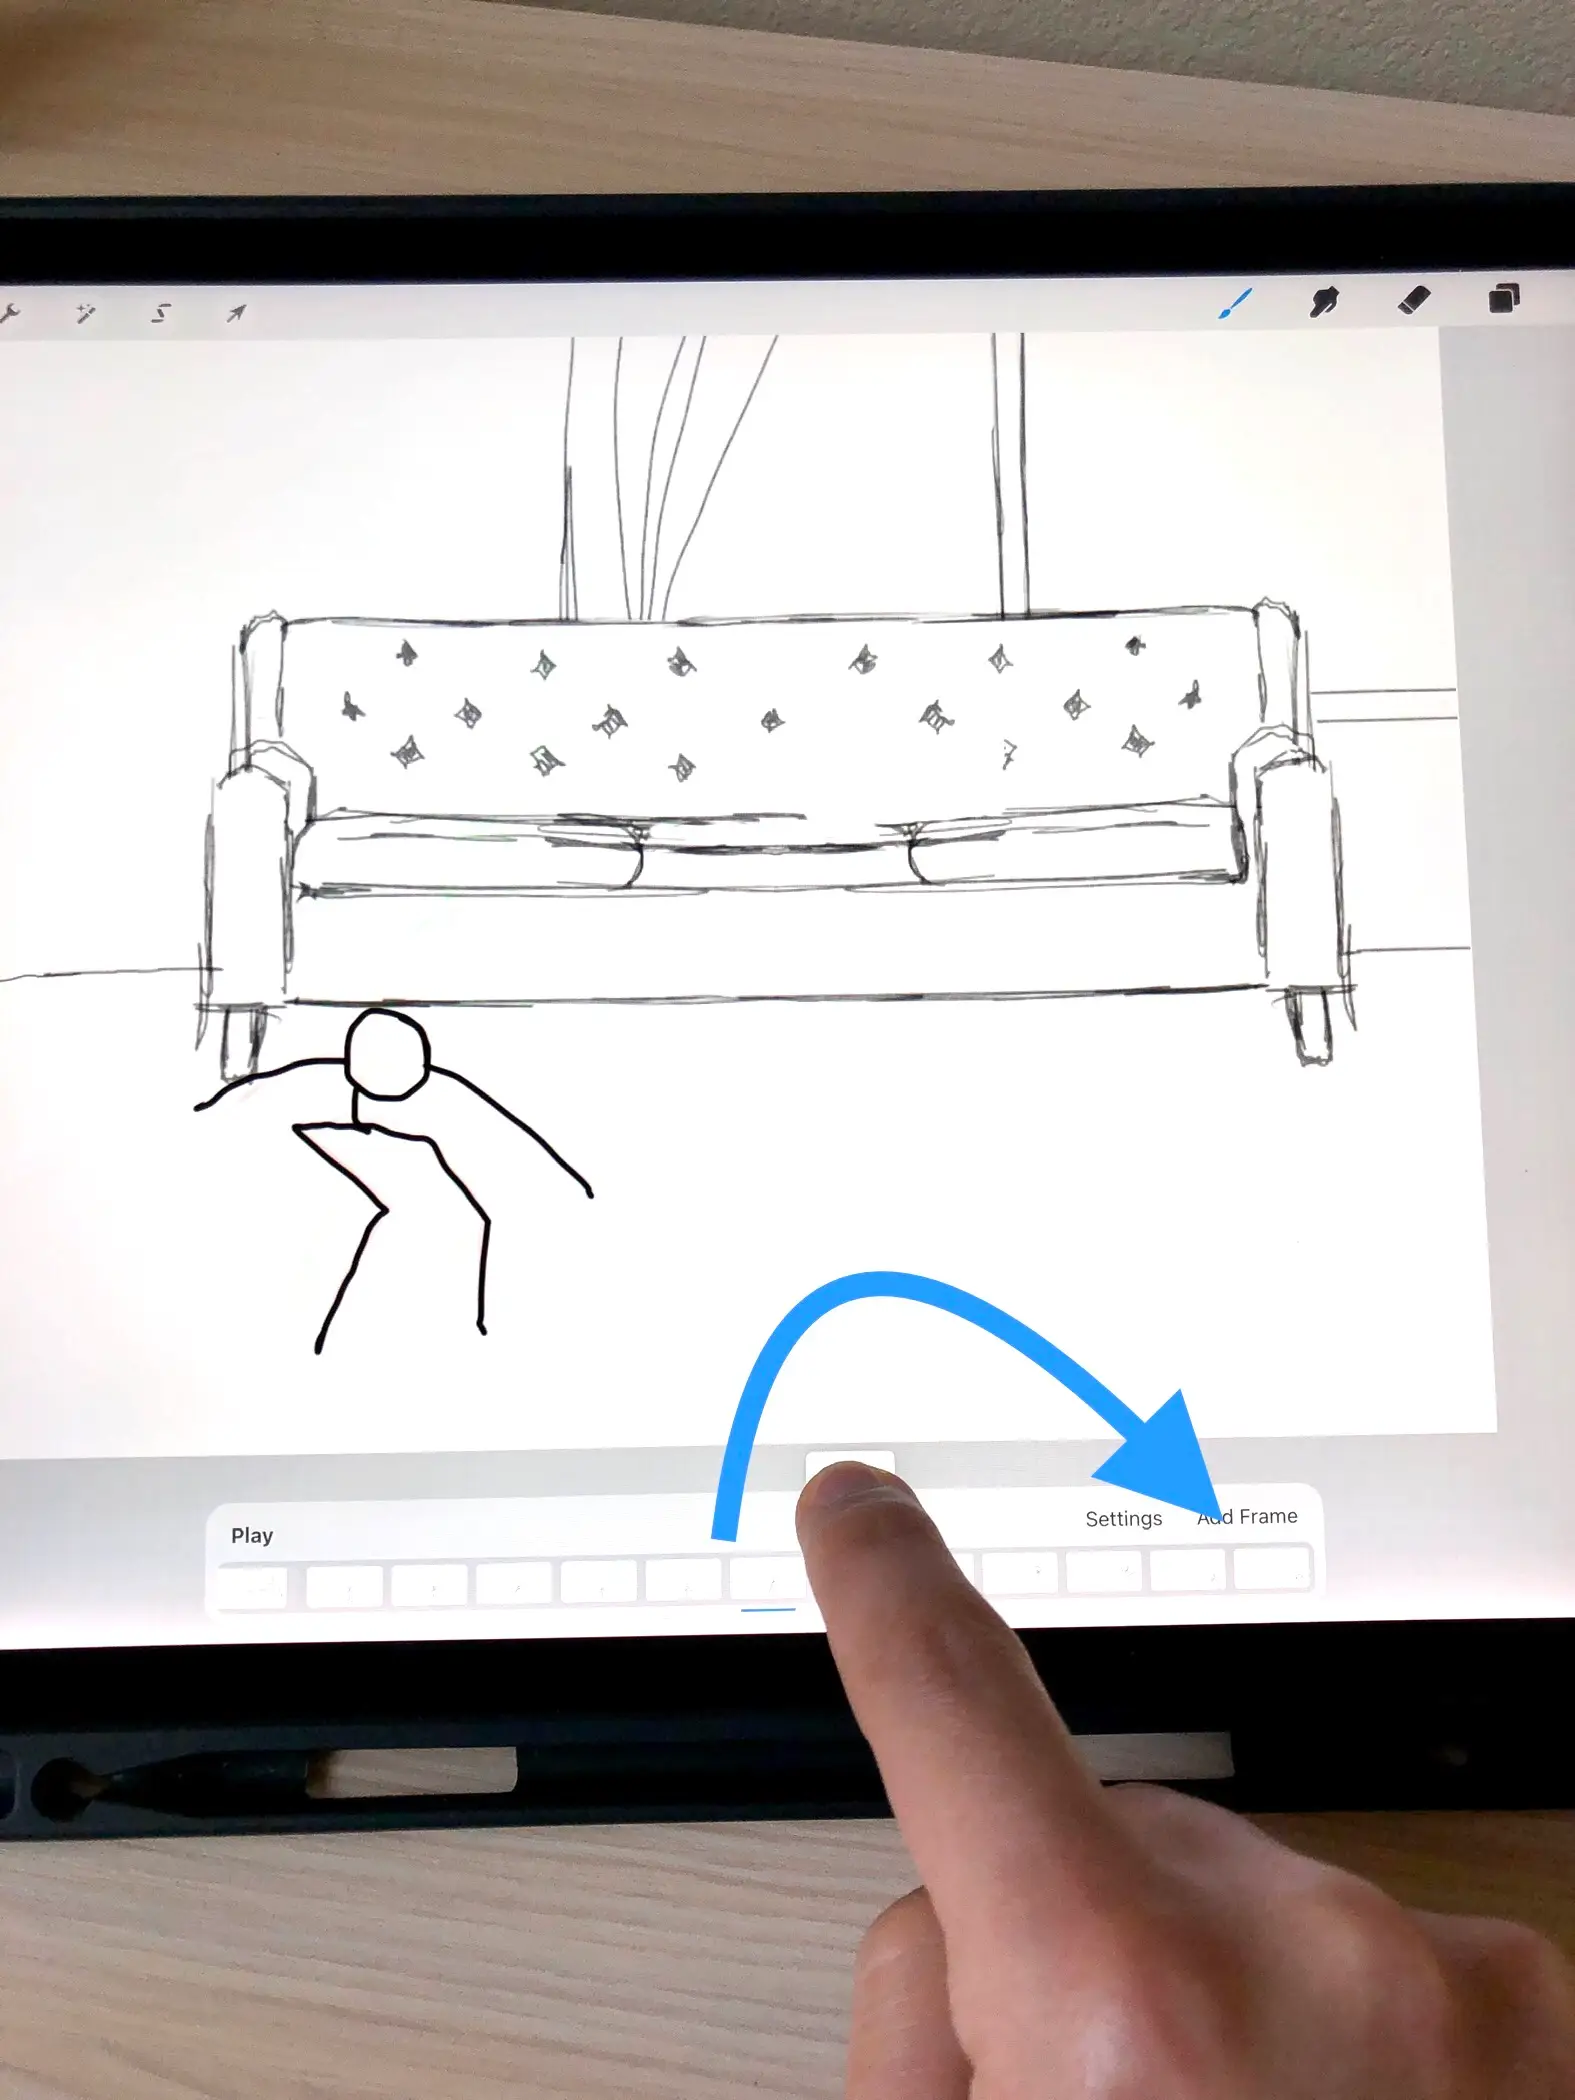
Using the add frame button, which is a rectangle with a “+” in the middle, you can easily add a new frame.
After you have added several frames, you might realize that you want to rearrange them.
Fortunately, Procreate lets you easily rearrange frames by simply opening up the frame list.
You can view all of your frames here and rearrange them as needed.
This can be helpful, particularly if you might be creating frames that are out of order.
This also makes it easy to add in a new frame at a later time in the event you realize that you have been missing something.
Drawing in Frames
Asking yourself how to make an animation on Procreate? Drawing in frames is the first step.
Drawing in frames is easily the most simplistic part of the process of how to animate in Procreate as long as you are familiar with the app.
In the same way that you would with a regular drawing, you will use the tools to draw the image that you want.
When it comes to animation on Procreate, the way that you draw each frame is absolutely crucial.
You want them different enough to justify the frame being added, but similar enough to not make the animation drawing.
There are a few ways to go about this.
Using Procreate’s expansive collection of drawing tools and free Procreate brushes, you can easily make highly detailed frames.
Depending on what you are animating, you might find that you need to reuse some frame materials to avoid redrawing the same background repeatedly.
However, if you are more focusing on a single character in space, you might find that you want to just draw it over every single time.
If you want basic Procreate animations, you can simply draw the new element subtly altered in every single frame.
For more complex options, you might want to copy the previous frame and then adjust key elements instead.
For example, if you’re learning how to draw a dog, you can draw each step as a separate layer.
Each layer would be a frame in the animation after you turned on the animation assist feature.
You can also use Procreate’s onion skin frames in order to reference the previous frame, which makes tracing over it easier.
Using this, you can customize in a way that still matches the previous frame.
Moving Through Frames to Demo
At the foundation of knowing how to animate in Procreate is the slider bar tool.
It’s the basis for how to make animations on Procreate, if you’re wondering how can you animate in Procreate.
When you first begin to animate, you will find that this bar does nothing.
That is because it cannot do anything until you hit a point where you have multiple frames.
After you have begun to add your frames, this slider bar will make it easy for you to skip from one frame to the next.
This makes it great for doing demos and for moving back to a previous frame for other adjustments.
When you move this slider at the bottom, you can move backward and forwards along the timeline for your animation.
You might find that you want to move it along the timeline to see where everything will fall as you animate.
This process makes it easy, and can also show you how different frame speeds might look.
Using it as a manual approach to moving from one frame to the next is also beneficial because it can show you where you might have missed something.
Using this approach to demo makes it easy to spot the places where you might have forgotten something subtle in your scene.
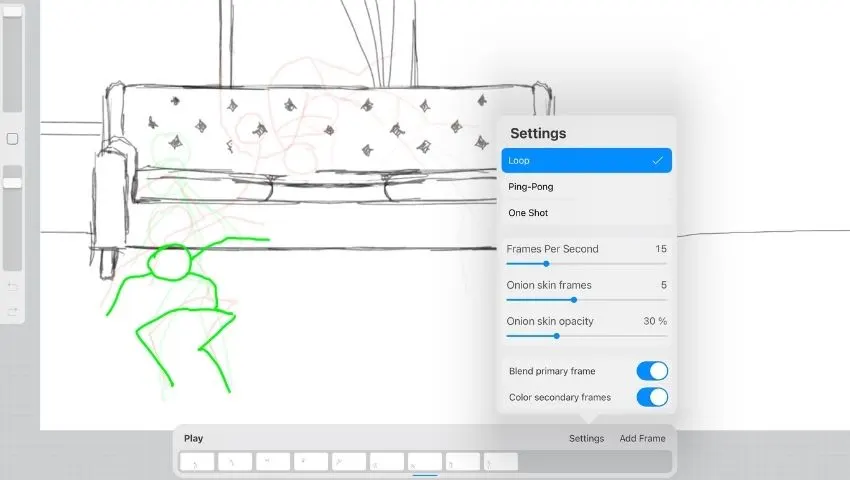
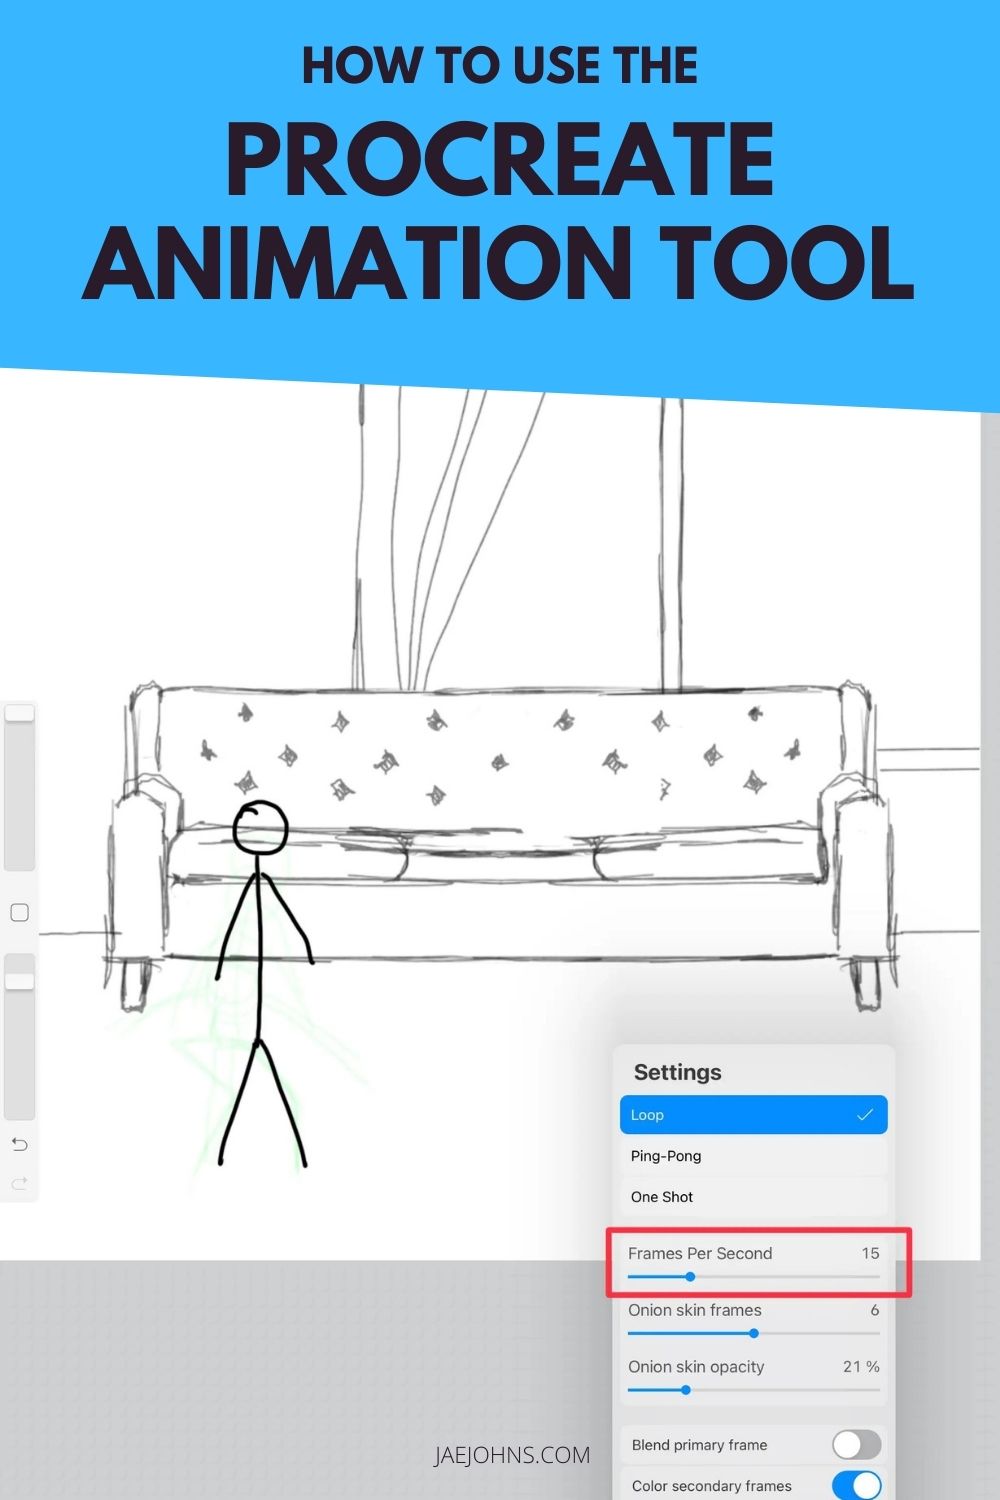
Adjusting Frames Per Second
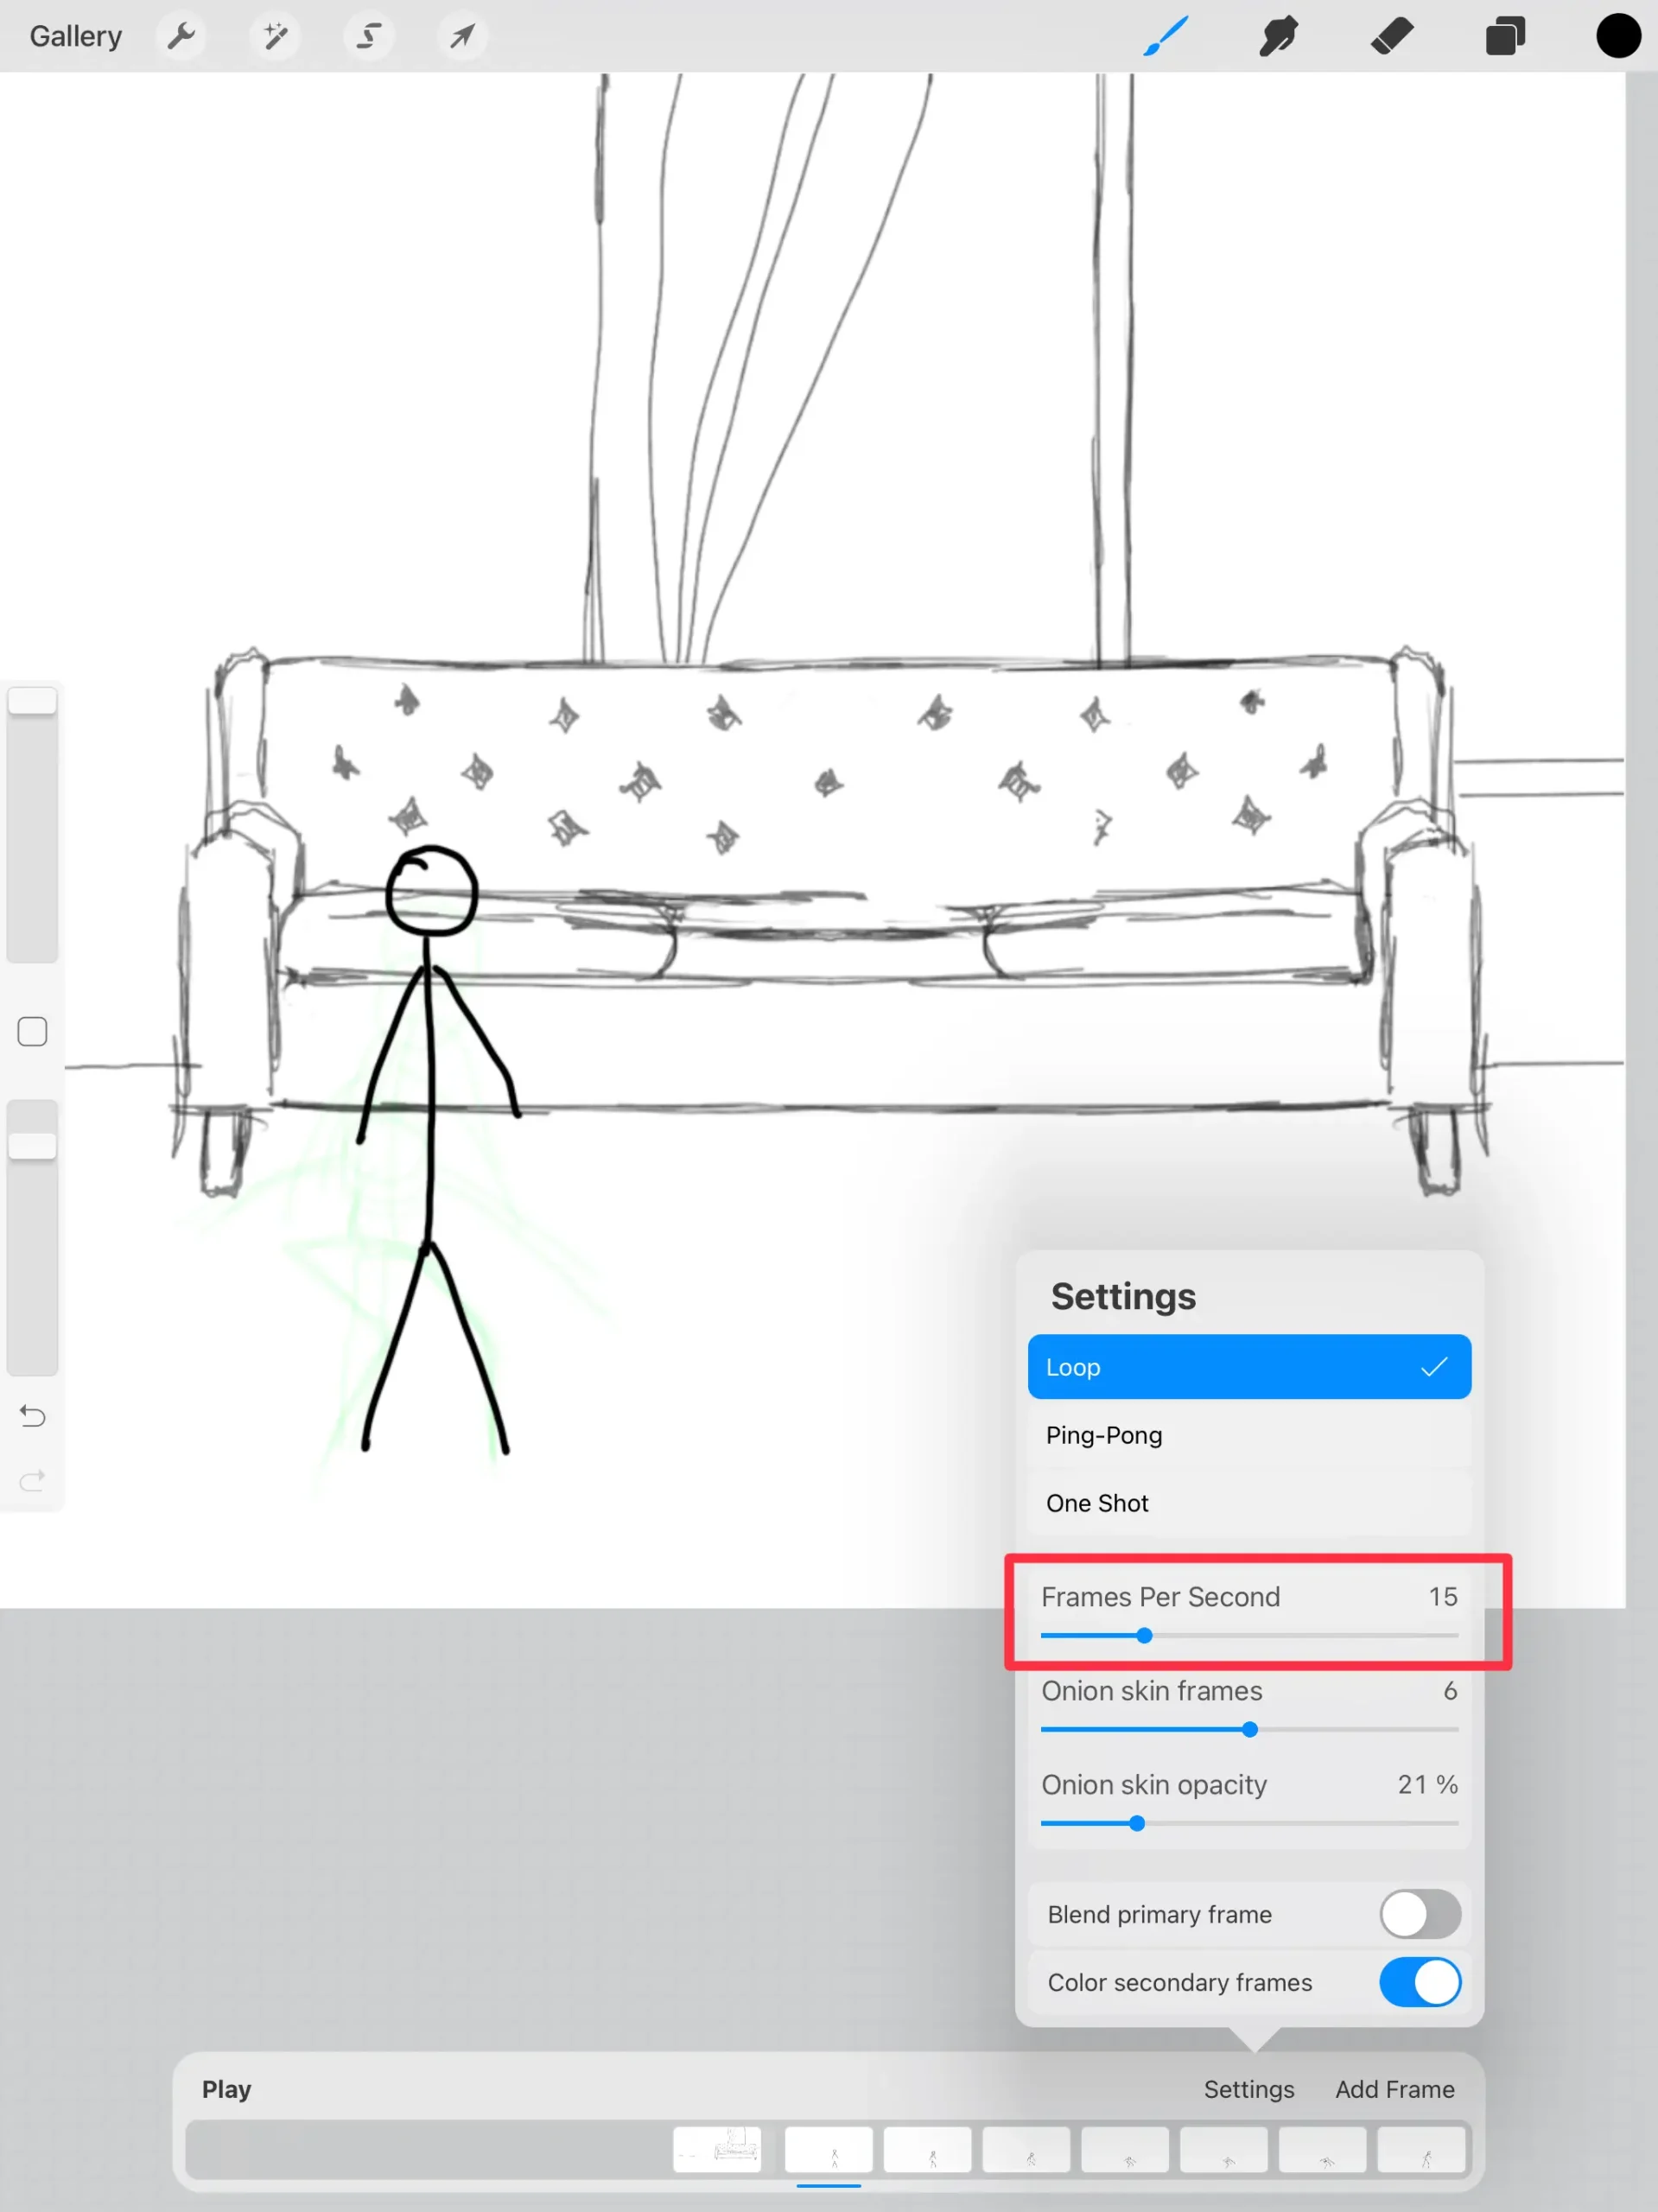
The frames per second is a crucial point of focus for any animator.
It’s easy to do when using Procreate for animation.
Depending on your animation style, the number of frames per second, also known as the frame rate, might make or break your animation on Procreate.
Choosing the right speed can play a fairly significant role when it comes to spotlighting in your animation.
If the speed is too high, you might force your viewers to miss out on an element entirely.
On the other hand, if your animation speed is too slow, you might find that your animations do not look correct.
A common problem with slower animation speed is jerky movements, so when you are using Procreate animation software, you will need to try different speeds.
Finding the right speed for your Procreate animation project is a fairly simple process.
Unless you have created an astonishing amount of frames, chances are you won’t want to use higher speeds.
The end result here would be a very short clip.
On the other hand, if you have frames that shift relatively significantly or have a higher amount of them, using a slow number of frames per second can make your animation seem more jarring.
Experiment by adjusting the amount while you view the project to see what feels right.
Adjusting Onion Skin Frames
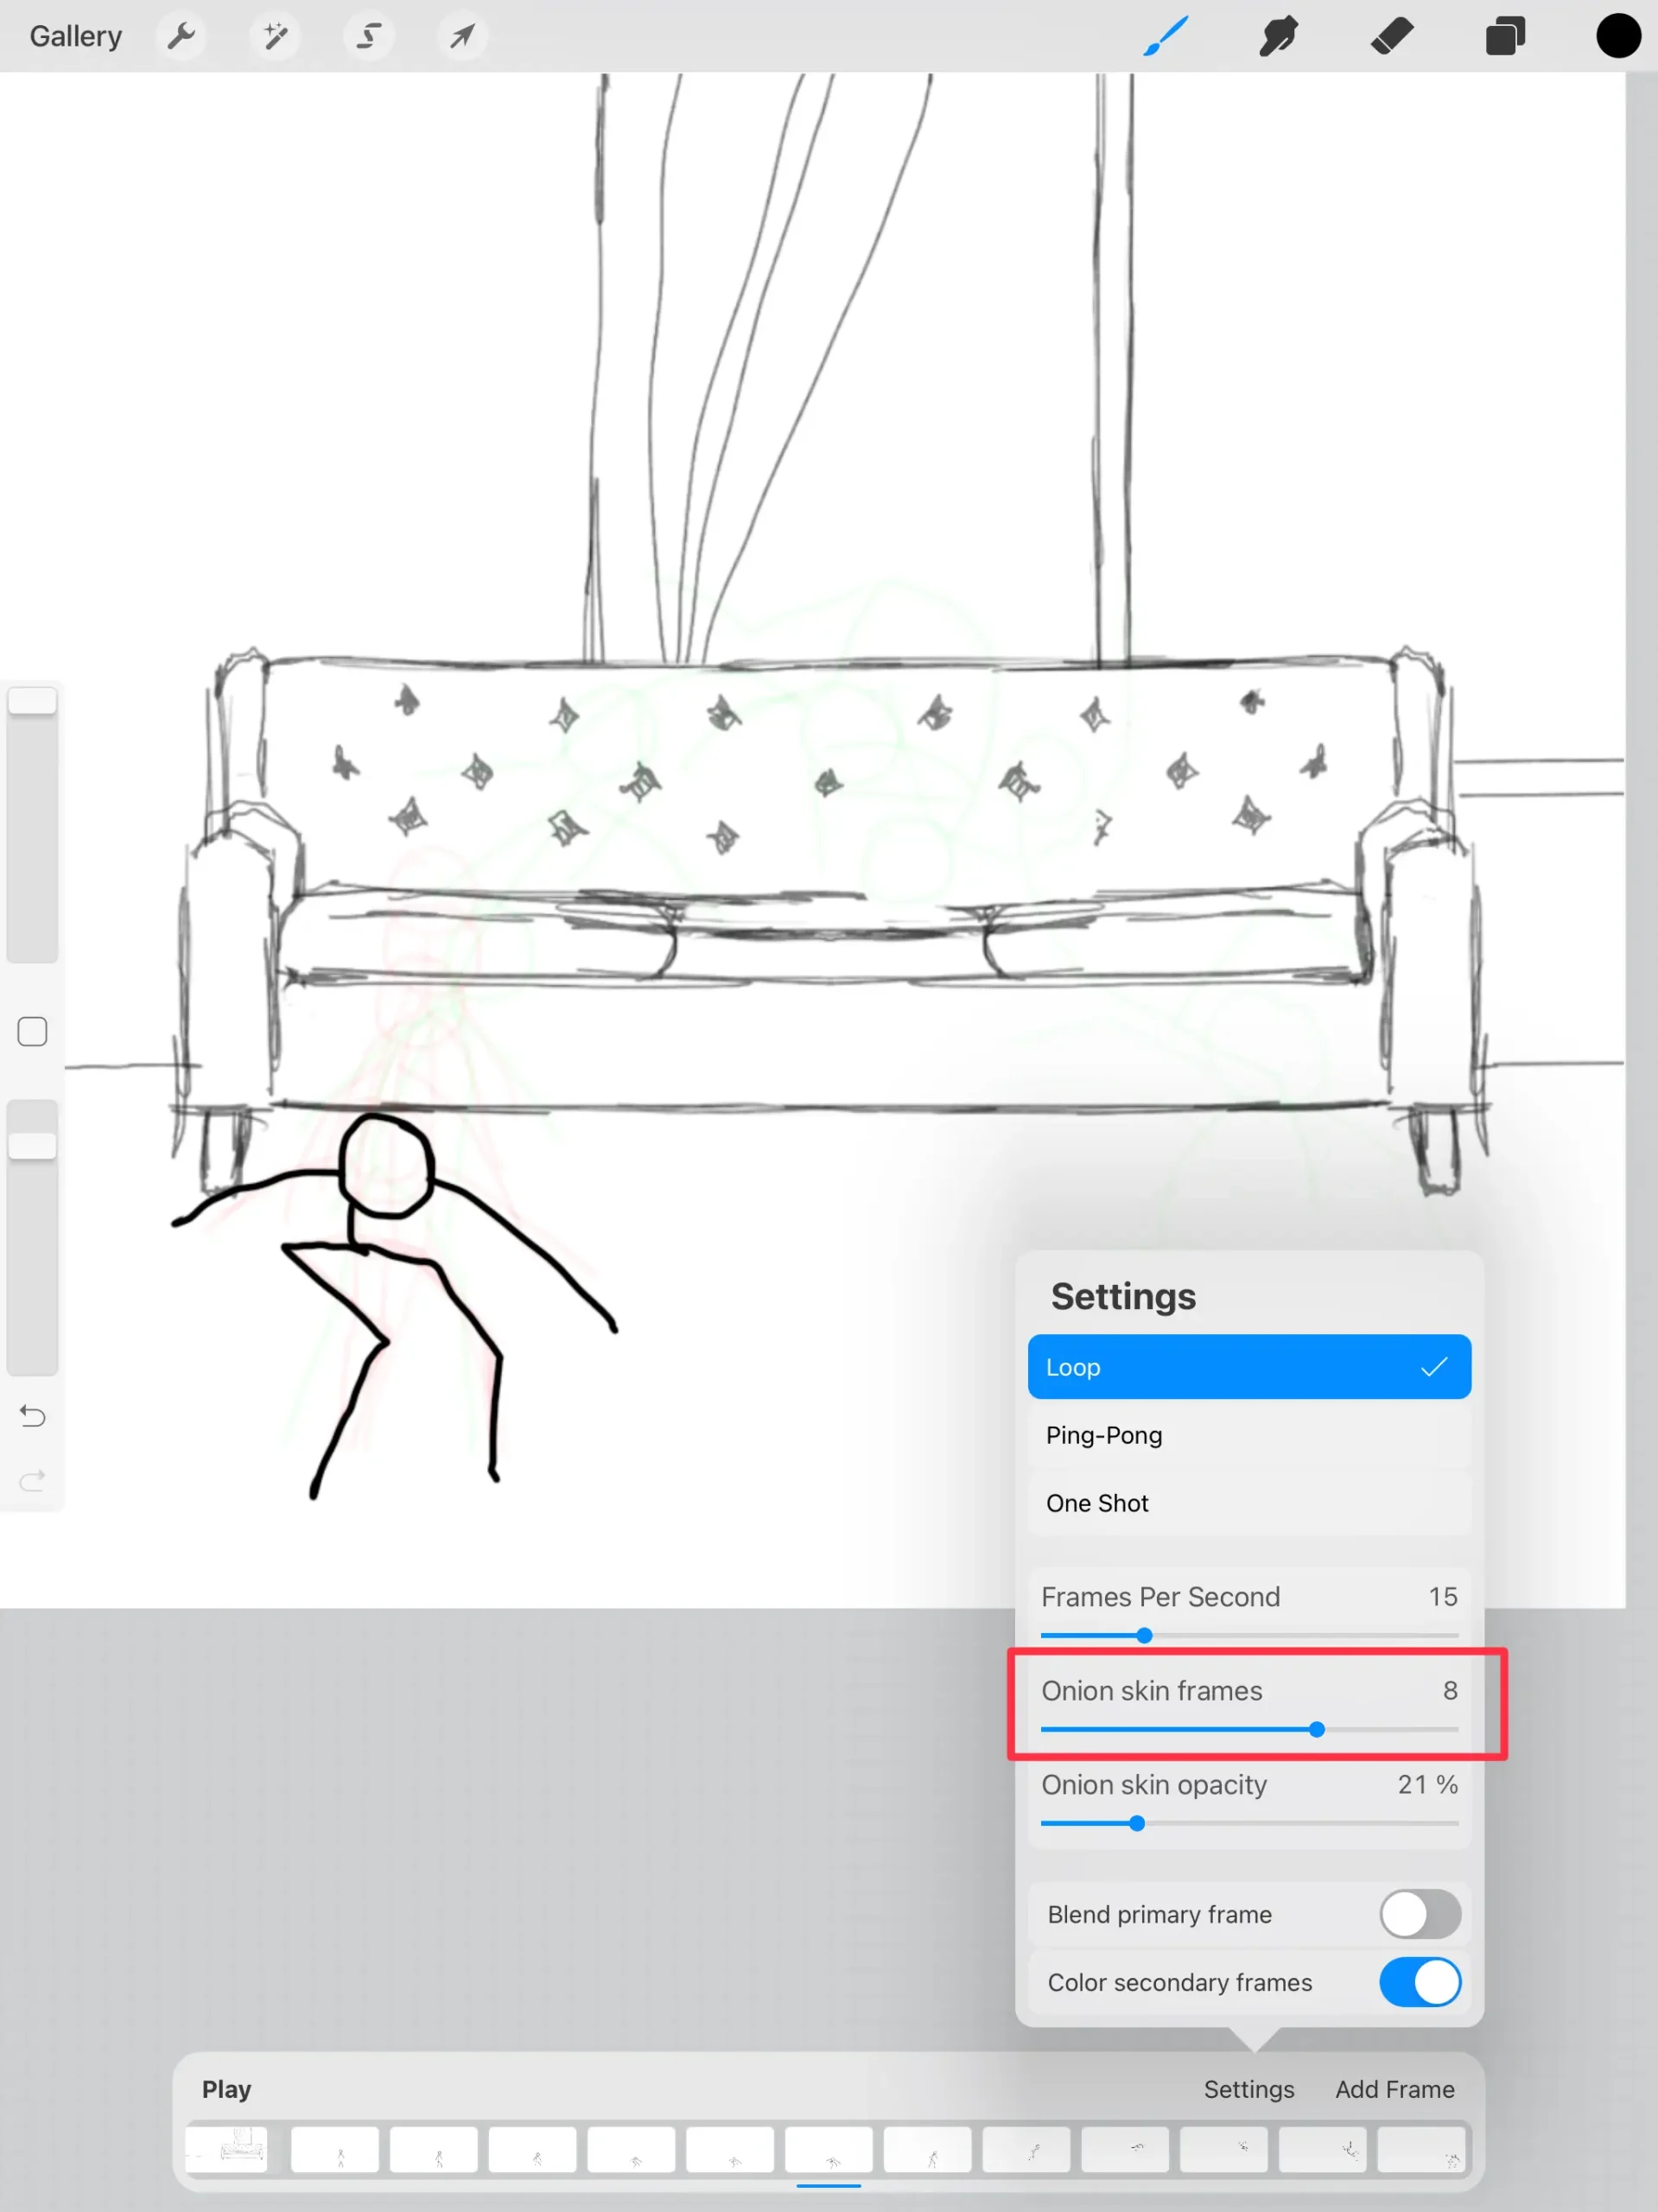
Onion skin frames are one of the more compelling features within Procreate animation software.
These frames allow you to see a broader picture of your animation.
When learning how to animate with Procreate, it’ll probably be the most notable unique feature.
It is a truly helpful feature, but there are definitely some instances where it works better than others.
An onion skin frame is used to show multiple animation slides at any given point in time.
While it might sound a little strange, it can be really helpful when you are working on drafting new slides.
You can use this to see where you were as well as where you plan to go.
Depending on what kind of animation you are creating, you will likely want to adjust how many onion skin frames you can see at a time.
If you are making a simple ten frame short of a character walking, you will likely be able to enjoy all ten frames at once.
This can make it easy for you to create, add, and review as needed.
However, for more complex scenes, you might find yourself looking for only one or two frames.
It is also important to remember that this process doesn’t work very well if you are going to work on something incredibly complex.
It can be difficult to distinguish from one scene to the next when you are dealing with more detail.
Adjusting Onion Skin Frame Opacity
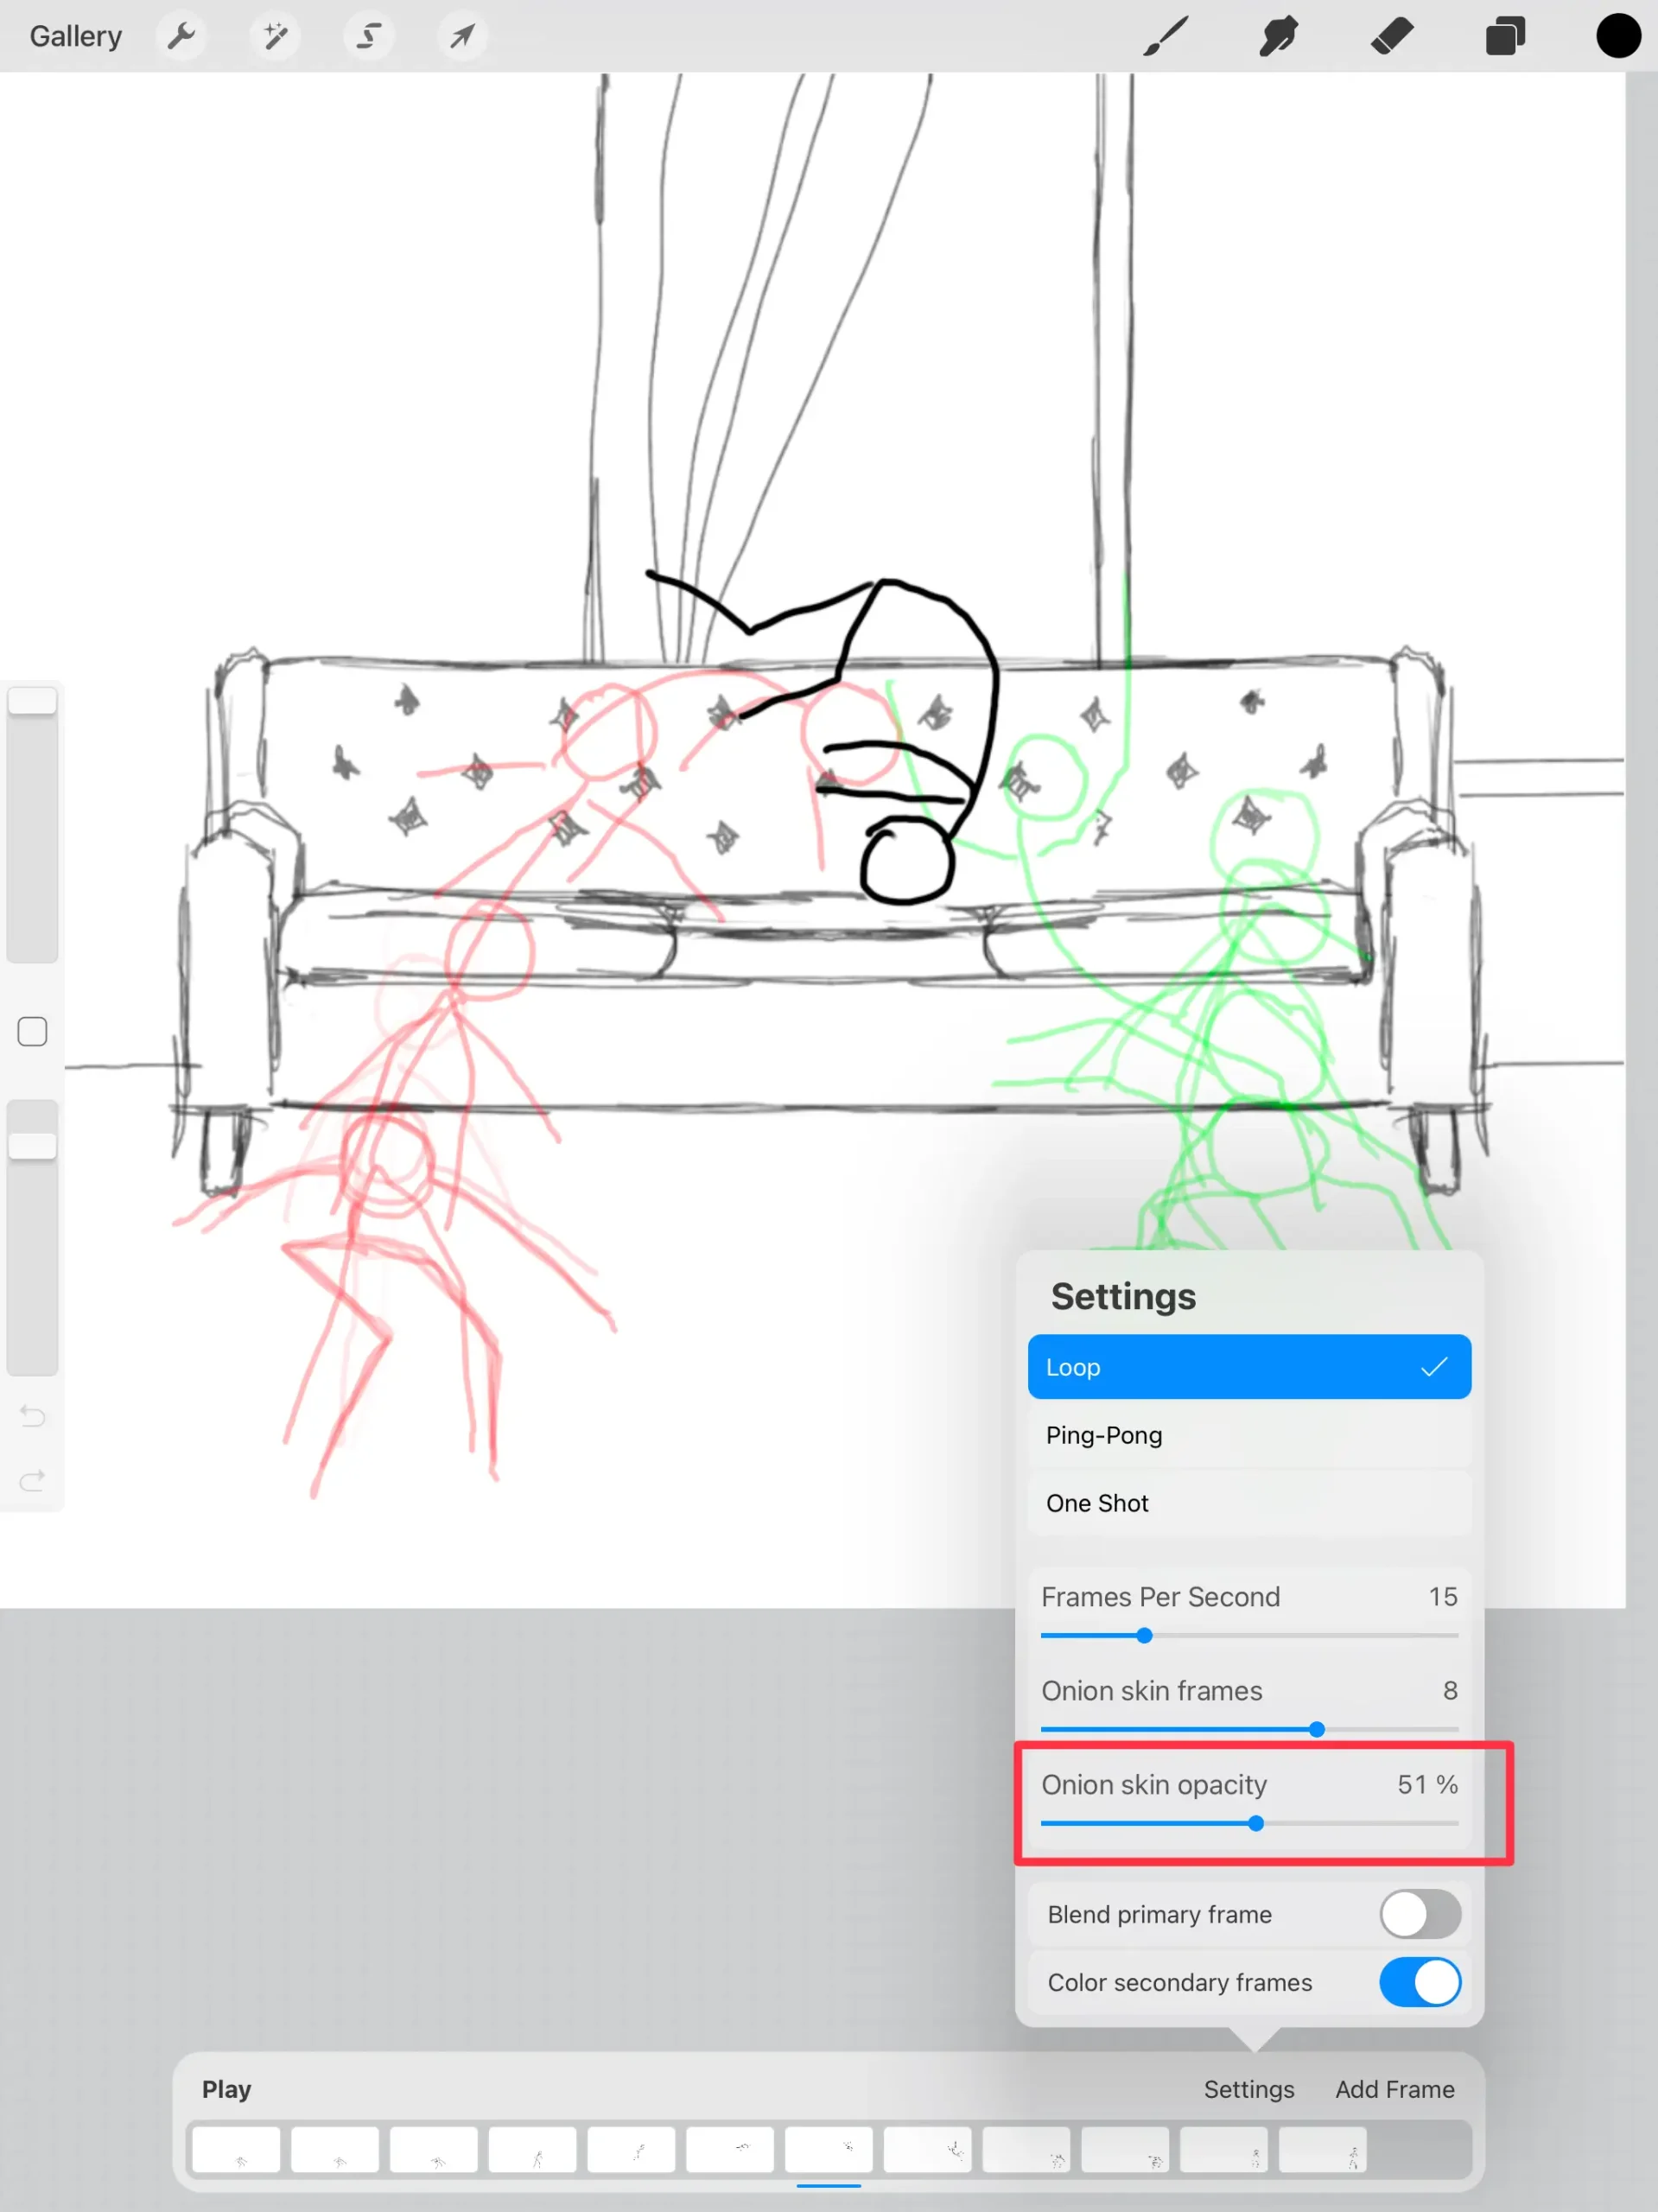
When you are working with onion skin frames, you will want to adjust the opacity in some instances. It’s a crucial part of knowing how to animate on Procreate.
While the base level for opacity might be fine when you are working with a simple animation or practicing, it isn’t always right.
As you begin to grow your Procreate animation skills, it is these little tools that will help you to make more complex work.
The opacity of the onion frame is how dark or light the onion frames are in relation to the primary frame.
As you work with onion frames, the Procreate blend primary frame will always be the darkest and boldest.
Though you can certainly adjust the opacity of the onion frames to match that, people generally don’t.
This is because it can make it more difficult to focus on the correct frame.
When this occurs, it is easy to accidentally make adjustments for the wrong frame as you work.
If this happens, you will find yourself deleting and recreating, which wastes time and energy.
Fortunately, you can make these frames as dark or light as you need to for the right outcome.
If you want to trace, you might want the frames a little darker.
If you are just using them for reference, a faint outline might be good enough.
Play around with the opacity bar to determine what is best for your project, and lean on this as a constant part of your process.
Procreate Blend Primary Frame
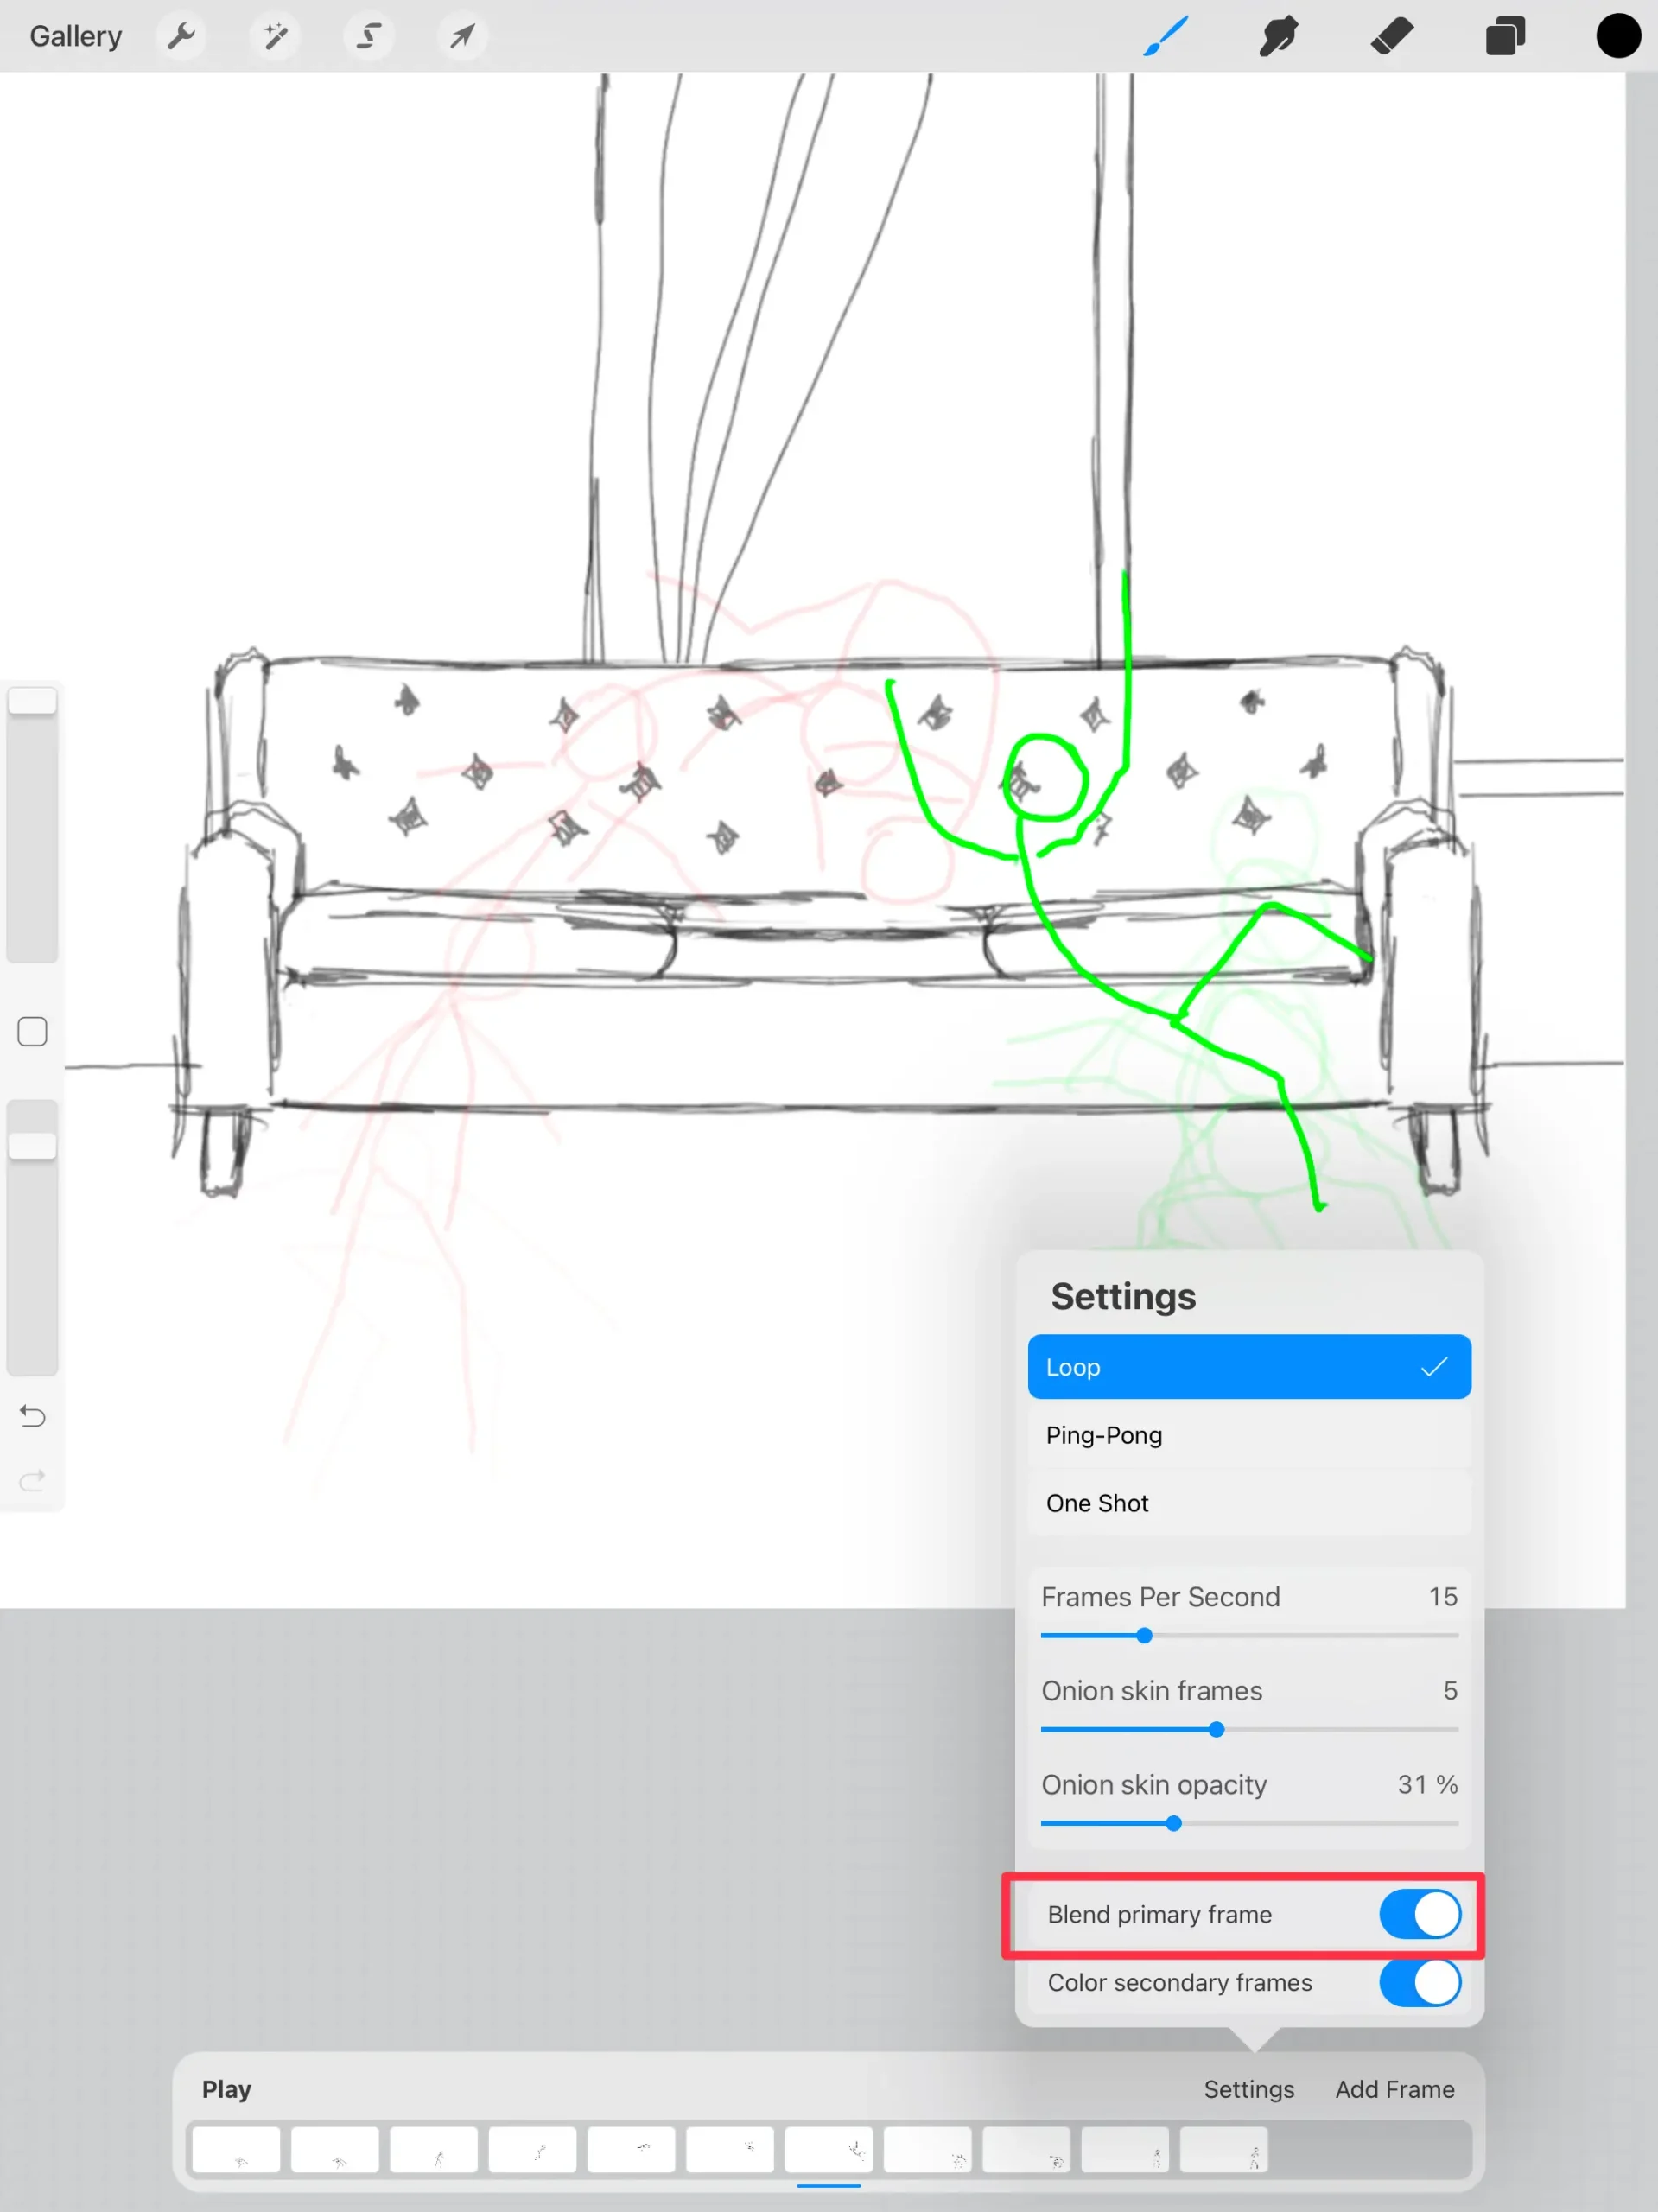
The Procreate blend primary frame option in the
Procreate animation tools list is an unspoken gem.
Many people have no idea what this tool does, even when they use it.
However, once you realize what it does, you will want to use it all the time.
In Procreate, your primary frame is the frame that you are currently working on at any given point in time.
You can slide along these using the bar at the bottom.
When the blend primary frame option is deactivated, your primary frame will be completely solid with everything beneath it being blocked out.
However, when you activate the blend primary frame option, the opacity of the primary frame will alter just slightly to give a more blended appearance with other frames.
This allows you to easily see your primary frame without losing out on what is behind it.
Using the Different Playback Types
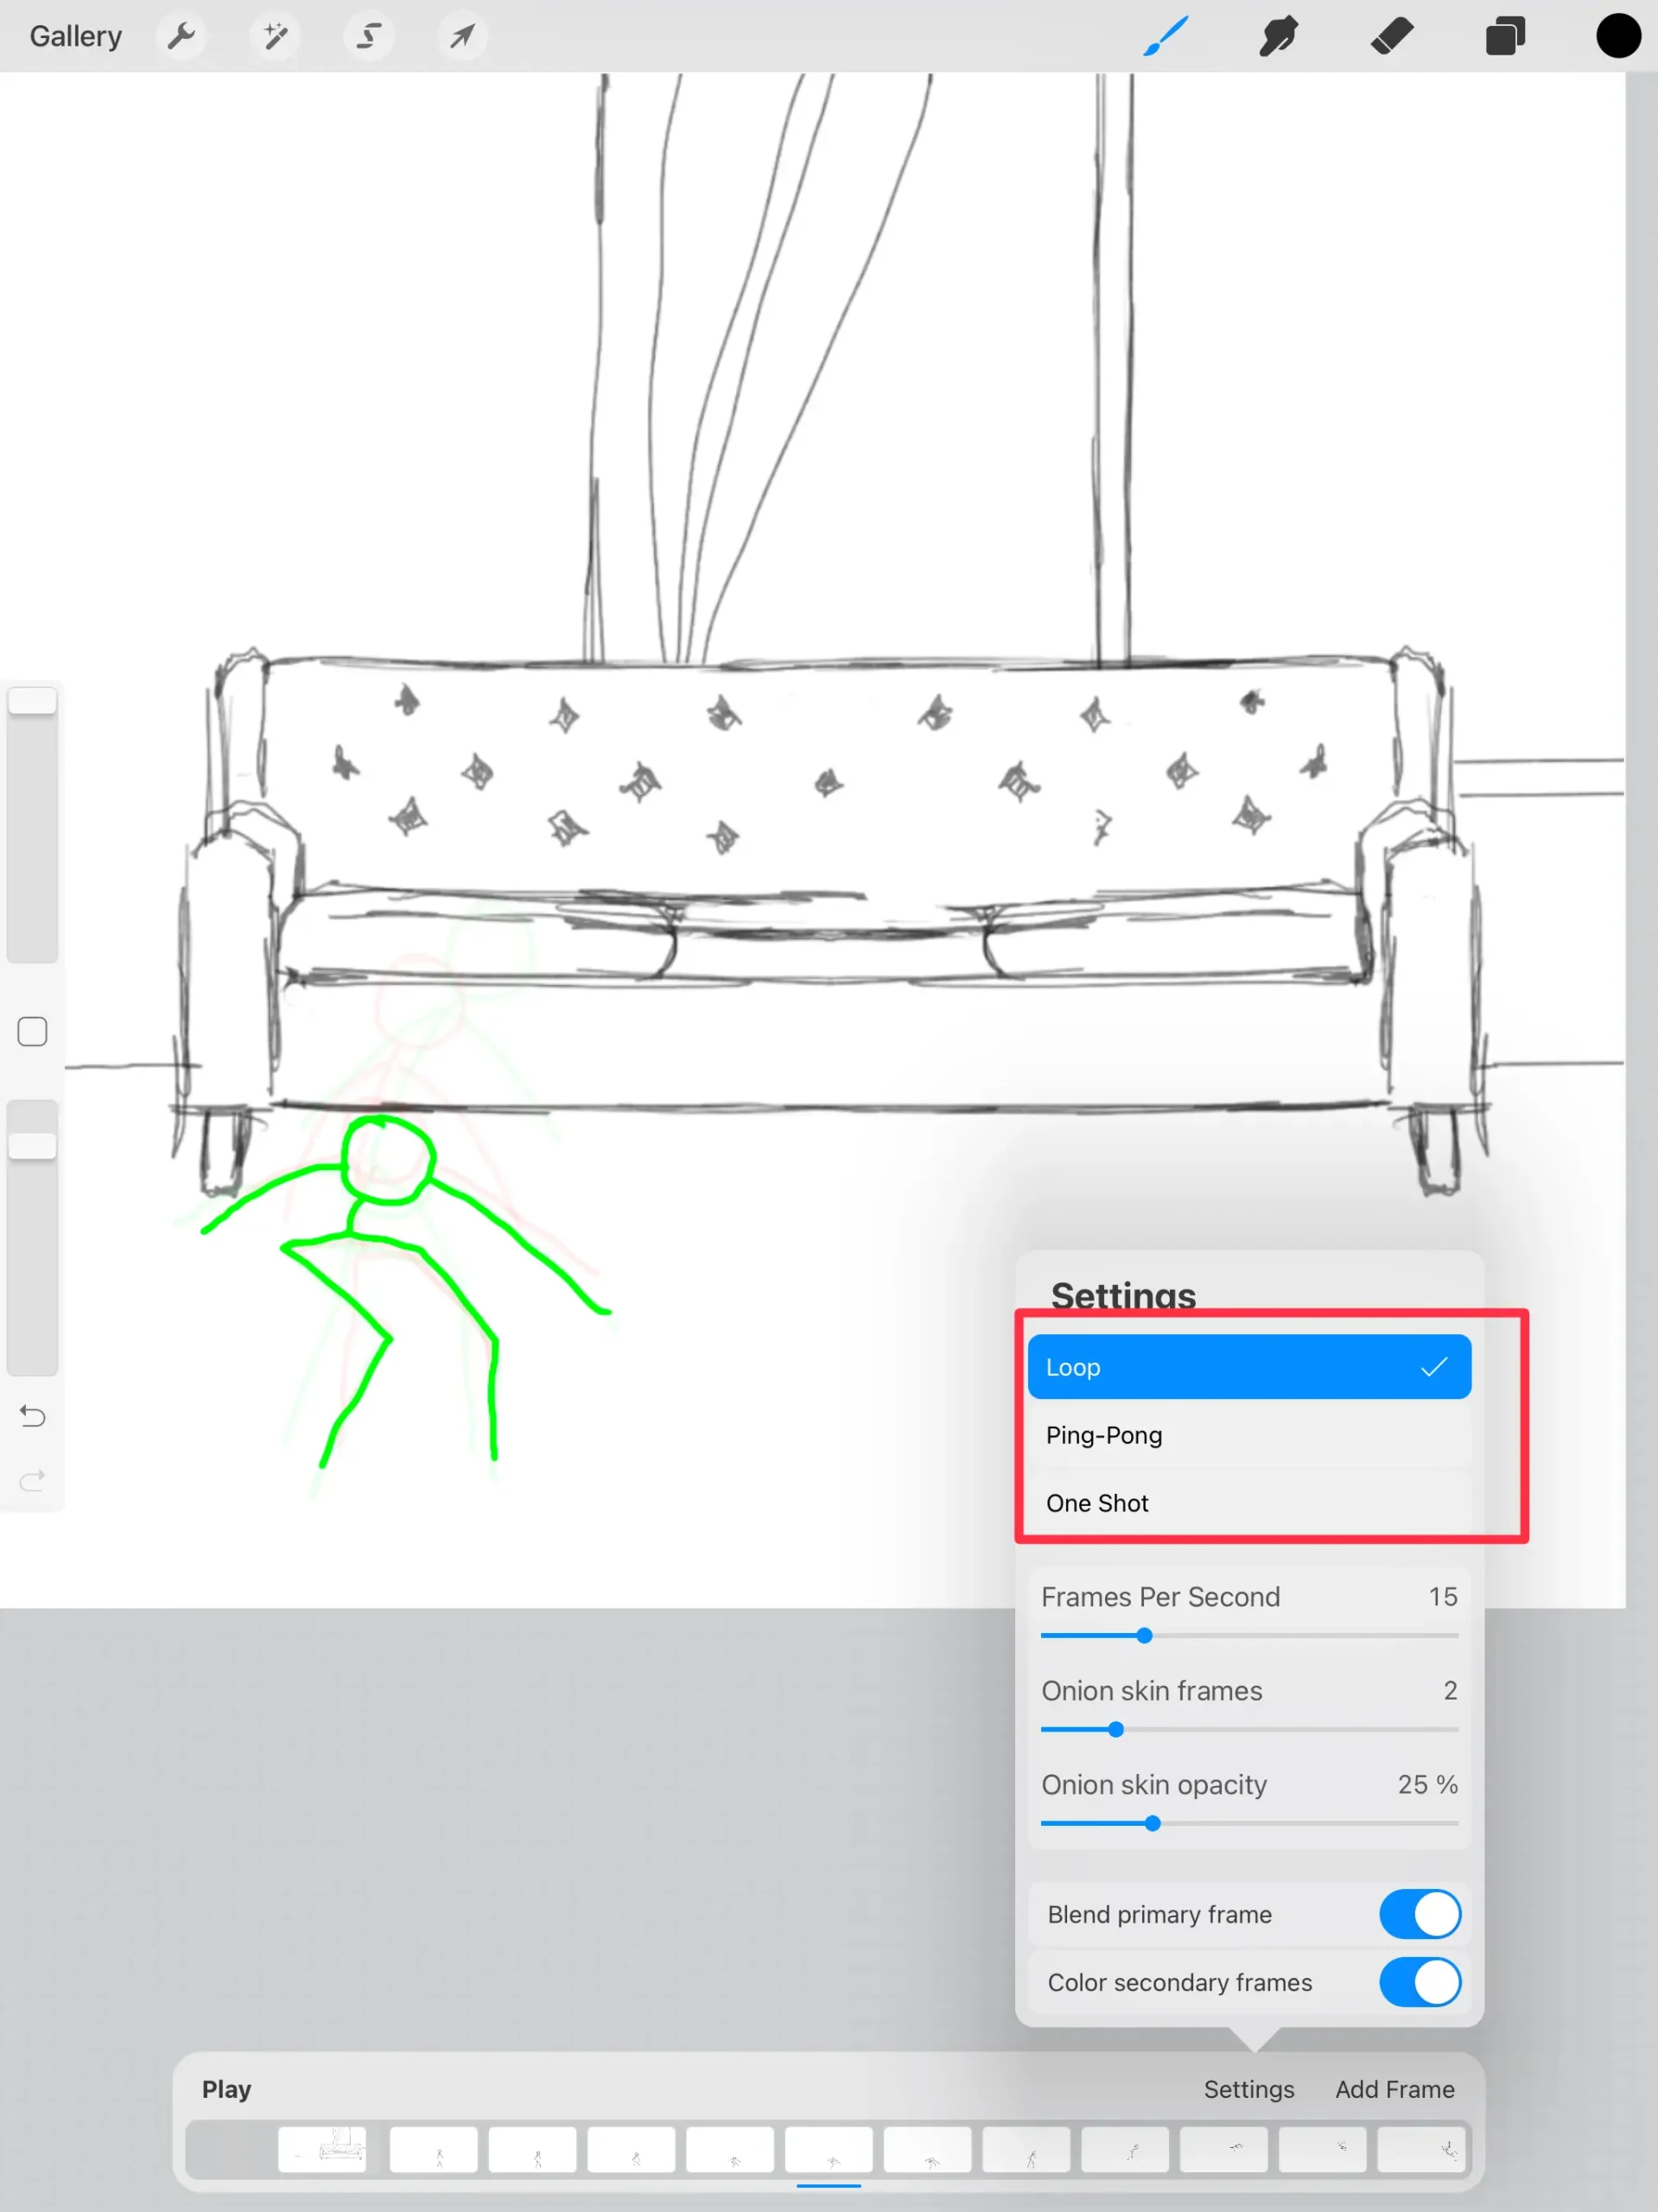
In knowing how to animate in Procreate, you have a variety of different playback and export options for viewing your video.
Depending on what you are viewing the video for, you might find that some styles suit you more than others.
For example, if your plan is to simply show someone your animation while you work on it, you might opt for the one-shot playback option.
This feature will very simply play the video one time with all of the base settings in place.
On the other hand, if you are looking to spend more time watching and reviewing, you might opt for a loop instead.
Video loops will allow your video to play on endlessly until you physically stop them from doing so.
This can be great for taking time to observe different elements of your video without forcing you to continuously restart it.
It can make your editing process much easier.
The final playback option, and in my opinion, the best for reviewing, is the ping pong video.
The ping pong playback option is perfect for reviewing and editing because it plays your video backward and forwards.
It works in a way similar to a loop, but when it reaches the end, it plays in reverse.
Many people find that this is an amazing way to go about finding minor mistakes in animation.
As an added bonus, it really does look cool.
Making a video that plays well forwards and backward is definitely a great way to bring your animation to the next level.
If nothing else, it is pretty much always fun to watch.
Procreate Animation Tutorial
Here’s a step-by-step tutorial on how to animate in Procreate.
Procreate Animation Tools
Can you make animations on Procreate? Yes, as we’ve seen. A different question you might want to ask “is Procreate good for animation?” really comes down to the tools it offers.
Procreate has some nice animation tools that you can use to make simple or even complex animations.
The most significant tool is Procreate Animation Assist and within that tool, there are other tools you can use to aid in your animating.
Procreate’s Animation Assist allows you to create animations in an easy way.
So, if you are asking can you animate on Procreate? With Animation Assist, you can!
Procreate Animation Assist
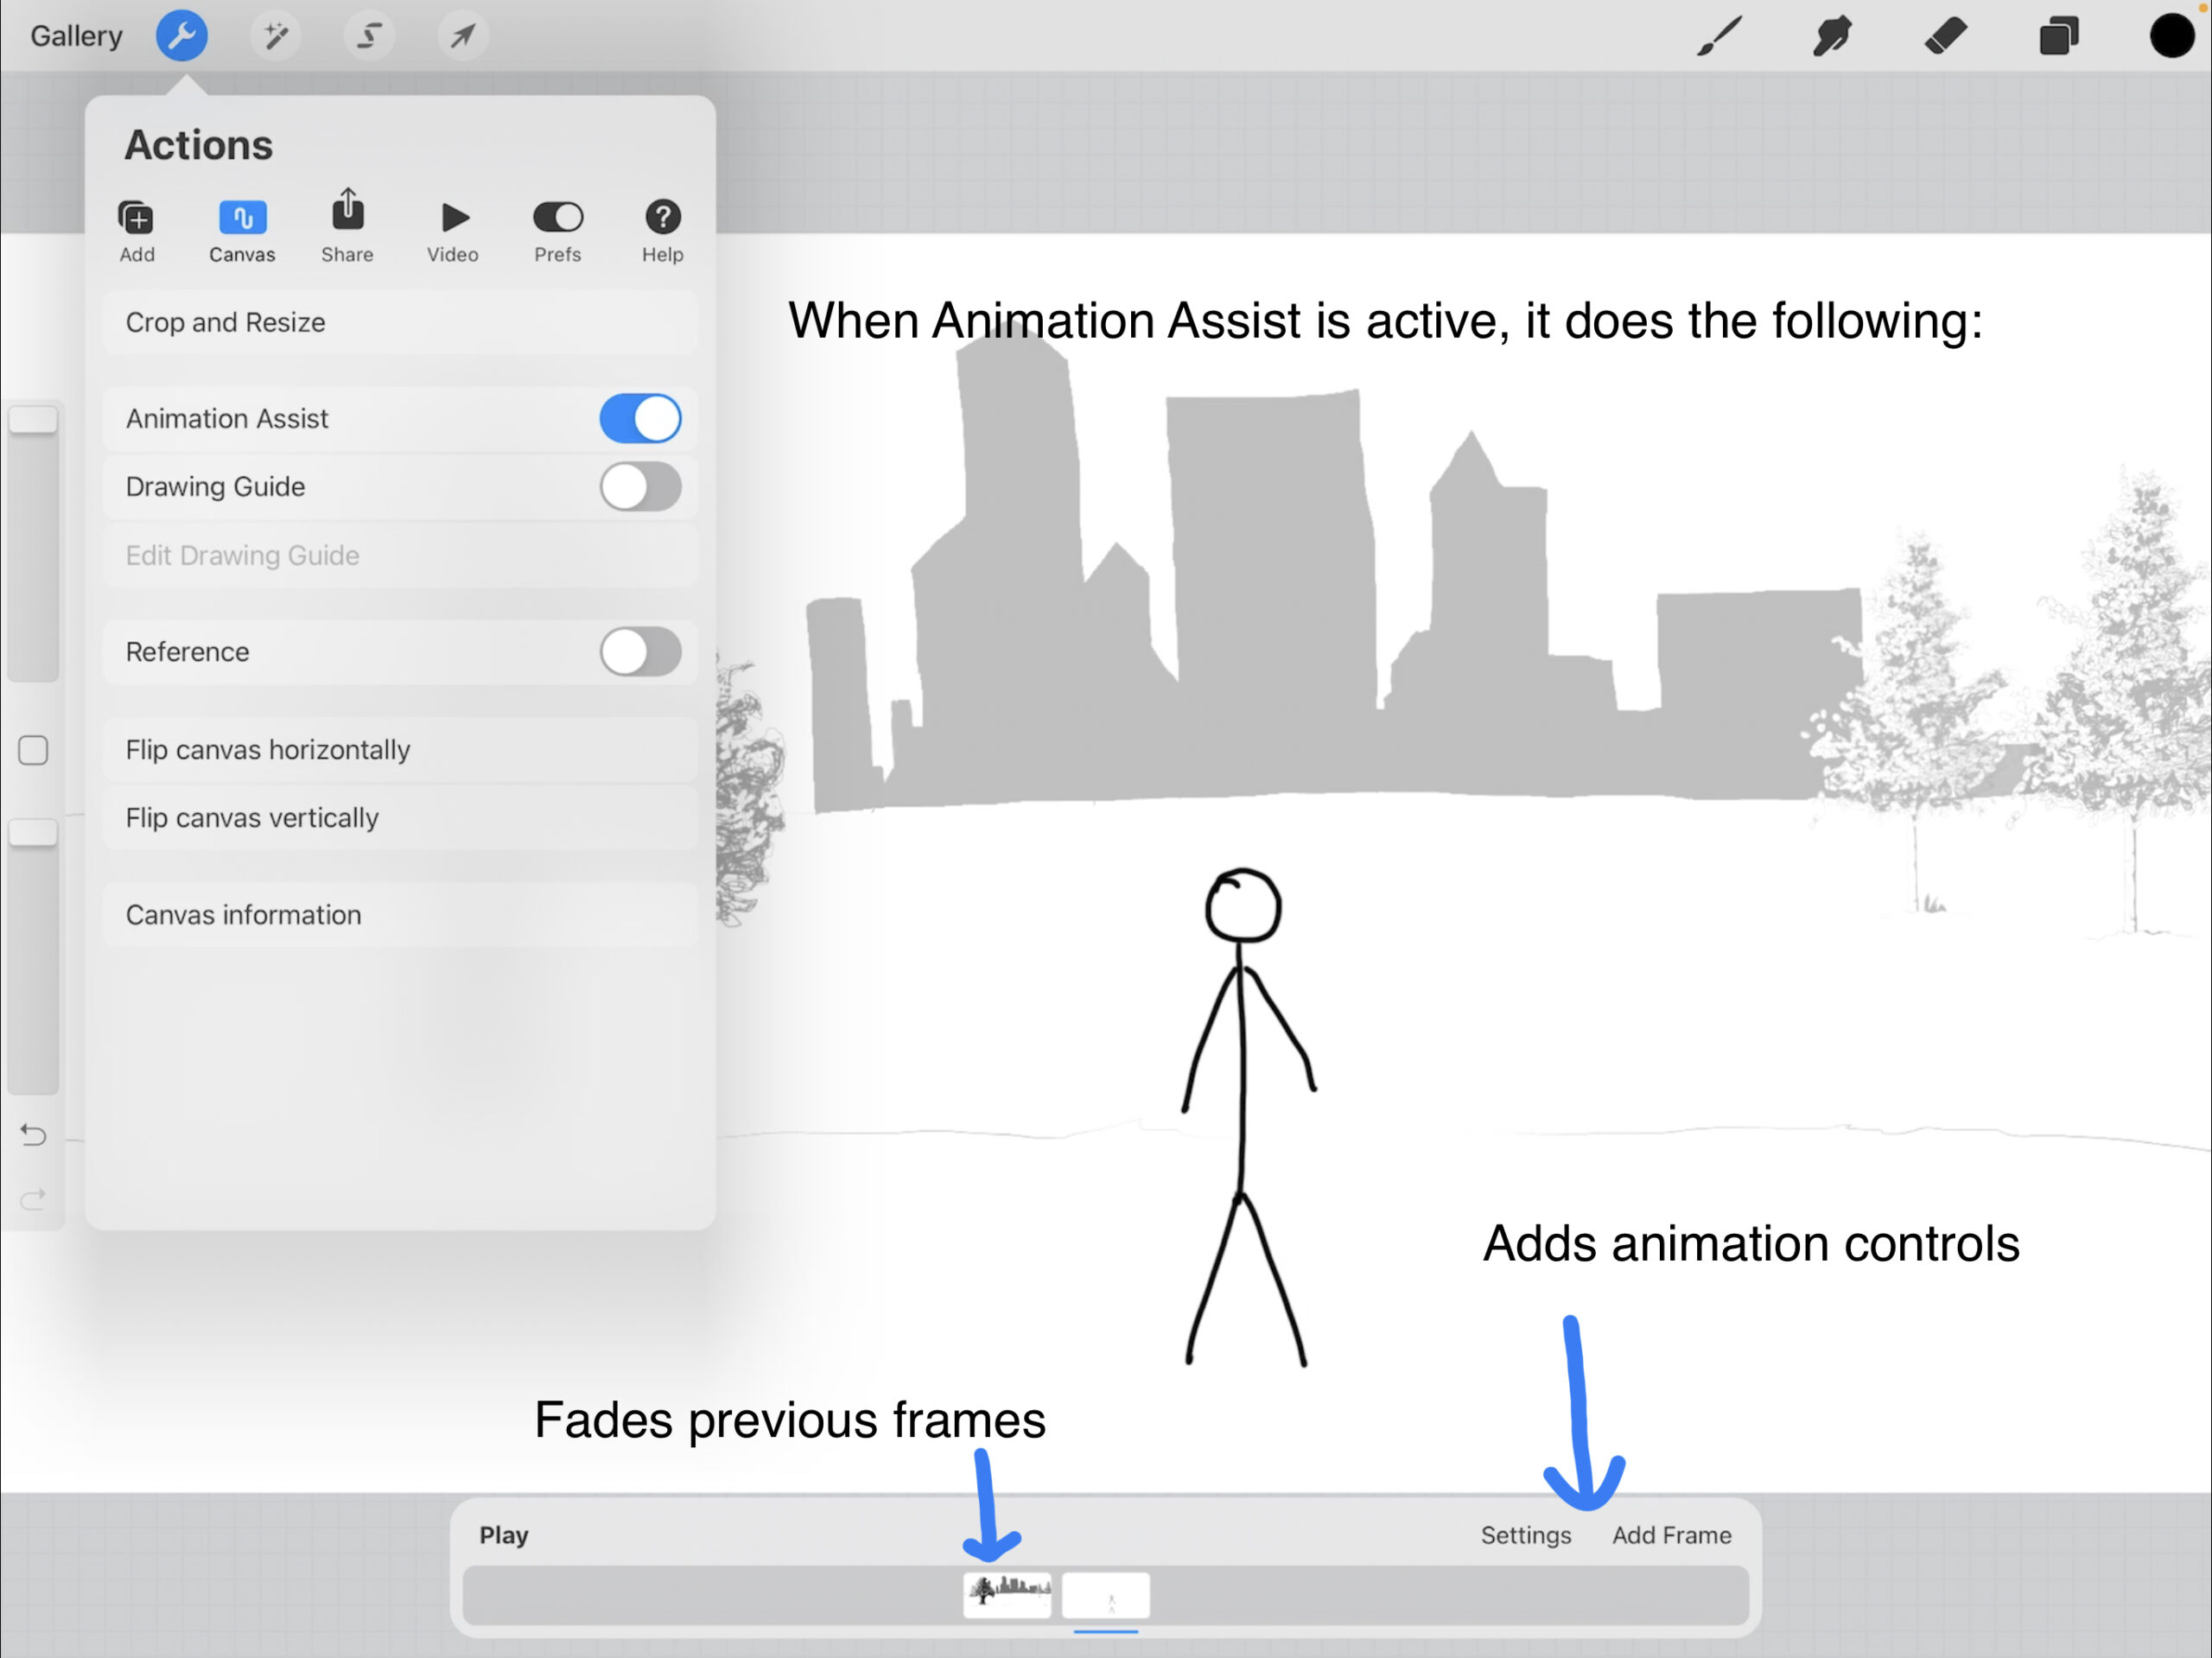

Animation in Procreate is easy with animation assist.
Here’s how to use animation assist.
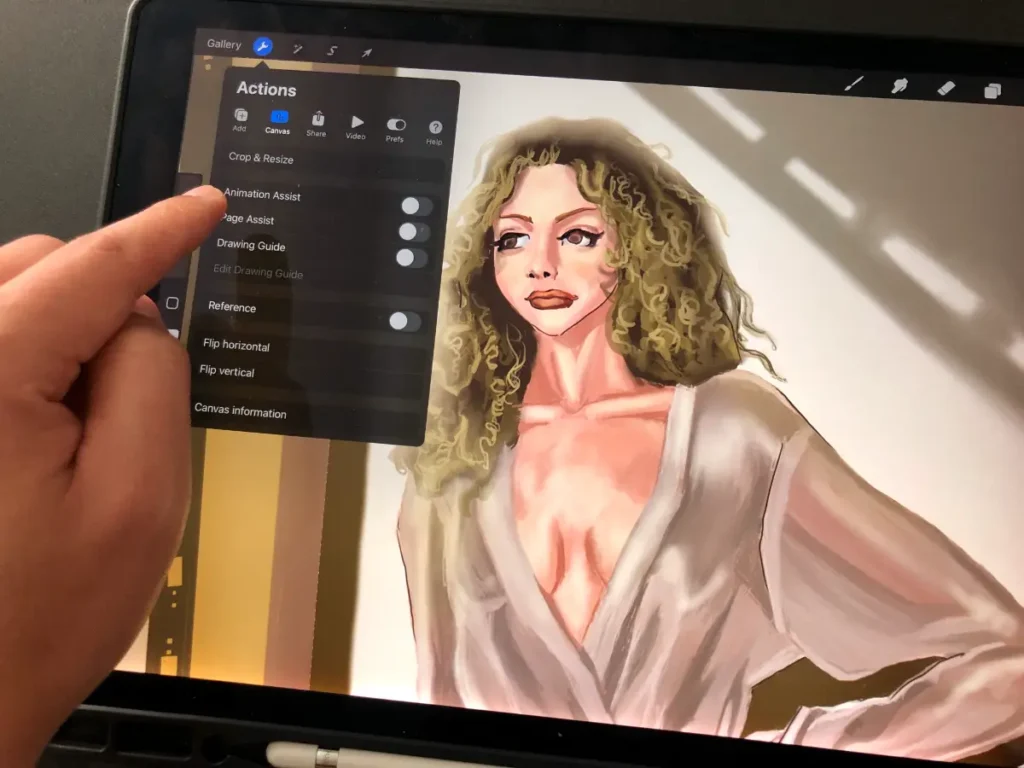
- Click on the wrench icon
- Click on the canvas option
- Switch on the animation assist
When you turn on the animation assist, it will add animation controls on the bottom of your screen and it will fade the layers (frames) below the currently active one.
Other Procreate Animation Tools
- Onion Skin
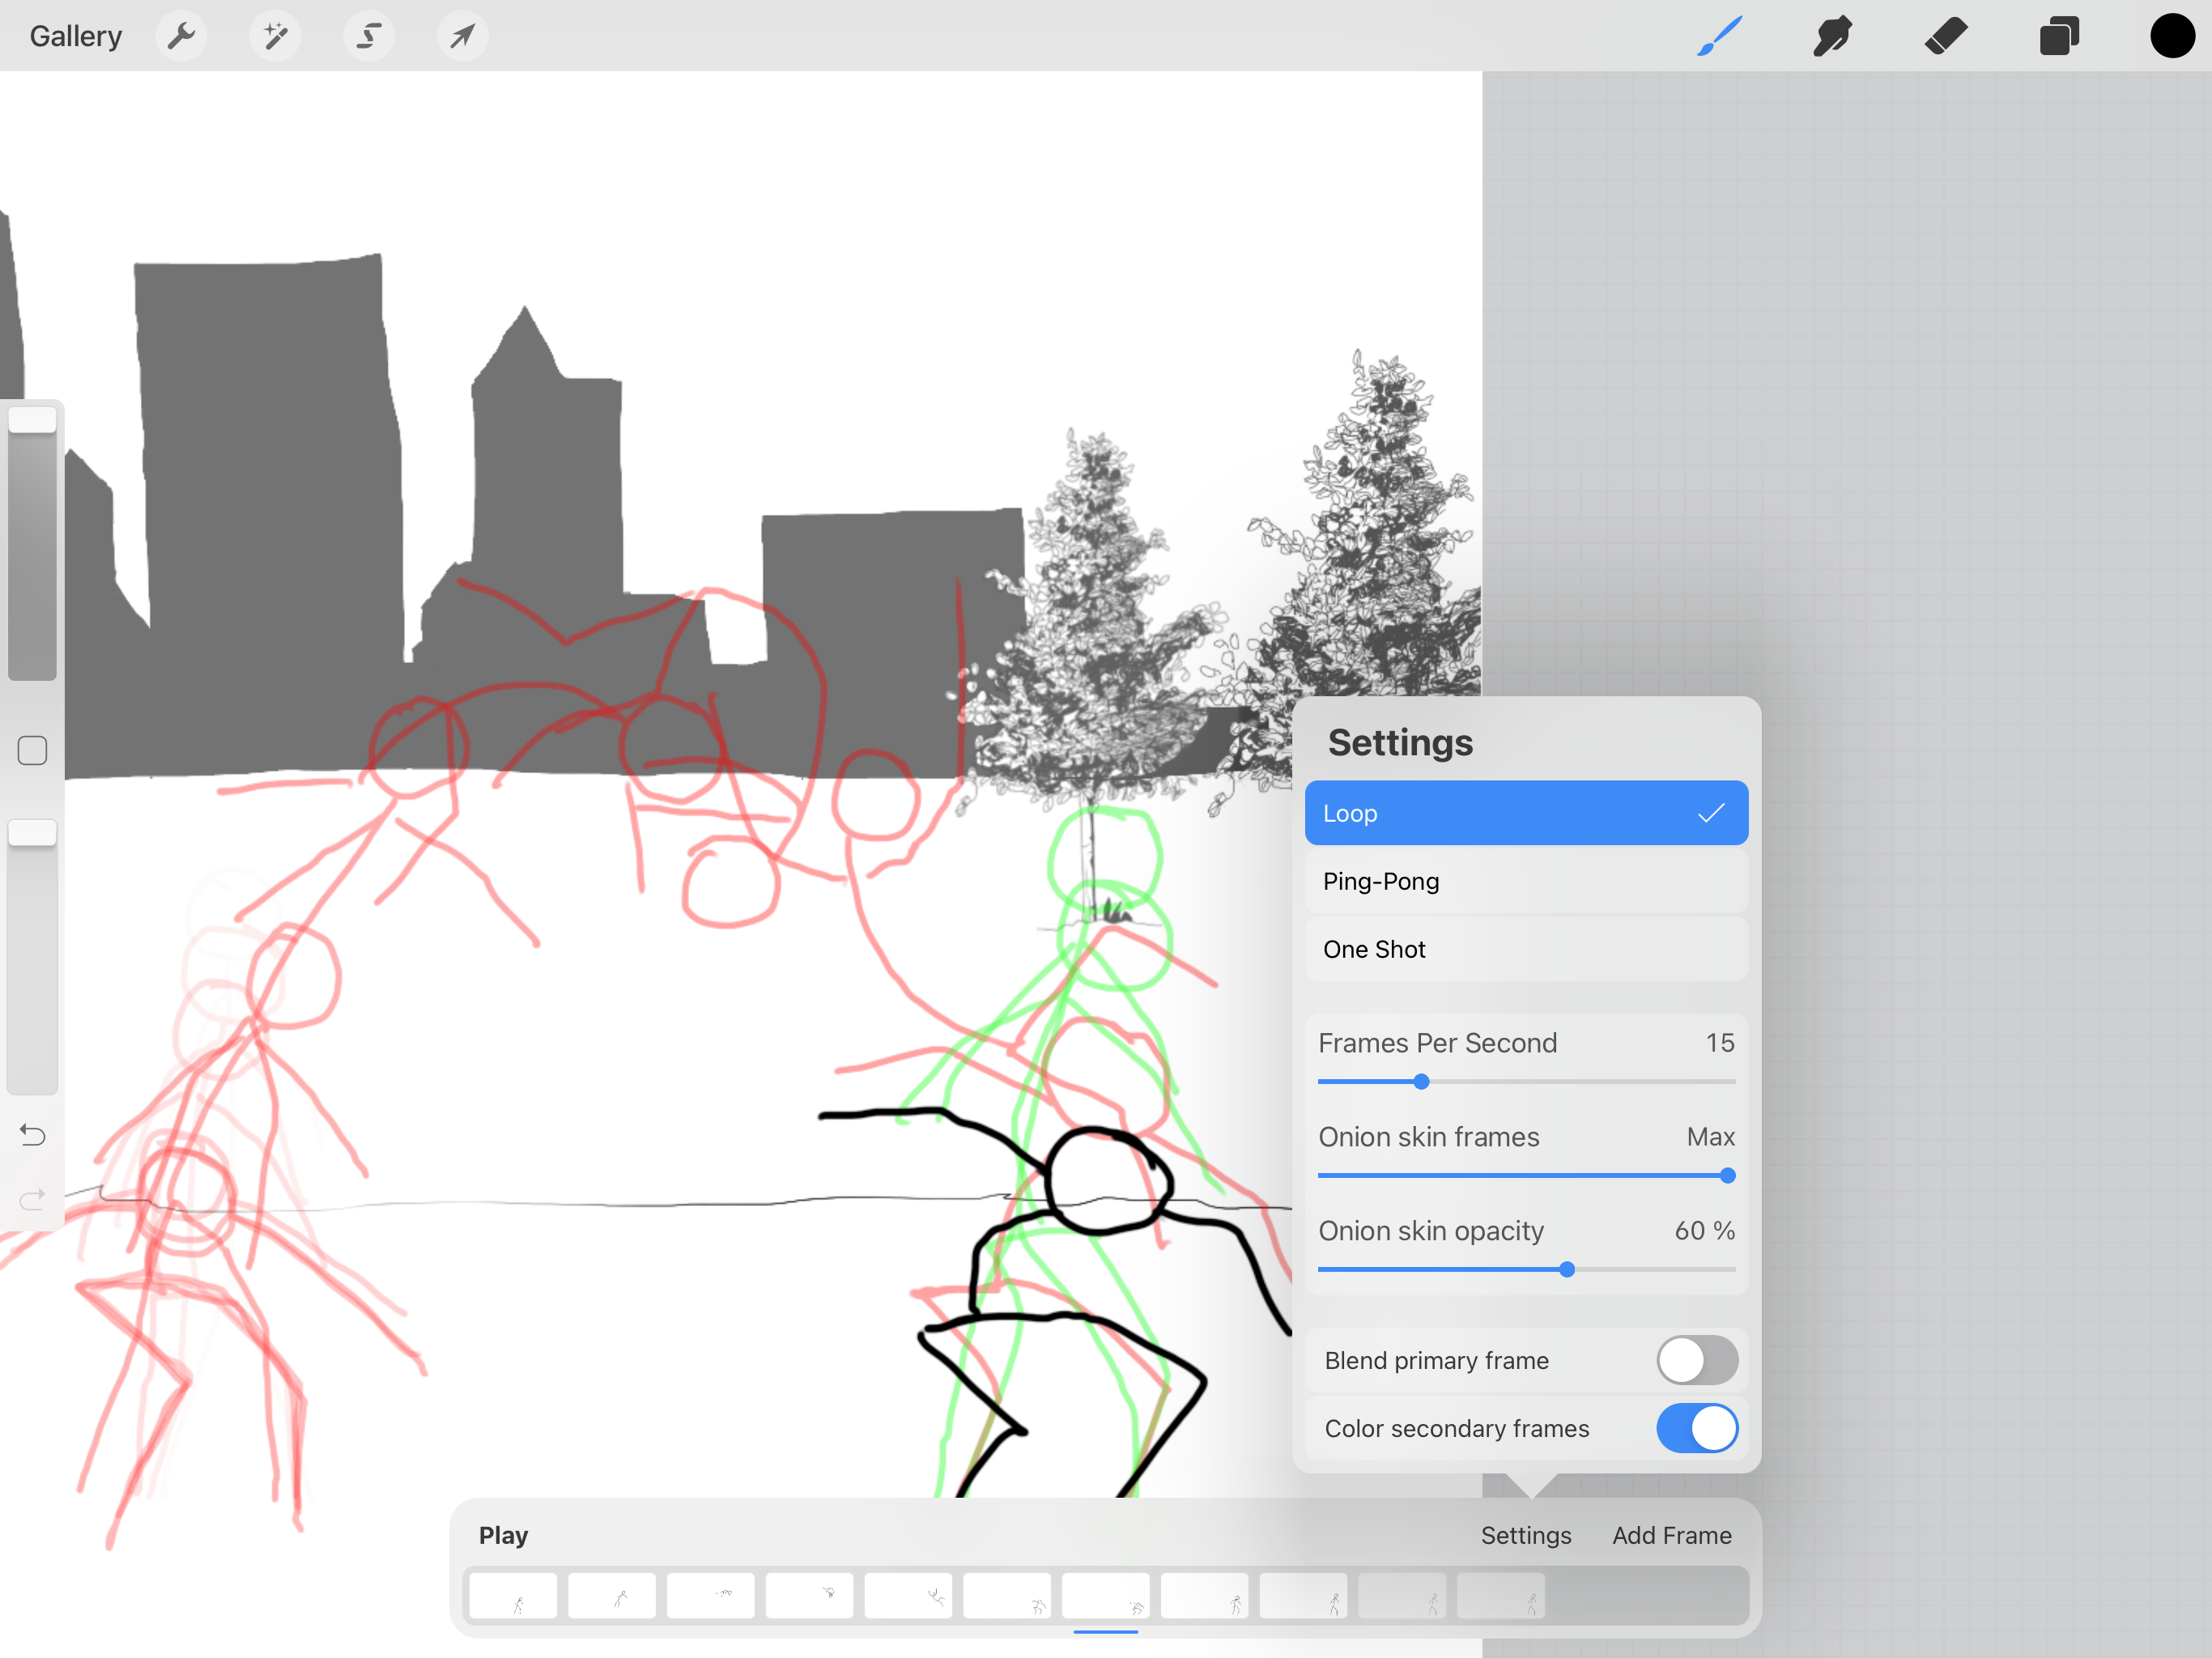

Onion skin is a tool that fades the previous frames, so you can see what you did in order to create your current frame.
On the animation controls, you press the settings option to get the onion skin controls.
You can also set the onion skin opacity, the onion skin frame amount, color the previous frames and the upcoming frames as two different colors, and blend the currently active frame.
- Hold Frame
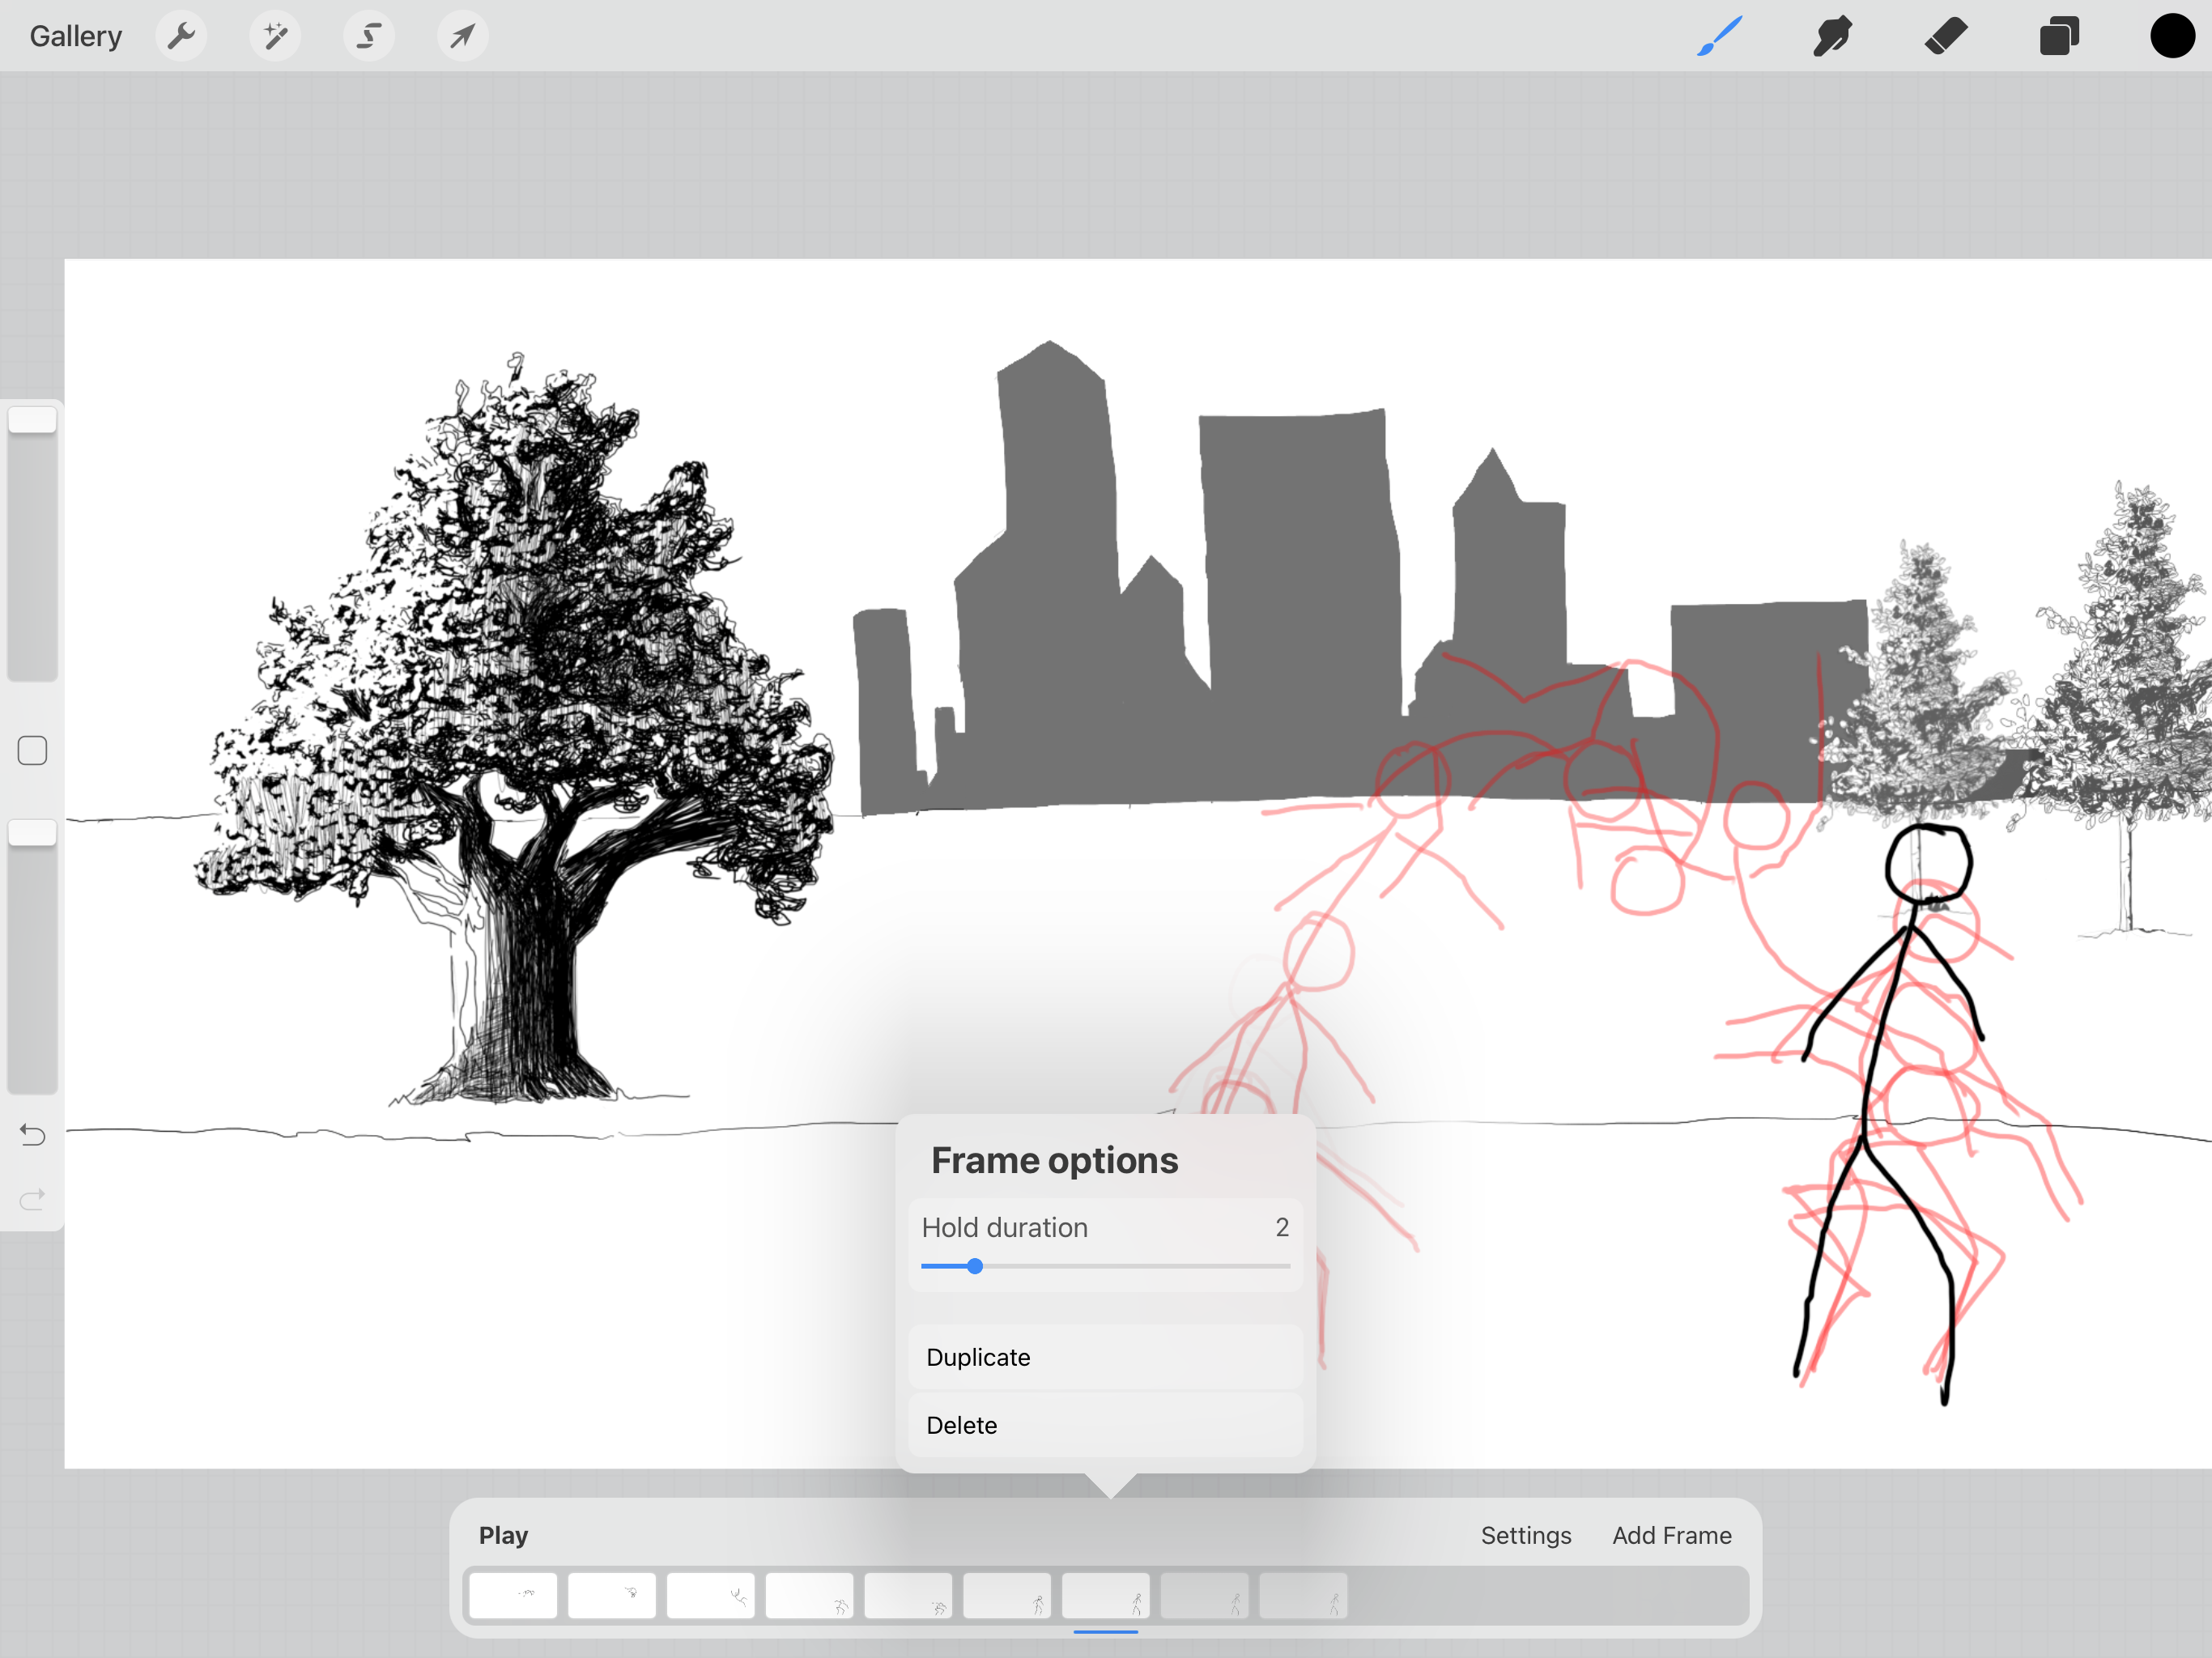

Hold frame allows you to pause the frame for a duration of your choosing.
Tap on a frame to activate the hold frame option.
If you choose the hold duration as 2, then it will automatically add two more frames identical to the frame you’re holding.
- Foreground Layer


The foreground tool allows you to set a frame as the foreground element. So instead of drawing something in the foreground every time, you can set the frame as a foreground.
Tap on the frame to set it as the foreground.
You can only set the frame the is furthest to the right side or the topmost layer in your layers palette as a foreground. Make sure you don’t have any hidden layers above this frame in your layers palette, as that can prevent you from setting the foreground parameter.
- Background Layer
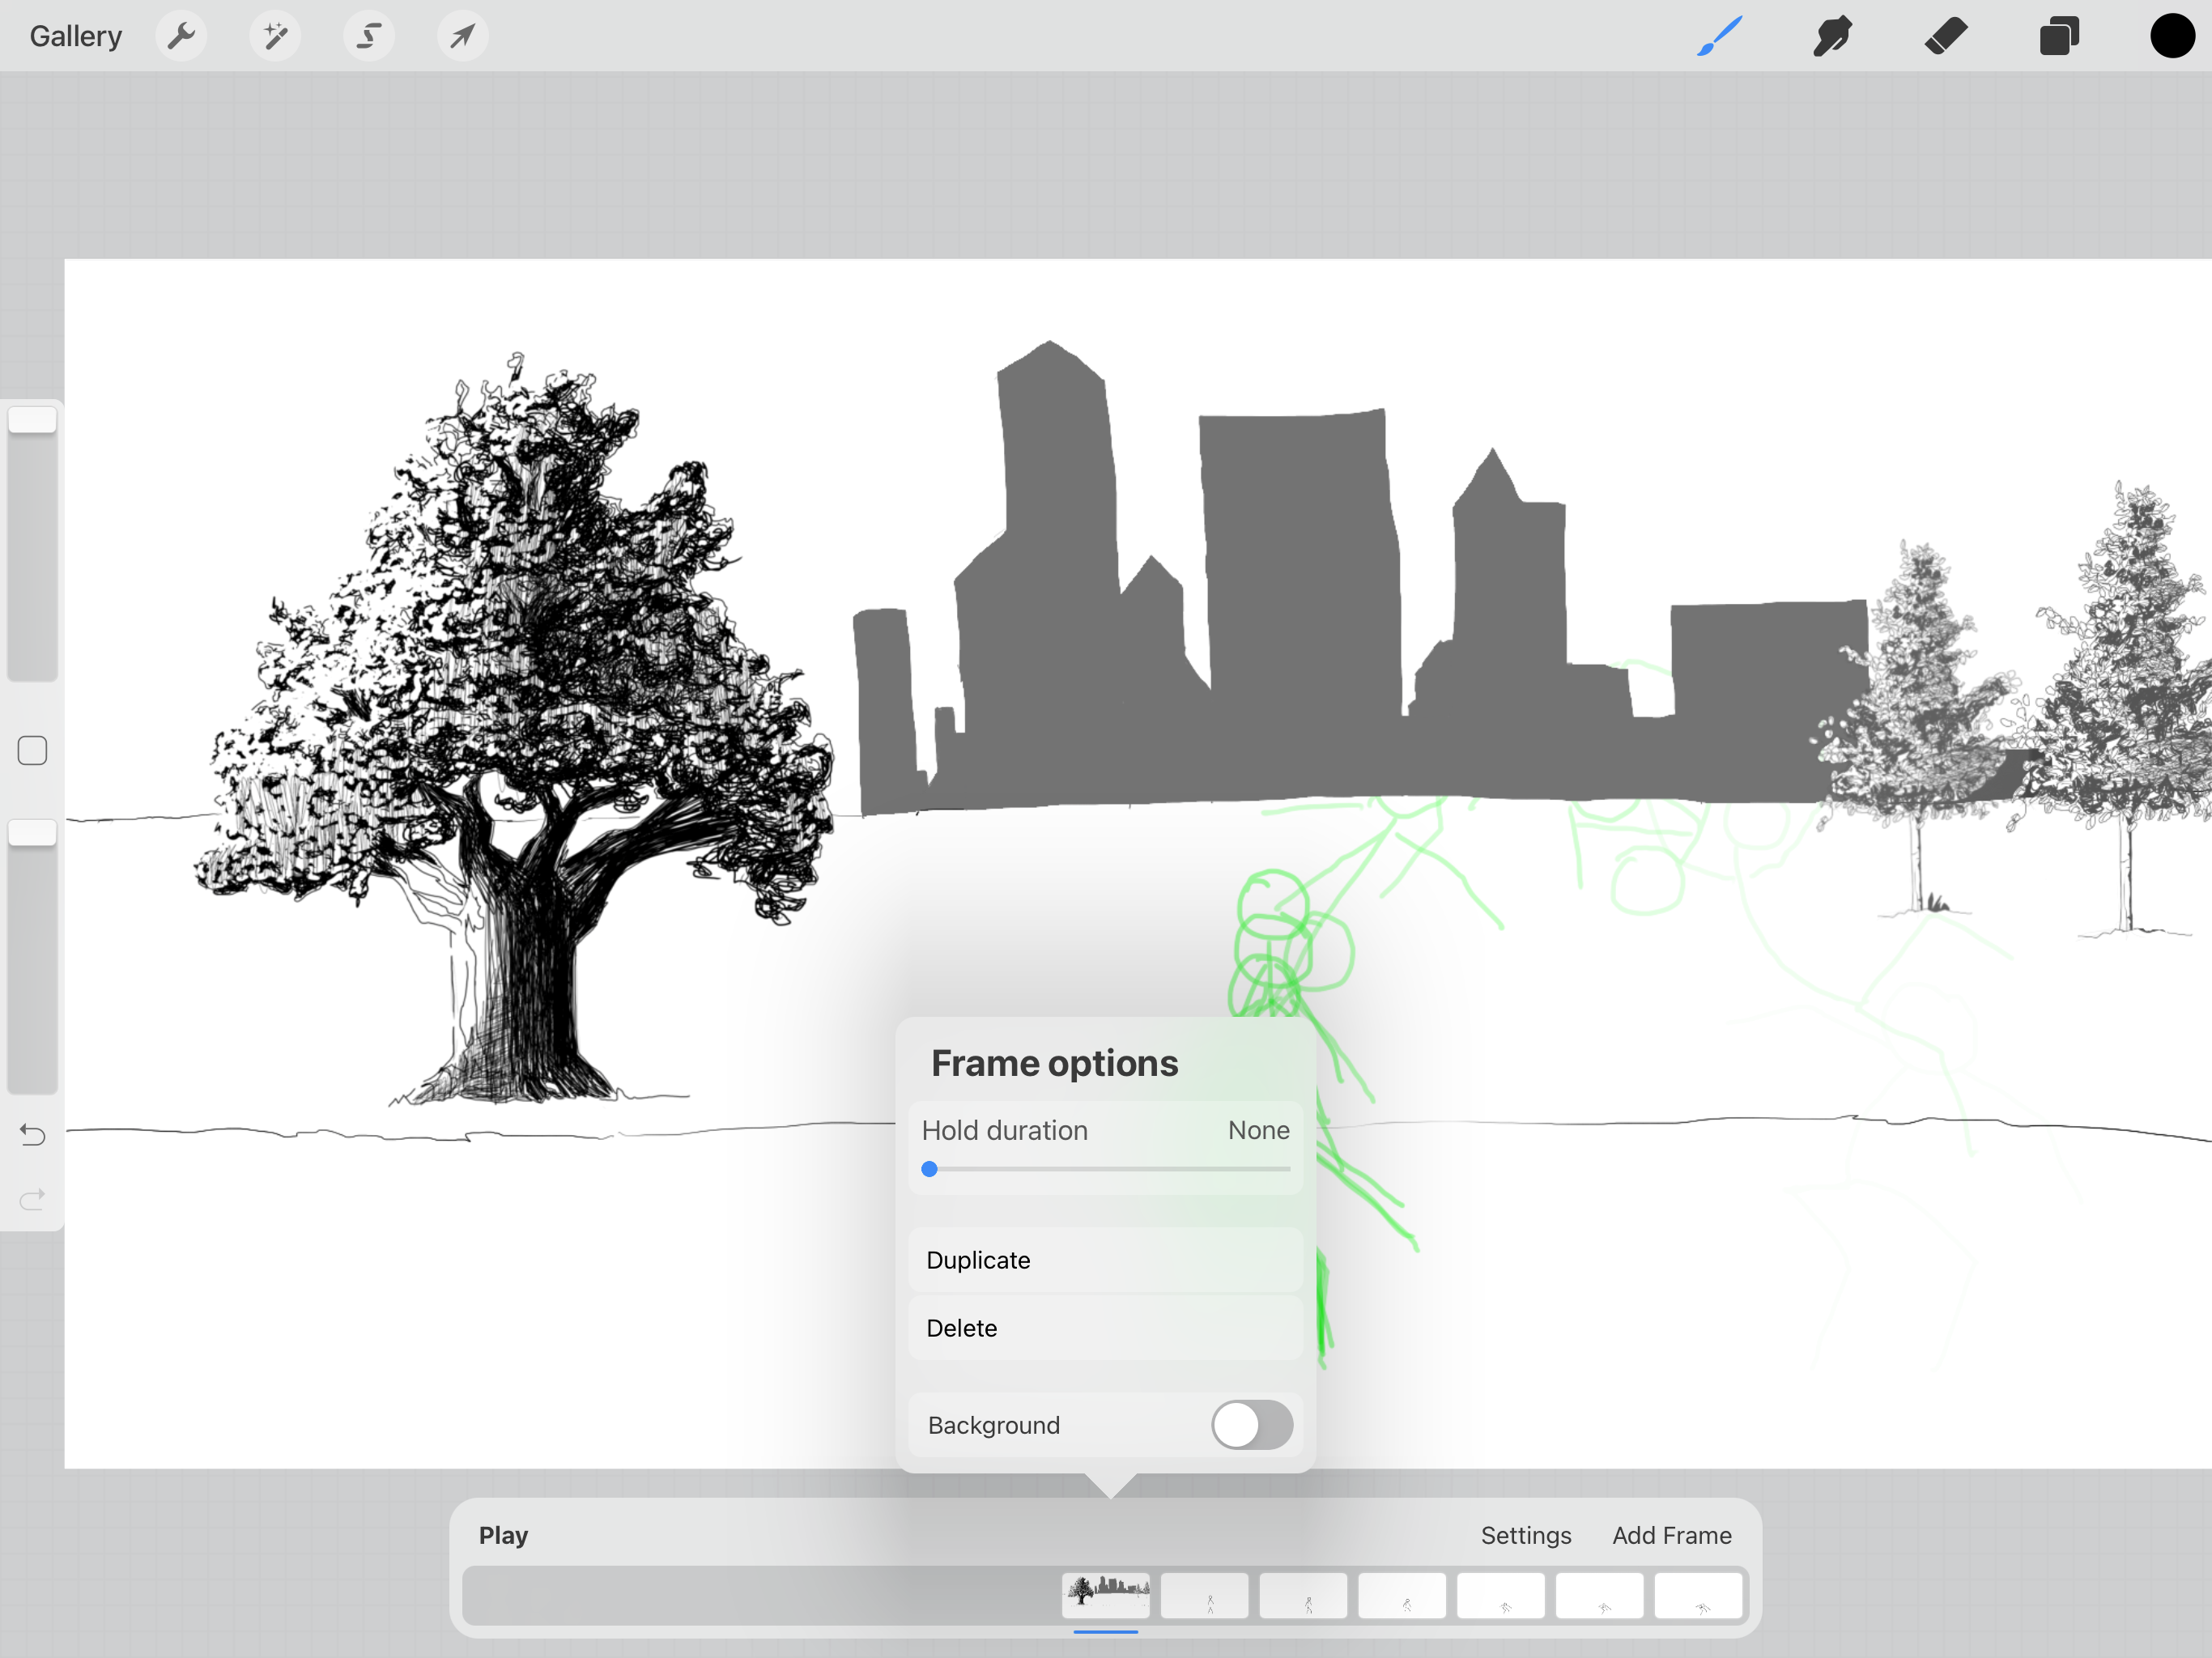

The background tool is like the foreground but it sets the background.
Tap on the frame to set it as the background.
Like with the foreground tool, you can only set the background to the furthest left frame or bottom-most layer in your layers palette.
- 4K Timelapse


You can set the quality of the timelapse setting when you first create a canvas. It’s in the same area where you configure the dimensions.
You can set the recording in 1080p, 2K, or 4K. You can also set the quality.
It ranges from low quality to lossless. Low quality and good quality are small enough to send through email. Studio quality is better and lossless means that it doesn’t lose any quality.
You can also set the timelapse to a different compression, which is HEVC. By default, it is turned off, but you can easily switch it on.
- Private Layer
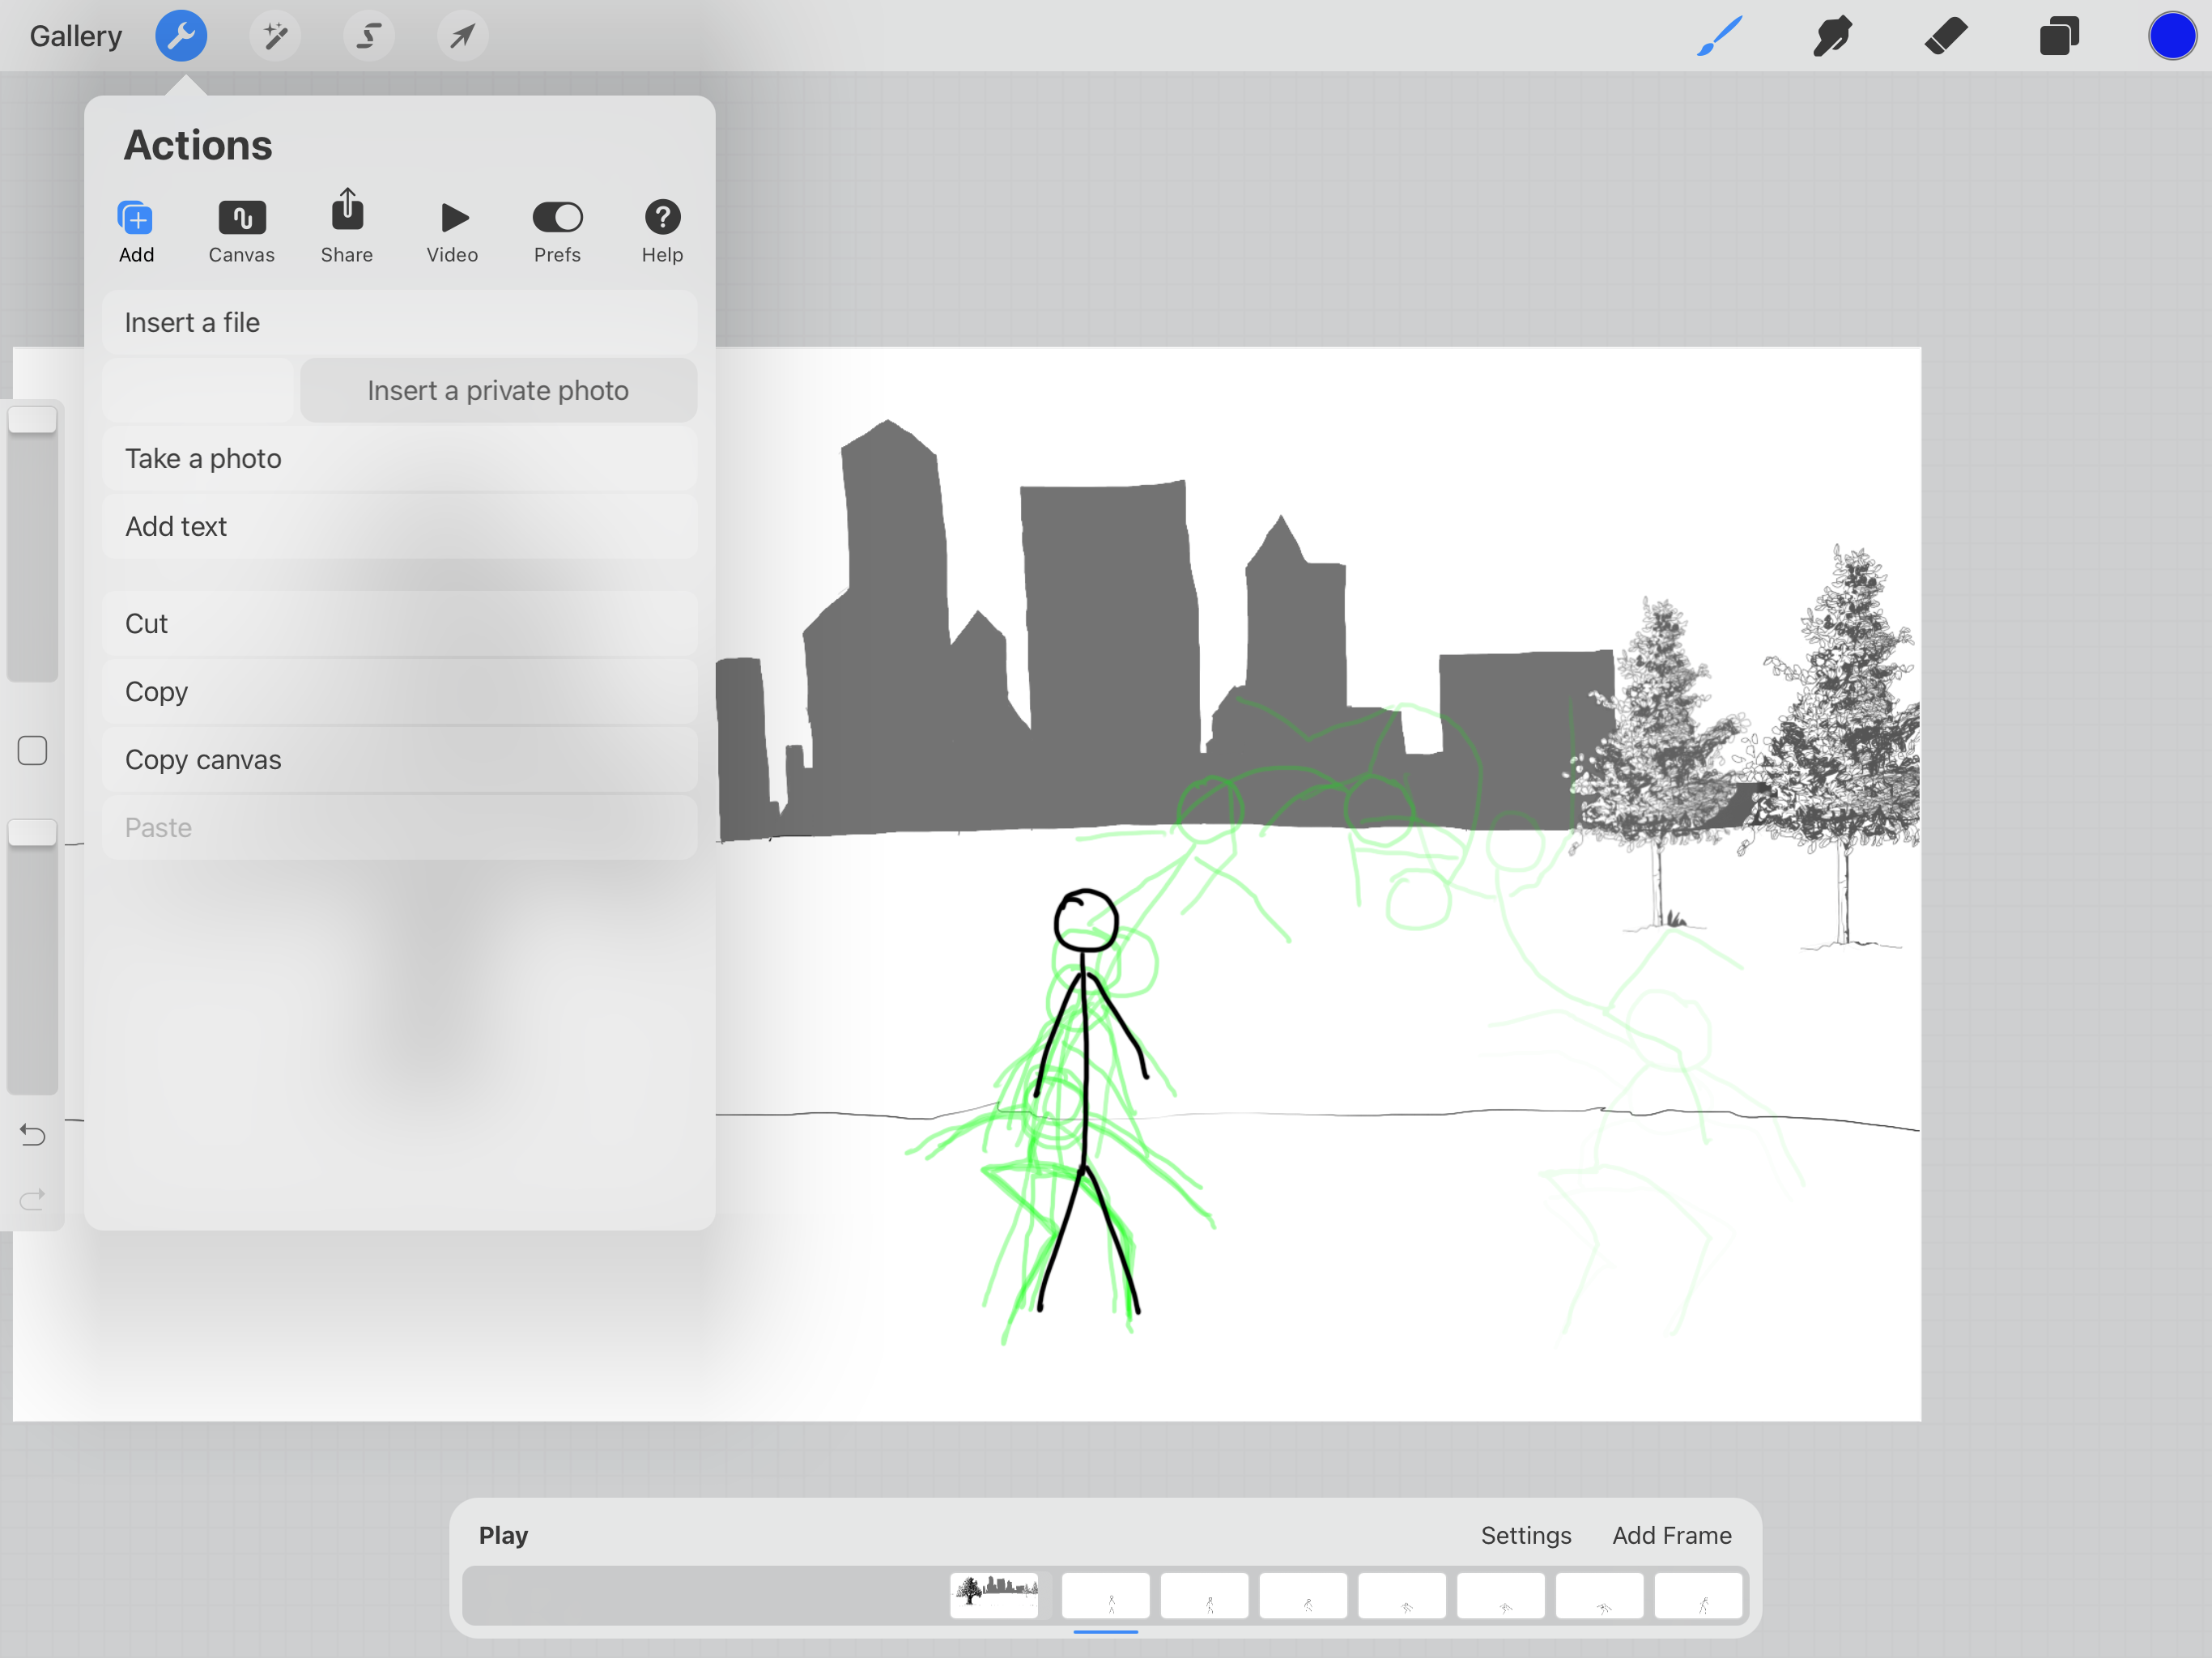


Sometimes you may want to add a layer that doesn’t get displayed in your timelapse playback. With the private layer tool, you can do this.Click on the wrench icon, then swipe right to left on the insert a photo, insert a file, or take photo options.
You will see a private layer pop up in the layers palette. The layer will be labeled “private”.
Procreate Animation Tips
Here are some quick Procreate animation tips to help you animate in Procreate. Follow these, and you’ll learn how to make an animation on Procreate in no time.
- Instead of redrawing a frame, use the duplicate frame option to create frames faster.
- Duplicate the artwork before merging layers to create a backup. Make sure your duplicated art is not immediately above the background color layer or the topmost layer. This will affect your ability to set a background or foreground in your animation.
- Start at the end – create your final scene first, and create the frames leading up to it.
- Import videos to use as a reference for your animation. You can record yourself walking, grabbing something, etc with your iPad and then import that into Procreate. Click the following to know the best iPad for Procreate.
- Turn on color secondary frames in the animation assist settings. This will color your previous frames and upcoming frames as two different colors to help you visualize your frames and create frames easier.
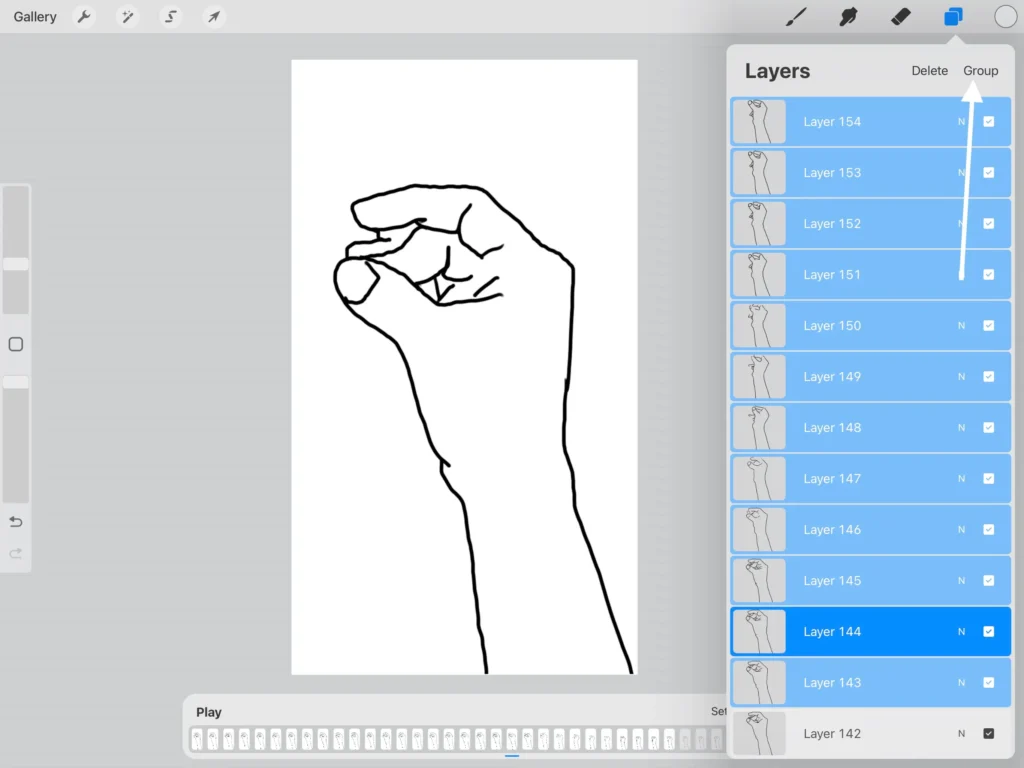
- Activate multiple layers at once by pressing and holding the checkmark field next to the layer name. You can also learn how to select multiple layers in Procreate to help you save more time.
Detailed Tips
Here are a few more detailed tips as part of our Procreate animation tutorial explaining how to make animations on Procreate.
Using Layer Groups
When learning how to animate with Procreate, you’ll quickly find out about the Layers panel. Each new frame of a Procreate animation gets added there.
You might not know that if you want to put multiple layers on one frame, you can use layer groups.
A layer group allows you to work with the layers in the group as you normally would when not animating in Procreate. As a result, you don’t need to worry about erasing parts of your animation that just stay static and instead can focus on just the moving parts.
To make one, open the Layers panel and click on the plus icon, adding a new layer. Then, all you have to do is drag it on top of an existing frame and you’ll get a layer group.
Know your Layer Cap
There is a limit to the number of frames you can have for a single animation when animating on Procreate. Usually, your frames will be capped at 100-120. This number depends on both your canvas size and how much your device can handle.
If you are making a larger project, you need to create multiple Procreate animation projects and export them to an external video editor to splice them into an animation on Procreate.
Choosing your FPS
Different Frames Per Second change the feeling of your animation completely.
Generally speaking, the more frames you have the smoother the animation you’ll get.
However, you can get more organically looking animations with more control of the end product if you use more hand-drawn frames. The balance between the two is one of the most difficult choices for an animator and can decide a lot about the scope and feel of a project.
Color, Shading & Texture Techniques in Motion
Nail your colors early and keep them consistent—nothing breaks an animation faster than flickering hues or mismatched shadows.
1. Separate Lines & Colors with Reference Layers
- Keep your clean line art on its own layer.
- Tap that layer and choose Reference.
- On a new layer below, drag the Active Color onto closed regions to ColorDrop flat fills; Procreate treats the Reference layer’s ink as the boundary, so your fills stay neatly inside the lines. Procreate Help Center
2. Choose the Right Method for Shadows & Highlights
| Method | When to Use | How |
| Alpha Lock | Quick cel‑shading on the same color layer | Two‑finger swipe right to lock → paint shadows directly; no new layers needed. Procreate Help Center |
| Clipping Mask | Non‑destructive gradients, airbrush glows | Add a new layer above your colors, tap → Clipping Mask; now anything you paint affects only the pixels below. |
| Multiply / Overlay Blend | Global mood shifts | Change the shading layer’s blend mode to Multiply (shadows) or Screen/Overlay (highlights). Procreate Help Center |
3. Keep Palettes Consistent Across Frames
- Build or import a Palette (Colors › Palettes) before you animate.
- Lock it as Default so every new frame starts with the same swatches. Procreate Help Center
4. Speed‑Recolor with Gradient Map
Need to shift a character’s outfit mid‑project? Duplicate the group, then run Adjustments › Gradient Map and pick a new palette—highlights, mid‑tones, and shadows remap instantly without redrawing. Procreate Help Center
5. Add Subtle Texture
- Noise (Adjustments › Noise) at 2 – 5 % breaks up flat digital fills.
- Light Bloom or Glows give magic effects their pop. YouTube
- Grainy paper brushes (e.g., Procreate’s built‑in “Artist Crayon” set to low opacity) add a hand‑drawn vibe.
6. Quick Color‑Consistency Checklist
- Line layer set as Reference
- Flats on separate layers, grouped by character/object
- Shadows via Multiply clip or Alpha Lock, highlights via Screen/Overlay
- One master Palette locked as Default
- Optional Gradient Map layer for instant palette swaps
- Light noise/bloom for texture without bloating file size
Master these steps once and every frame will feel cohesive—no more distracting color pops or muddy shading midway through your loop.
Applying Effects: Blur, Liquify, Glows & More
Adding FX after your flats are locked can turn a simple loop into eye‑catching motion―just keep each effect on its own layer so you can tweak timing without repainting.
1. Blur for Depth & Speed
| Effect | Where to Find It | Best‑Use Cases |
| Gaussian Blur | Adjustments › Gaussian Blur | Soft depth‑of‑field, subtle background focus. Slide left/right to set intensity. |
| Motion Blur | Adjustments › Motion Blur | Fast limb swings, speed lines, falling objects. Drag in the direction of movement. |
| Perspective Blur | Adjustments › Perspective Blur | Dramatic zooms or camera pans; keeps vanishing‑point lines coherent. |
Tip: Duplicate the frame, blur the copy, then lower its opacity or Erase parts with a soft brush to blend.
2. Liquify for Wiggly or Rippling Elements
- Select Adjustments › Liquify.
- Choose Push (for flag ripples) or Expand (for pulsing glows).
- Work on a separate layer; if the effect needs to animate, create multiple copies and adjust each one slightly.
- Toggle Animation Assist and set those layers as sequential frames for a fluid morph.
3. Glows & Light Flares
- Paint base color on a new layer → set Blend Mode to Add or Screen.
- Duplicate the glow layer, apply Gaussian Blur at 10–20 %.
- Add Bloom (Adjustments › Bloom) for sci‑fi or magical pulses; crank Transition to feather edges smoothly.
4. Distortion (Ripple, Noise, Halftone)
- Adjustments › Noise: 2–5 % grain breaks digital perfection.
- Adjustments › Halftone: comic‑book dots; reduce Scale for subtler texture.
- Adjustments › Chromatic Aberration: slide only 1–2 % for a mild retro glitch.
5. Non‑Destructive Workflow
- Group all FX layers above the main artwork.
- Name each group by frame number (e.g., “Frame 07 FX”) so timeline stays tidy.
- Toggle the visibility icon to test animation with/without effects before final commit.
6. Quick FX Checklist
- Blur on its own duplicate layer, opacity reduced if needed
- Liquify frames saved as separate layers and sequenced
- Glows set to Add/Screen with extra blurred copy for bloom
- Noise or halftone kept under 5 % to avoid file bloat
- Effect groups clearly labeled to match timeline frames
Use these effects sparingly; subtle touches amplify motion without drowning your core artwork in visual noise.
Looping Tricks for Seamless GIFs
A perfect loop snaps back to its first frame with zero visual jump—ideal for Instagram stickers, website backgrounds, or TikTok reaction GIFs.
1. Bookend Keys: Make Frame 1 and Frame N Identical
- Duplicate your opening key, drag it to the end of the timeline, and rename it “Loop Back.”
- Tip: If the motion is cyclic (e.g., a spinning coin), offset the duplicate by a half‑step and enable Ping‑Pong playback instead of Loop for even smoother cycling (see step 4).
2. Ease into the Loop
- For organic moves, add two extra in‑betweens that gradually slow the action as it approaches “Loop Back.”
- Think of them as a visual cushion; they soften the eye’s transition when the GIF restarts.
3. Hide Tiny Pops with Motion Blur or Opacity Fades
- Duplicate “Loop Back,” apply a 5 – 8 % Motion Blur in the same direction of travel, and set layer Opacity to 50 %.
- Sandwich this blurred copy between the last full‑resolution frame and Frame 1—barely visible, but it masks micro‑shifts the viewer might notice.
4. Use Playback Modes Wisely
| Mode | Best For | How to Enable |
| Loop | Actions that end exactly where they start (rotating logo, blinking neon sign). | Actions › Canvas › Animation Assist › Playback › Loop |
| Ping‑Pong | Motions that travel back and forth (pendulum, waving hand). Saves you from drawing the return swing. | Playback › Ping‑Pong |
| One Shot | Single‑run animations—avoid for GIFs. | Playback › One Shot |
5. Trim Dead Air
- Play at 12 fps first; if it feels sluggish, delete redundant holds or hike the FPS to 15–18.
- GIFs love tight timing—aim for 1–3 s total length; anything longer balloons file size.
6. Export Settings for Web‑Ready Loops
- Actions › Share › Animated GIF
- Frames‑Per‑Second: match the timeline (12–18 fps is plenty).
- Resolution: choose Max if the GIF will stay under 1080 px wide—social platforms downscale anyway.
- Dither: leave Adaptive checked; it smooths gradients without bloating kilobytes.
- Transparent Background: toggle ON for sticker‑style loops.
Quick Loop Checklist
- First and last frames match perfectly (or ping‑pong enabled)
- Extra ease‑in frames soften the restart
- Optional blurred “patch” masks tiny pops
- Total runtime ≤ 3 s for fast loading
- GIF exported with Adaptive dither & correct FPS
Dial in these tricks and your Procreate loops will play forever—no distracting stutter, no awkward jumps—just smooth, hypnotic motion.
Export Options: GIF, MP4, PNG Sequence & HEVC
Choosing the right format preserves quality and keeps file sizes under control—use the chart below to pick, then follow the step‑by‑step settings.
1. Where to Find the Export Panel
Actions (🔧) › Share › Share Layers — here you’ll see Animated GIF, Animated PNG, Animated MP4, Animated HEVC, plus PNG Frames for individual files. Procreate Help Center
2. Quick‑Reference Format Guide
| Format | Best For | Pros | Caveats |
| Animated GIF | Social stickers, email loops | Universal support, small dimensions | 256‑color limit → banding in gradients; max 50 MB upload on many sites |
| Animated PNG | High‑fidelity art loops, transparent vids for editing | 24‑bit color + alpha; lossless | Larger files; Safari & older Android lack native playback |
| MP4 (H.264) | YouTube, Instagram Reels, TikTok | Widely compatible; efficient compression | No alpha channel—background must stay solid |
| HEVC (H.265 / .MOV) | Web overlays, OBS scenes, video editors that accept transparency | Supports full‑alpha transparency; half the size of MP4 at same quality | Not all platforms accept .MOV HEVC; Google Drive preview removes alpha Procreate Folio |
| PNG Frames | Importing into After Effects, Premiere, or Unity | Every frame isolated; perfect for VFX pipelines | Creates a folder of hundreds of files—zip before sharing |
3. Recommended Settings per Format
- GIF
- Frames‑Per‑Second: 12–18 fps
- Dither: Adaptive
- Transparency: toggle ON if background is off
- Animated PNG
- Resolution: Max (Procreate caps at parent canvas)
- Background: Transparent for overlays; opaque for color richness
- MP4
- Frames‑Per‑Second: Match timeline (24 fps for smooth, 30 fps for web video)
- Quality Slider: 2nd‑highest notch—keeps visual fidelity while trimming file size
- HEVC
- Color Depth: 8‑bit is fine (10‑bit only needed for HDR workflows)
- Transparency: ON (shows up as alpha in editors like Final Cut & DaVinci)
- PNG Frames
- Scaling: 100 % (export at native canvas size)
- Naming Convention: Enable “Frame number suffix” so sequences import in order
4. Export Walk‑Through (Example: Transparent Sticker GIF)
- Hide the background layer or set canvas background to ‘None’.
- Actions › Share › Animated GIF.
- Enable Transparent Background.
- Drag the Frame Rate slider to 15 fps.
- Keep Dither › Adaptive checked; tap Export.
- Choose Save to Files or Copy to GIPHY if installed—done! Procreate Help Center
Summary for Exporting
Use GIF for universal stickers, APNG for crisp loops with transparency, MP4 for social video, HEVC (.MOV) when you need high‑quality alpha, and PNG Frames for pro‑video pipelines. Find them under Actions › Share › Share Layers and tweak FPS + transparency for the best balance of quality vs. file size.
Optimizing File Size Without Losing Quality
Small files load faster, upload smoothly, and keep your iPad storage sane—follow the tweaks below before you hit Export.
1. Choose “Web Ready” (Not “Max Resolution”)
When exporting GIF, PNG, MP4, or HEVC, Procreate offers two presets: Max Resolution and Web Ready.
- Web Ready drops excess pixels that most platforms downscale anyway, often cutting size by 40‑60 % with zero visible loss on phones or laptops. Procreate Help Center
2. Trim Canvas Dimensions Before You Animate
- If your final outlet is 1080 × 1920 px, don’t create a 4K canvas “just in case.”
- Duplicate the doc → Actions › Canvas › Crop & Resize → enter target dimensions → Re‐sample.
- Your layer limit bumps up and every frame weighs less.
3. Dial Back Frame Rate for Loops
- Most social platforms auto‑convert uploads to 30 fps or less; looping GIFs feel smooth at 12‑18 fps.
- Lowering from 24 fps to 12 fps literally halves the exported frame count.
4. Keep Color Counts Lean (GIF Only)
- Stick to ≤ 256 colors—Procreate’s Adaptive Dither handles gradients gracefully.
- Busy gradients? Try Animated PNG instead; same transparency, 24‑bit color. Procreate Help Center
5. Delete or Downgrade Time‑Lapse Data
Every canvas stores a hidden time‑lapse. If you don’t need it:
- Actions › Video › Time‑Lapse Recording → Off → when prompted, tap Purge to erase video data (often frees 100‑300 MB). Procreate Folio
- For future projects, lower default quality: New Canvas › Time‑Lapse Settings → set 1080p / Low instead of 4K Lossless. Procreate Help Center
6. Quick External Compression (Optional)
- MP4 / HEVC: Run through HandBrake (iPadOS or desktop) with the Fast 1080p30 preset to shave another 20‑30 %.
- GIF / APNG: Use ezgif.com → Optimize → Lossy 15 for tiny socials.
File‑Size‑Saver Checklist
- Export preset set to Web Ready
- Canvas resized to final delivery size
- FPS trimmed to 12‑18 (loops) or 24 (video)
- GIF color limit ≤ 256 with Adaptive Dither
- Time‑lapse recording purged or set to 1080p/Low
- Optional HandBrake / ezgif pass for one‑click squeeze
Apply these steps and your Procreate exports stay sharp and slim—no more “file too large” errors or bloated iPad storage.
Common Mistakes & How to Fix Them
Avoid these frequent pitfalls to save time—and your sanity—while animating in Procreate.
1. Hitting the “Layer Limit Reached” Popup
Why it happens: Canvas resolution is too high for your iPad’s RAM.
Fix: Actions › Canvas › Crop & Resize → down‑size to your final delivery dimensions (e.g., 1080 × 1920 px). Duplicate the file first so you keep a 4 K backup if needed.
2. Flickering Colors Between Frames
Why it happens: Painting flats directly on each frame without a reference layer.
Fix: Set your ink layer to Reference, place flats on a single color layer below, or use Clipping Masks so every frame pulls from the same palette.
3. Jumpy Playback Even at 24 fps
Why it happens: In‑betweens are missing or unevenly spaced.
Fix: Switch onion‑skin to 3 frames before/after, add breakdown drawings halfway between keys, and adjust spacing for slow‑in / slow‑out.
4. Ghost Lines After Liquify or Blur
Why it happens: Effects applied directly on original art layers.
Fix: Duplicate the frame → run Adjustments (Blur, Liquify, etc.) on the copy → toggle Alpha Lock to clean stray pixels or erase edges with a soft brush.
5. File Exports Look Washed Out
Why it happens: Exporting GIFs with No Dither or MP4s at the lowest quality.
Fix:
- GIF: Choose Adaptive Dither in the export panel.
- MP4: Slide quality to the 2nd‑highest notch; file size hardly changes, color fidelity returns.
6. Time‑Lapse Video Fills iPad Storage
Why it happens: Default time‑lapse is 4 K Lossless.
Fix: Actions › Video › Time‑Lapse Recording → set to 1080p / Low (or Off & Purge when done).
Quick Troubleshoot Checklist
- Canvas matches output size (no surplus pixels)
- Flats use Reference or Clipping Masks for color consistency
- Onion‑skin set to 3 frames; spacing checked for easing
- FX applied on duplicate layers, not originals
- Export with Adaptive Dither (GIF) or high‑quality MP4
- Time‑lapse quality lowered or purged when finished
Tackle these fixes early and you’ll dodge most headaches that derail first‑time animators.
Advanced Techniques: Camera Shake, Parallax & Faux‑3D Illusions
These tricks add professional polish—use them sparingly so they enhance, not distract.
1. Camera Shake (Impact or Hand‑Held Feel)
A. Quick Jitter Method
- Finish your animation, then duplicate it to a new canvas (keeps the master clean).
- Turn on Animation Assist and select All Frames in the timeline (Select › All → Duplicate).
- For each duplicate, nudge the entire canvas 2–5 px in random directions with the Transform tool.
- Reduce Timing: set each shake frame’s exposure to 1 (or even 0.5 by adding a hold on the underlying frame).
- Optional: add a Subtle Motion Blur (5 %) to each shake frame for cinematic realism.
B. Post‑FX Layer Method
- Flatten finished frames into a single layer group.
- Duplicate the group three times, offset each duplicate one pixel in different directions, then toggle Visibility on and off sequentially in the timeline.
- Lower group opacity to 50 % so shake feels organic.
2. Parallax Scrolling (Depth Illusion)
Setup: Place background elements on separate layers—Foreground, Midground, Background.
- Convert each layer group into Frames: Animation Assist › Settings › Each Layer = Frame.
- Duplicate each layer the number of frames needed (e.g., 12).
- Offset Movement:
- Foreground: shift 6 px per frame.
- Midground: shift 3 px per frame.
- Background: shift 1 px per frame.
- Play at 12 fps. Foreground races ahead, background crawls—instant depth!
- Want a vertical pan? Offset Y‑axis instead, following the same “closer moves faster” rule.
3. Faux‑3D (Camera Tilt / Turntable Spin)
A. Y‑Axis Tilt (e.g., Card Flip)
- Draw the object on a single layer.
- Duplicate the layer 8–12 times.
- For each layer, use Transform › Distort—drag left and right corners inward progressively to mimic rotation.
- Sprinkle in a slight Perspective Blur toward the edges for extra realism.
- Loop or ping‑pong the frames to complete the flip.
B. Turntable Rotation
- Separate object into front, top, side slices.
- Re‑draw or liquify parts to fake perspective as it “rotates.”
- Keep a reference circle path visible on its own layer to ensure edges stay on track.
4. Quick Advanced‑FX Checklist
- Camera shake frames offset ≤ 5 px for subtle realism
- Parallax layers duplicated & offset at staggered speeds
- Faux‑3D distortions applied evenly across duplicates
- Optional Motion/Perspective Blur for depth cues
- Playback checked at final FPS (12–24 fps) for smooth results
Master these techniques and your Procreate animations will leap from “nice” to “pro‑grade,” complete with cinematic camera moves and convincing depth.
Recommended Brushes, Plug‑Ins & Learning Resources
Level‑up your Procreate animations with the right tools and study material—everything below is free or low‑cost, and all links import straight into Procreate with one tap.
1. Go‑To Default Brushes (Already in Procreate)
| Stage | Brush Name | Why It Works |
| Rough keys | 6B Pencil | Loose graphite texture, great for flipping frames quickly. Procreate Help Center |
| Clean line | Technical Pen | Uniform pressure = consistent outlines across dozens of frames. Procreate Help Center |
| In‑betweens | Narinder Pencil | Slight texture hides minor jitter but still reads crisp when played back. Procreate Help Center |
| FX & Speed lines | Studio Pen (pressure‑size ON) | Tapered tips make motion streaks in a single stroke. Procreate Help Center |
2. Free Animation‑Friendly Brush Packs
| Pack | What’s Inside | Source |
| Webtoon Speed Lines (10 brushes) | Stamp‑style slashes for motion bursts | JRRH Gumroad – free download Gumroad |
| Simple Manga Motion Lines | Parallel zoom lines sized for 1080 px reels | SoftwareHow “Best Anime Brushes 2025” list SoftwareHow |
| Free Animation Essentials | Rough pencil, clean ink, glow airbrush | ProcreateBrush.net bundle procreatebrush.net |
Install: tap the .brushset file in Files → it auto‑opens in Procreate’s Imported folder. Procreate Help Center
3. Premium Packs Worth the $5‑$10
| Pack | Best Use | Price |
| 35 Speed‑Line Action Pack | Manga whip‑pans, impact frames | ≈ US $6 on Etsy Etsy |
| Top 10 Procreate Brushes 2025 (YouWorkForThem bundle) | Grainy textures & ink splatters for title cards | ≈ US $12 bundle price YouWorkForThem |
| 300 Comic FX Mega‑Set | Speech bubbles, halftones, motion FX | ≈ US $9 (Instagram shop) Instagram |
4. Companion Apps & Plug‑Ins
| Tool | Why Pair It with Procreate? | Platform / Cost |
| Procreate Dreams | Pro‑grade timeline, keyframes, audio—imports Animation Assist files flawlessly | iPad · US $19.99 one‑time Procreate |
| RoughAnimator | Onion‑skin + exposure charts for long‑form scenes, then clean‑up in Procreate | iPad · US $4.99 Reddit |
| ToonSquid | Vector‑based layers + tweening; export PNG sequence to finish FX in Procreate | iPad · US $19.99 Reddit |
5. Learning Resources (Bookmark These)
| Type | Resource | Why It Rocks |
| Official docs | Procreate Handbook > Animation | Step‑by‑step feature reference & gestures guide Procreate Help Center |
| Video series | Procreate YouTube – “How to Animate in Procreate” | 20‑min crash course; covers onion‑skin & export YouTube |
| Deep dive | “HOW TO USE PROCREATE FOR ANIMATION” (YouTube) | Full character scene walkthrough (2025 update) YouTube |
| App handbook | Procreate Dreams Handbook | Keyframing, timeline tricks, Flipbook workflow Procreate Help Center |
| Community | Procreate Folio Forum – Free Brushes | Thousands of user‑shared brushes & feedback threads Procreate Folio |
Recommendation Recap
Default picks: 6B Pencil, Technical Pen, Narinder Pencil, Studio Pen
Free packs: Webtoon Speed Lines, Simple Manga Motion Lines, Animation Essentials
Paid upgrades: 35 Speed Lines, Top 10 Brushes 2025, 300 Comic FX
Companion apps: Procreate Dreams (advanced timeline), RoughAnimator (roughs), ToonSquid (vector)
Learn more: Procreate Handbook, Procreate YouTube tutorials, Dreams Handbook, Folio forum
Stock your brush library, install a helper app or two, and keep those study links handy—your next Procreate animation will look sharper, flow smoother, and take half the time to finish.
Other featured topics that will help with your Procreate art:
- 34 Procreate Artists Speak Out: “One Procreate Tip I Wish I Knew Before Using It”
- 18 Must-Know Procreate Tips for Beginners
- 53 Best Fonts for Procreate
- How Does Procreate Masking Work?
- What You Oughtta About Procreate Reference Layer
- Use Procreate without Apple Pencil (What You Oughta Know)
- Top 3 Hand Lettering Tips for Beginners
- What Are The Different Styles of Lettering?
- Hand Lettering Fonts: Essential Things You Need to Get Started
- 100 Best Digital Painting Tutorials to Help You Paint Like a Master
- 9 Digital Drawing Exercises To Help You Get Better at Digital Art
- 5 Cool Easy Painting Ideas That Will Inspire You
- Procreate Marker Brush Pack
Conclusion & Next Steps
You now have a complete roadmap—from prepping your iPad to exporting web‑ready files—for animating confidently in Procreate. Start small: pick a 3‑second loop, apply the planning checklist, and practice each technique (in‑betweens, color management, FX, looping) on its own mini‑project. As your skills grow, layer in advanced moves like parallax and faux‑3D.
Ready to keep leveling up?
- Download the free brush packs listed above and test them on a quick bounce ball animation.
- Join the Procreate Folio Forum to post your work‑in‑progress and get feedback from seasoned animators.
- Challenge yourself with a 7‑day “One‑Loop‑Per‑Day” sprint—focus on a different principle each day (ease‑in/out, smear frames, camera shake, etc.).
- Explore Procreate Dreams if you need audio tracks, advanced keyframes, or longer timelines.
- Share your loop on Instagram or TikTok with the tag #ProcreateAnimation and see how fellow artists tackle similar prompts.
Keep iterating, stay curious, and push each new project just a touch further than the last—before long, you’ll have a portfolio of polished motion pieces ready for clients, social channels, or your own animated short. Happy animating!
Frequently Asked Questions
Which iPad models are best for animation in Procreate?
Any iPad that works with Apple Pencil will run Animation Assist, but more RAM equals more frames. A 16 GB M4 iPad Pro can reach about 1 000 layers on a 1080 × 1080 canvas, while a 4 GB entry‑level iPad from 2018‑2021 is closer to 120 layers on the same canvas.
How many frames can I animate before hitting the layer limit?
At 1080 × 1080 px, 16 GB RAM gives around 1 000 layers, 8 GB RAM about 500 layers, and 4 GB RAM roughly 120 layers. Check “Maximum Layers” under the DPI field whenever you create a new canvas.
Can I add audio or lip‑sync inside Procreate?
Animation Assist has no audio timeline. Export your visuals as MP4, HEVC, or PNG sequence, then add sound in Procreate Dreams, LumaFusion, CapCut, Premiere Pro, or another video editor.
How do I export an animation with a transparent background?
Turn off the background layer. Then export as Animated HEVC (.MOV) with Transparent Background enabled, or export a PNG Sequence for lossless alpha.
Why do my GIFs look grainy?
GIFs are limited to 256 colors. Use Adaptive Dither during export, keep gradients subtle, or switch to Animated PNG for full 24‑bit color plus transparency.
What’s the difference between Animation Assist and Procreate Dreams?
Animation Assist is flip‑book style—frame‑by‑frame only, no audio, no keyframes. Procreate Dreams adds a full timeline, keyframes, camera moves, audio tracks, larger canvases, and bigger layer counts, making it better for longer or sound‑synced projects.
Can Procreate create vector animation?
No. Procreate is raster‑only. For vector art or SVG/AI export, use Affinity Designer, Linearity Curve, Adobe Illustrator, or vectorize frames after you draw them.
How can I keep file sizes small without losing quality?
Export with the Web Ready preset, match canvas size to your final platform, lower loop FPS to 12‑18 fps, and purge or down‑sample the built‑in time‑lapse under Actions › Video.
Why does Procreate say “Cannot insert frame” even if I’m under the layer limit?
The canvas’s total memory footprint may exceed your iPad’s available RAM. Check it under Actions › Canvas › Canvas Information › Statistics. Reduce canvas size or merge/background‑flatten painted frames to free memory.
What’s the easiest way to share my animation on social media?
Use GIF for looping stickers under 15 MB, MP4 (H.264) for Instagram Reels or TikTok at 1080 × 1920 px, and HEVC (.MOV) if you need transparency inside video‑editing apps. Export via Actions › Share › Share Layers and upload directly from Files or Photos.